Booking In
The screens here are specific to Manchester and are not available as part of the core iGene product.
The booking in steps of the workflow are all within a single screen. The aim of this screen is to provide a quick way to enter details about a sample before moving onto the next stage of assigning tests.
It is the intention that these screens be used with minimal mouse input to allow users to quickly enter referrals using the keyboard.
Field details
The booking in screen reveals different areas as the user works through the process. The start of this is to confirm the patient before progressing to booking the sample in.
NHS Number Search
The first box which is presented to the user is the search by NHS number. It is to search for a patient by NHS number to see if they already exist within the application. This also has validation built into it in order to make sure NHS numbers are valid before searching.
For testing, NHS numbers can be generated using NHS Number Generation - Note this is an external site and is nothing to do with Genial Genetics.

There are 3 items on this form:
- NHS Number Textbox - This is where the NHS number is entered.
- Search Button - Press to search.
- No NHS Number Button - Press to go to an advanced search screen.
The NHS number can be entered as 123 456 7890 or 1234567890. The search will perform the same way. Note, that NHS numbers are stored without spaces in the back end database.
Once a number has been entered, either press ‘Enter’ or click ‘Search’ will progress to the the stage of viewing search results. Alternatively, if the NHS number is not known, click ‘No NHS Number’.
If no number is found or the NHS number is invalid, a message is displayed to the user to inform them of this.
No NHS Number
If the user is unsure or does not have an NHS number, clicking the ‘No NHS Number’ button will reveal an advanced search area.

This search function can search by a single item or a combination of the 3 items. These being:
- Surname - The current surname of a patient.
- Firstname - The current firstname of a patient.
- DOB - The date of birth of a patient.
- Search Button - Press to search using the details entered. This is also a split button and has an option to do further actions by clicking the down arrow:
- Contains - Search if the text Contains.
- Soundex - A sounds like function (not currently available).
- Back - Takes the user back to the NHS number search screen
The date search box can either be used to select a date using a mouse, or the user can type a date into the date box. The date format must be dd/mm/yyyy. The search does not work with a 2 digit year.
Pressing the search button or pressing enter in any of the text fields will begin the search. See viewing search results for results.
If no patient is found, the user is given a new button called ‘Not Found - Add New’. Clicking this will begin the process of adding a new patient. For details on these fields within this area see checking/adding patient.
Search Results
Search results for either the NHS Number search or No NHS Number search are both displayed in the results table.
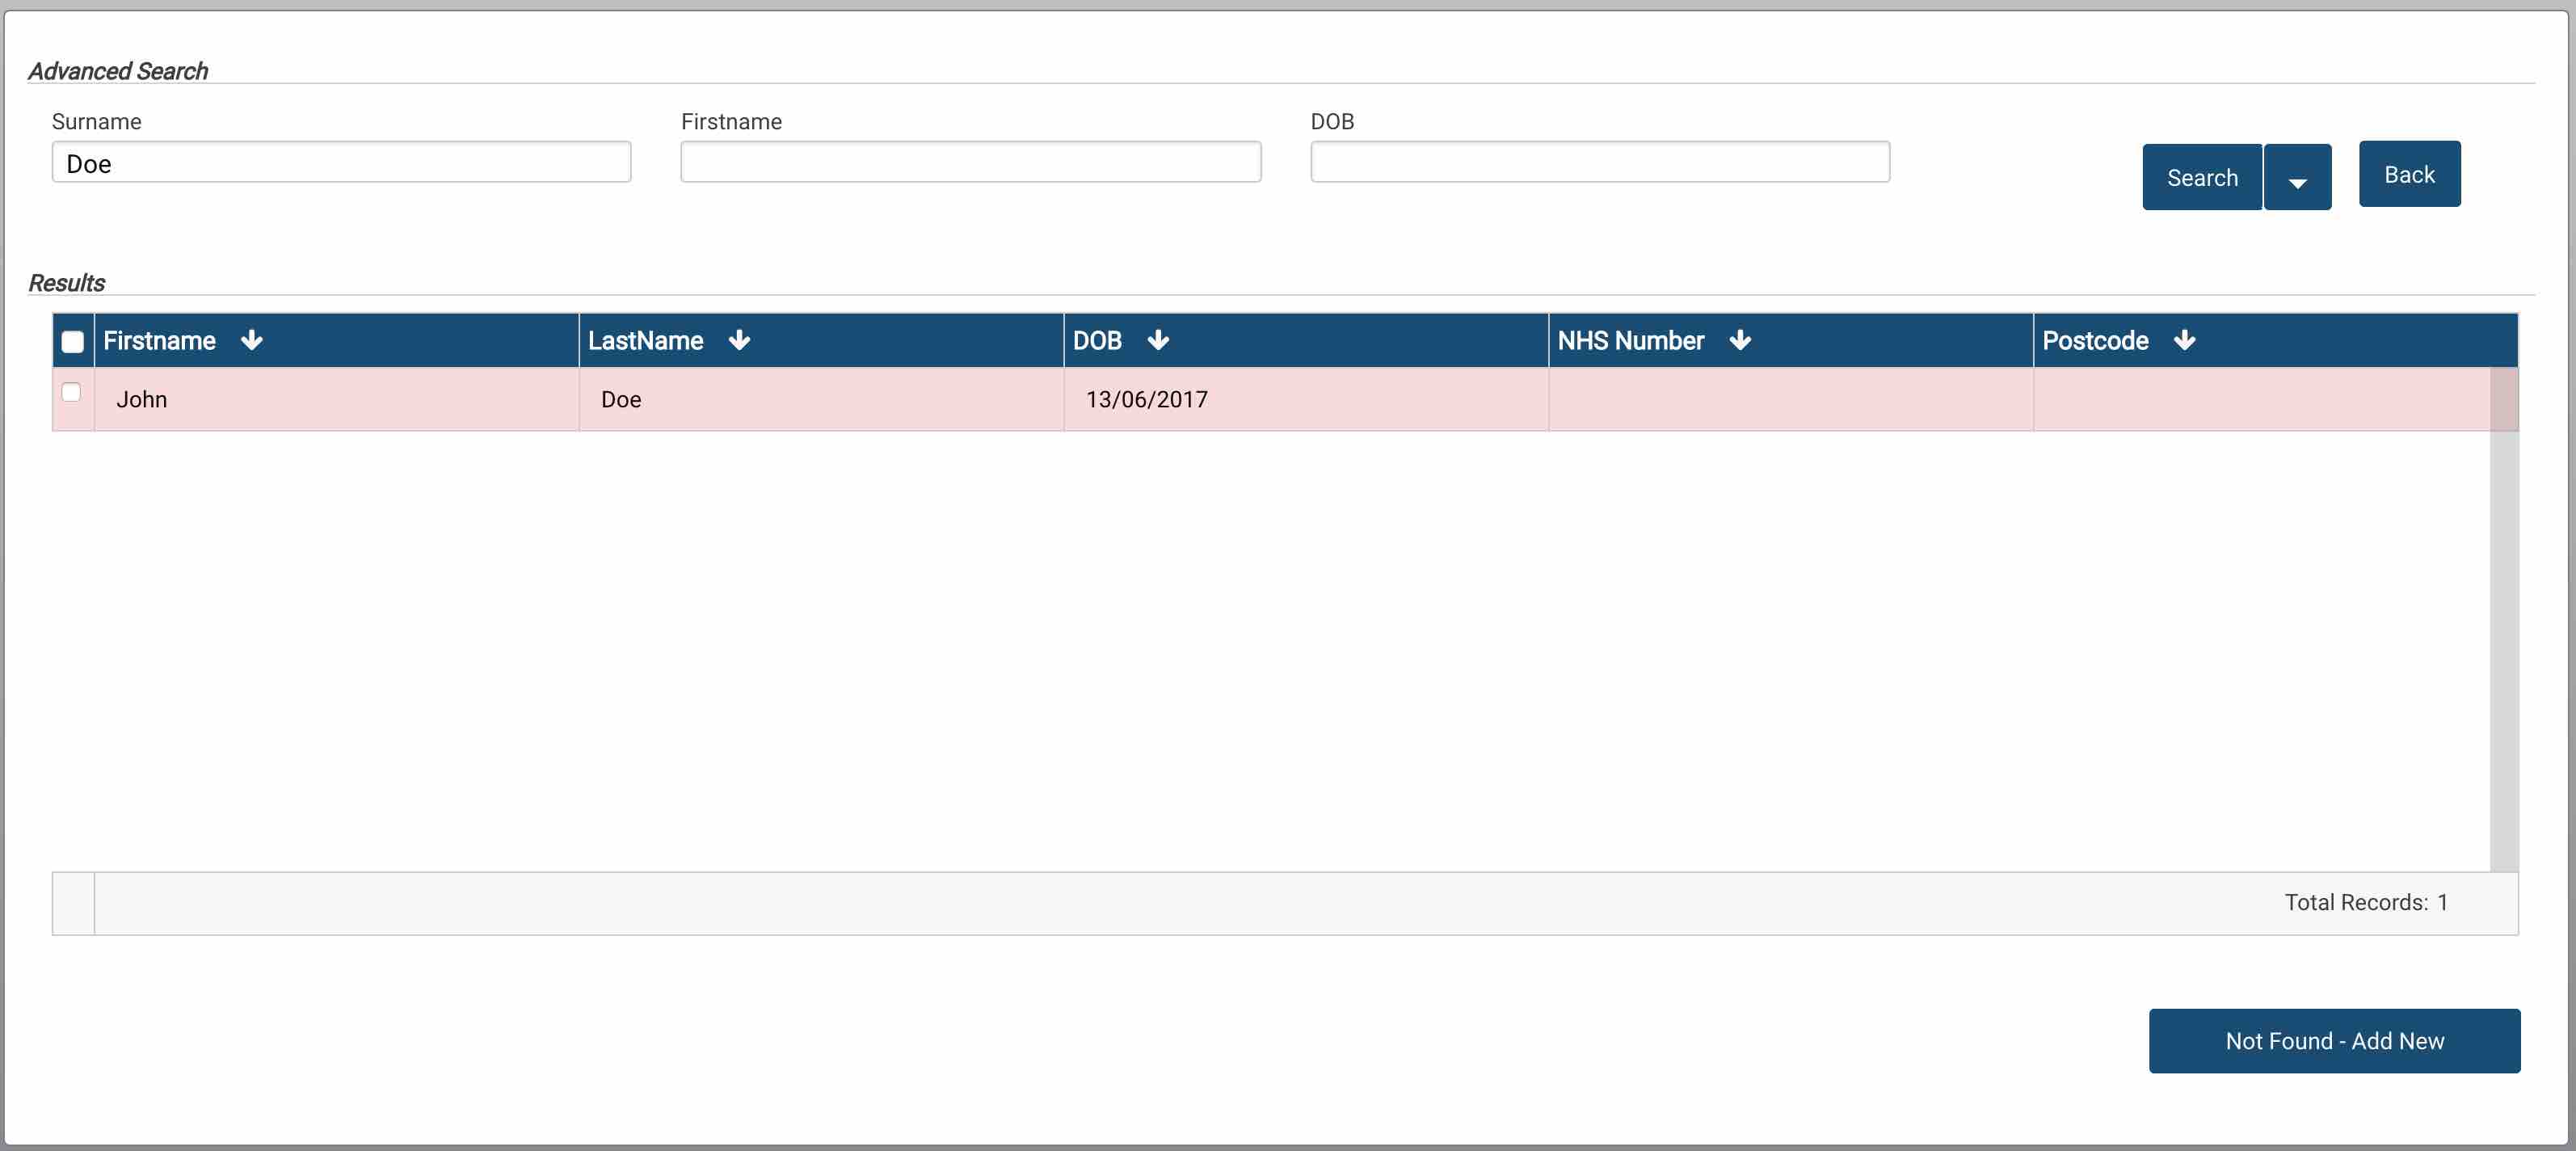
The table shows:
- Firstname - The patients current first name.
- LastName - The patients current last name.
- DOB - The date of birth of the patient.
- NHS Number - The NHS number of the patient displayed in the 3-3-4 format.
- Post Code - The post code for the patient.
If more than 10 items are available, the scroll bar will allow the user to scroll through a list either with the arrow keys or using a mouse. Once the correct row has been found, double click the row to see the patient details. If using the arrow keys, make sure the row is highlighted and press the enter key.
At this stage, the user is also presented with the ‘Not Found - Add New’ button. This will allow them to create a new patient.
Checking/Adding Patient Details
For illustration purposes, the images in this section are dealing with a blank patient. Details will transfer if a patient is selected from the search results screen.
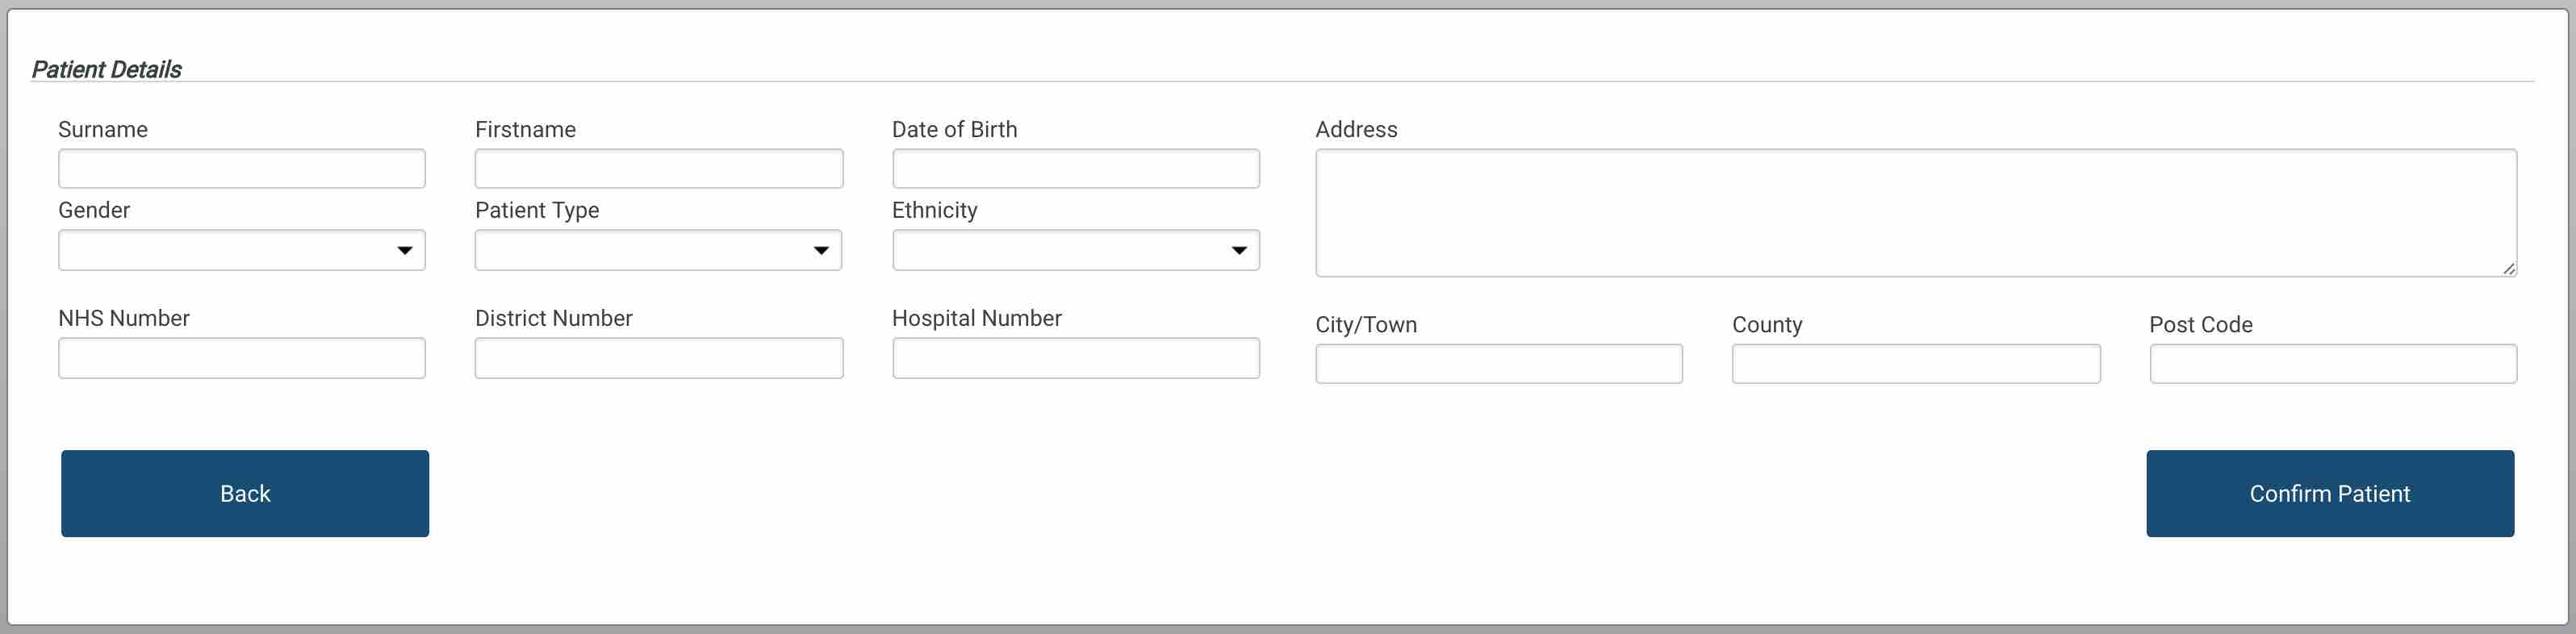
The patient screen above is where the details of a patient are displayed or a new patient is entered. Additional information can also be added to a patient which has been selected from the search result e.g. an NHS number is now associated with that patient.
- Surname - The last name of the patient.
- Firstname - The first name of the patient.
- Date of Birth - The date of birth of the patient in the format dd/mm/yyyy. Note, the year has to be 4 numbers.
- Gender - The gender of the patient. Configured using the sex preference.
- Patient Type - The type of patient e.g. NHS, Private etc. Configured using the patient type preference.
- Ethnicity - The ethnicity of the patient. Configured using the ethnicity preference.
- NHS Number - The NHS number of the patient. This is displayed as 3-3-4 but it is stored without spaces.
- District Number - This is required for the PAS system and will be used to linking orders to patients.
- Hospital Number - A number assigned to the patient by the hospital system.
- Address - A free text area to type the address of the patient.
- City/Town - The city or town the patient lives in.
- County - The county the patient lives in.
- Post Code - The post code the patient lives in.
- Back Button - Will take the user back to the search results.
- Confirm Patient Button - Will take the user to enter the referral details.
If this is an existing patient, a table is displayed with previous referrals. These can be viewed by double clicking the rows within the table.
The ‘drop down’ items are Autocompletes, they are not intended to be clicked and scrolled through. Instead, with the cursor in the box, begin typing and the list will filter down. Using the arrow keys, the user can select the correct item and pressing enter will accept the value. The user can scroll through the list but it will only display the first 20 results.
Once the fields are completed, pressing ‘Confirm Patient’ will move the screens to the referral details section. Pressing the back button will take the user back to the search screen.
Referral Details
The referral details screen is where the sample, pregnancy, reason for referral and physician details are entered. It also contains a patient dashboard so that the current details can be checked at each stage. For the purposes of this document each area is discussed below in the order they appear on the form.
Once all the stages have been completed, see the saving section of this document.
Patient Dashboard

The patient dashboard is a read-only area of the screen which shows the current patient details. These details were either entered from a new patient or selected from an existing patient. These fields are:
- Surname - The last name of the patient.
- Firstname - The first name of the patient.
- DOB - The date of birth of the patient. Note, the format is dd/mm/yyyy.
- Gender - The gender of the patient.
- NHS Number - The NHS number of the patient.
- District Number - The district number of the patient.
- Hospital Number - The hospital number of the patient.
If any of this information is incorrect do not proceed with referral entry. Instead, cancel the referral entry and start again.
Pregnancy Details

The selected patient can have a pregnancy with multiple fetuses. On pressing the Add Pregnancy button (shown above) the following details are displayed:
The below screen image has an extra fetus added for illustration later. Normally, a single fetus line is displayed.
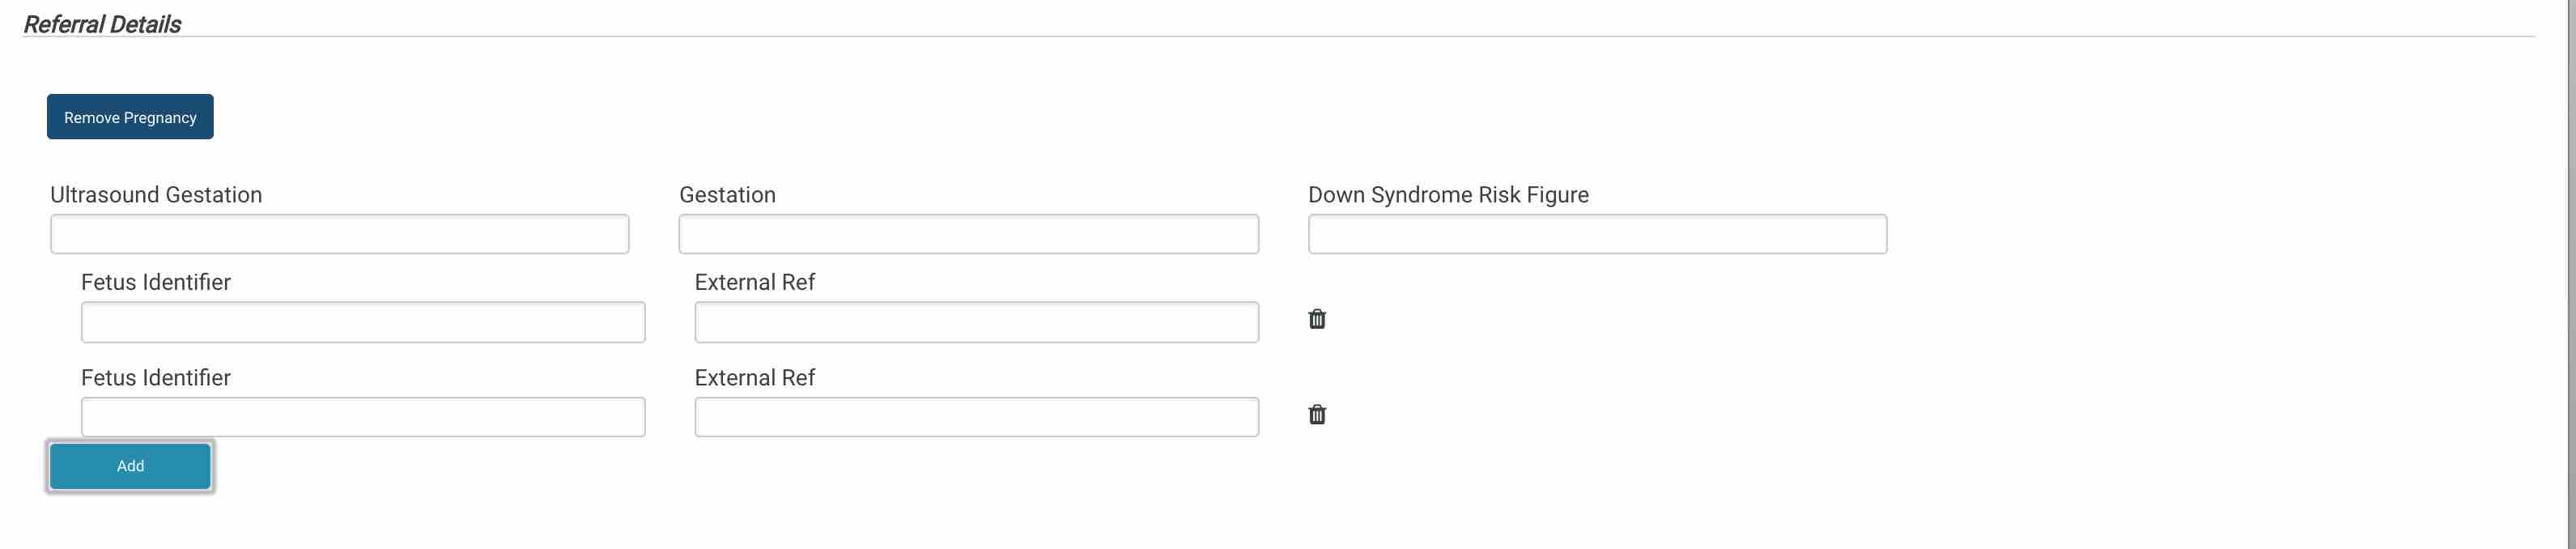
The fields which are available at this point are:
- Ultrasound Gestation - The gestation time as taken from the Ultrasound.
- Gestation - The current gestation length.
- Down Syndrome Risk Figure - The risk figure of down Syndrome.
- Fetus Identifier - An internal identifier for the fetus e.g. Fetus-1 or Fetus-A.
- External Ref - The external reference of the fetus as provided on the referral card. This can be different to the internal fetus identifier.
- Add Button - A button to add more fetuses.
- Bin Icon Button - When clicked, this will remove the fetus row.
- Remove Pregnancy Button - This will clear out all the pregnancy details and remove them from the referral.
Referring Physicians

One referral can have many referring physicians. A single row is displayed as a default with the following items:
The ‘drop down’ items are Autocompletes, they are not intended to be clicked and scrolled through. Instead, with the cursor in the box, begin typing and the list will filter down. Using the arrow keys, the user can select the correct item and pressing enter will accept the value. The user can scroll through the list but it will only display the first 20 results.
- Physician - The name of the physician. This can be searched using firstname of last name. The display also shows the physicians specialty area which is set in the address book within iGene.
- Location - The location the physician is referring from. This list is limited based on which physician is selected.
- Referral Involvement - is how the physician is involved in the investigation e.g. Referring Physician or Consultant.
- Primary - Sets the physician as the primary referrer for the referral.
- Receive Report - Set if the referring physician should receive a report or uncheck if not.
- Bin Icon Button - Delete the row
- Add Button - Adds a new row for a new physician.
Referral Reasons

The reason for referral free text box is where the user enters the referral reason from the referral card as written down.
Sample Details

One referral can have many samples. A single row is displayed as a default with the following items:
The ‘drop down’ items are Autocompletes, they are not intended to be clicked and scrolled through. Instead, with the cursor in the box, begin typing and the list will filter down. Using the arrow keys, the user can select the correct item and pressing enter will accept the value. The user can scroll through the list but it will only display the first 20 results.
- Sample Type - This autocomplete is the type of sample which has been received.
- Sub Sample Type - This is the sub sample type. This item is dependent on the main sample type having sub sample types set. If the sample type does not have sub sample types then this autocomplete will always be blank.
- Container - The container type which the sample has arrived in.
- External Ref - The external reference number of the sample.
- Fetus Reference (Read Only) - This is used after saving the referral to identify which fetus belongs to the correct sample.
- Date Obtained - The date the sample was taken in the format dd/m/yyyy. Note, the year has to be 4 digits.
- Time Taken - The time the sample was taken.
- Date Received - The date the sample was received. Defaults to the current date.
- Time Received - The time the sample was received. Defaults to the current time.
- Add Button - Adds another sample row to be entered.
The sample details area also has a multi icon button to the left next to the sample type drop down.

These buttons perform the following actions:
- Bin Icon - When clicked, deletes the current sample.
- Copy Icon (2 sheets of paper) - Duplicates the current sample row.
- Eye Icon - Displays extra details to be entered.
When the eye icon is clicked, another row of information is displayed.

- Condition - The condition the sample has arrived in.
- Volume - The amount of sample received.
- HTA - Checkbox to mark if the sample is under the human tissue act and needs special disposal.
Notes

The notes area is where any extra information needs to be entered which is of relevance to the referral.
Saving
Once the referral information has been entered, the ‘Save Referral’ button is clicked. This will then return with a referral number and display the following buttons.

The referral number is unique per referral. Also, once this button is clicked:
- The referral screen is now readonly. Any changes on this screen will not get saved. If the user needs to change anything then this should be performed in the v1 referral screen. This can be accessed using the link in the right actions area.
- If a pregnancy has been added, the assigning fetus to sample stage will need to be completed.
- Background tasks are started.
The user can then click new referral to begin the process again.
Assigning Fetus to Samples
After a referral has been saved and if a pregnancy has been entered, some decisions need to be made as to how to assign samples to fetuses. If one fetus has been entered and one sample has been entered, iGene will automatically assign that sample to the fetus. If more than one sample has been entered and at least 1 fetus has been entered, the user will be prompted to mark which sample belongs to the correct fetus.
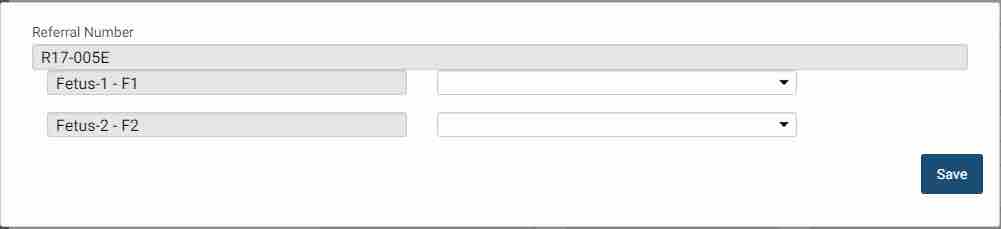
The screen shows:
- Referral Number - The referral number assigned.
- Fetus Details - The internal fetus ID and also the external reference of the ID.
- Sample autocomplete - The sample autocomplete lists all the samples on the referral. It does the external reference number so the correct sample can be assigned.
Once the save button is clicked the fetus assignments are stored in the database. The user can change these by clicking the ‘Reassign Fetus’ button next to the new referral button.
Background Tasks
Once a referral is saved background tasks begin in order to populate the actions area on the right of the page with:

- Link to V1 Referral screen
- Links to Re-Print Labels
- Links to other family members
iGene also automatically prints out labels for the samples and for the referral card by creating a file which the Bartender software (that is managed by the department) prints the labels. Further labels can be printed by pressing the links in the right side menu.
Scanning can also be performed at this point. By attaching the referral card paperwork label and scanning it into the folder location, the application is looking for any attachments. Once they are scanned into iGene, they will appear on the right side menu.
The workflow engine is also started at this point in order to assign the hold reasons for the referral. For more details on the workflow, see the sample reception process details.