Navigation
iGene uses a simple 2 tier-based navigation system which is easy to use and allows users to quickly navigate to the area they are interested in.
The areas within the application are grouped into modules and each module has a number of modules inside it. Certain modules may be hidden or disabled based on a user’s preferences and permissions within the application.
The main modules in the application are:
- Home
- Overview
- Print Jobs
- Tasks
- Noticeboard
- My Profile
- Patients
- Patient Add
- Patients Search/Add
- Consent
- Clinical
- Clinical Referrals
- Pedigree Charts
- Pedigrees
- Waiting List
- Triage List
- Follow Up List
- Surveillance List
- Appointments
- Processing
- Reports/Letters
- Sign Off
- Laboratory
- Lab Referral
- Setup
- Worksheets
- Cultures
- Slides
- FISH Setup
- Results
- Reports
- Sign Off
- Sample Management
- Samples
- Sample Triage
- Sample Batching
- Tests Ordered
- Send Outs
- Quality Management
- Equipment
- Stock
- Manufacturing
- Billing
- Billing List
- Batch Billing List
- Invoices
- Administration
- Letters
- Address Book
- Clinics
- Preferences
- Users
- Distribution Lists
- Staff
- Organisations
- Locations
- Facilities
- Permissions
- Reports
- Sent Reports
- Saved Searches
- Noticeboard
- System
- Email Queue
- Email Templates
- DropBoxes
- Importer
- Remote Client
- Interfaces/Plugins
- Workflows
The Screen Layout
The main iGene window is divided into four areas:
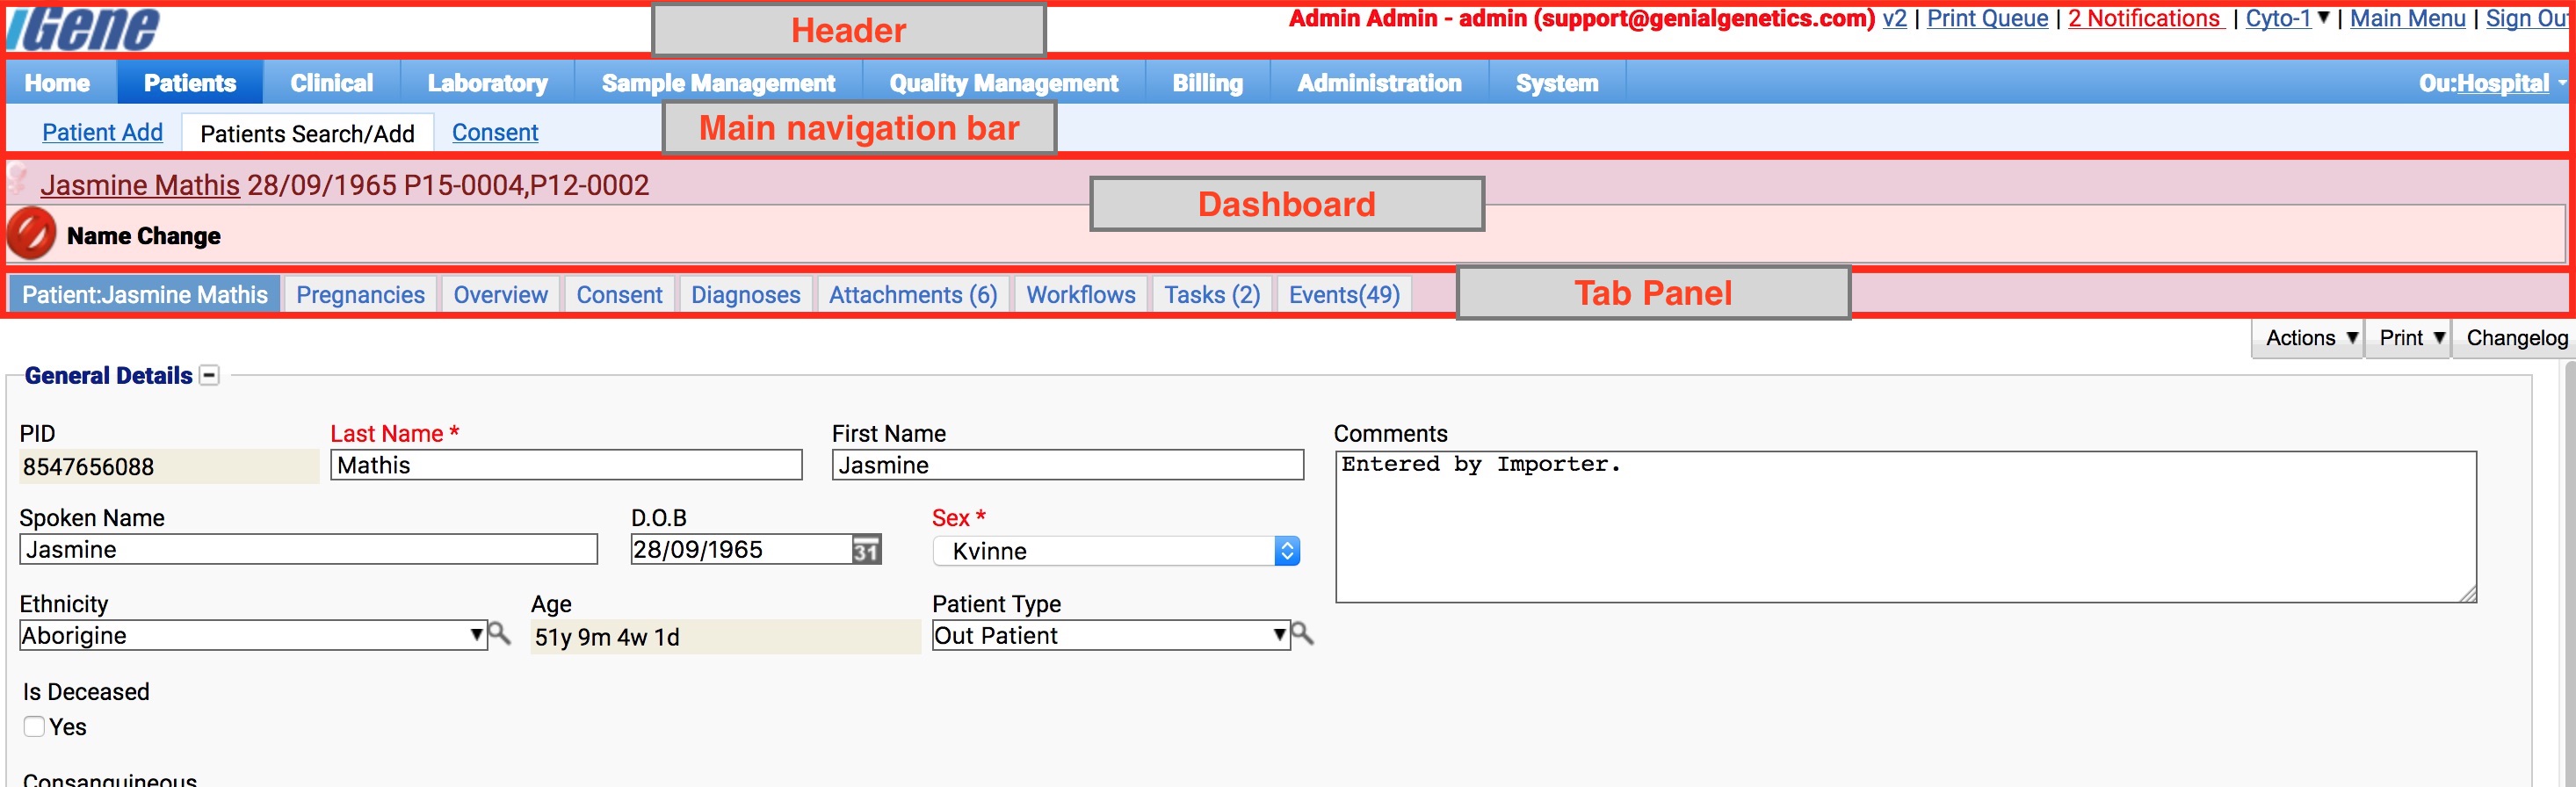
- The Header: The header area shows the currently logged in user and some commonly used links to access the Print Queue, Notifications area and the Main Menu. Additionally, the user can log out of the application via the Sign Out link
- Main Navigation Bar: The main navigation bar is the primary way to navigate throughout the application. The navigation bar is split into two areas:
- Upper Navigation Bar: The upper area of the navigation bar shows the current top-level module in the application. e.g. The Patients or Laboratory modules.
- Lower Navigation Bar: The lower navigation area shows the individual modules for the currently selected top-level module, e.g. Patients. Once a top-level module is selected, any available sub-modules will be displayed here.
- Dashboard: The dashboard shows various information about the area currently being viewed. Generally, it will show patient or referral information, alerts and warning boxes. This area provides a clear indication of which patient or case is currently being viewed. The contents of the dashboard can be configured on a site-wide basis to make the area more useful.
- The Tab Panel: The tab panel is used to jump between related areas and will change based on the area being viewed, e.g. Once the patient’s area is opened, it can be used to jump to the various areas related to that patient (Demographics, Attachments, Events, etc.)
The Main Menu
As well as the navigation bar, the main menu can be used to navigate the application as well as control which areas are visible in the navigation bar. To access the main menu, select the Main Menu link in the header bar as shown below:

The main menu will appear in a popup window as shown below:
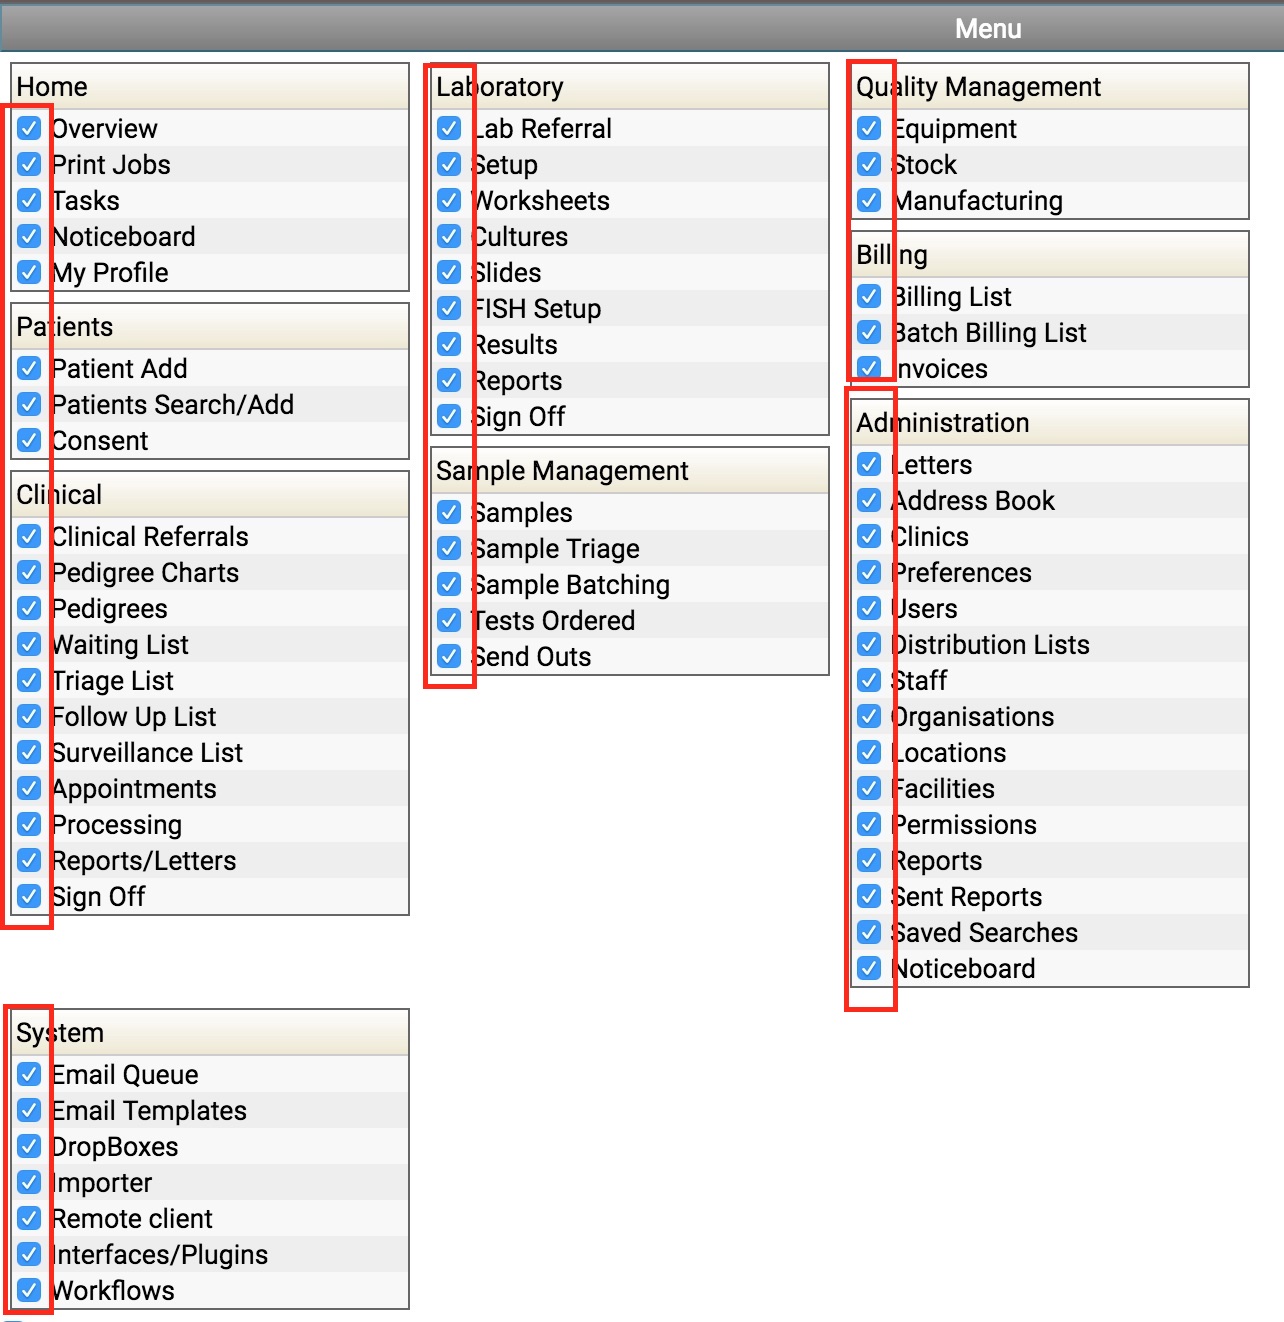
The menu is subdivided into top-level modules, and in each module there is a list of sub-modules. (N.B The appearance of modules can differ based on a user’s permission). Selecting one of the sub-modules will navigate to that area, e.g. Selecting Laboratory -> Lab Referrals will open up the Lab Referrals module.
Next to each sub-module is a checkbox that can be used to control the visibility of the the sub-module in the navigation bar. Areas that are never or rarely used can be hidden from the navigation bar, e.g:
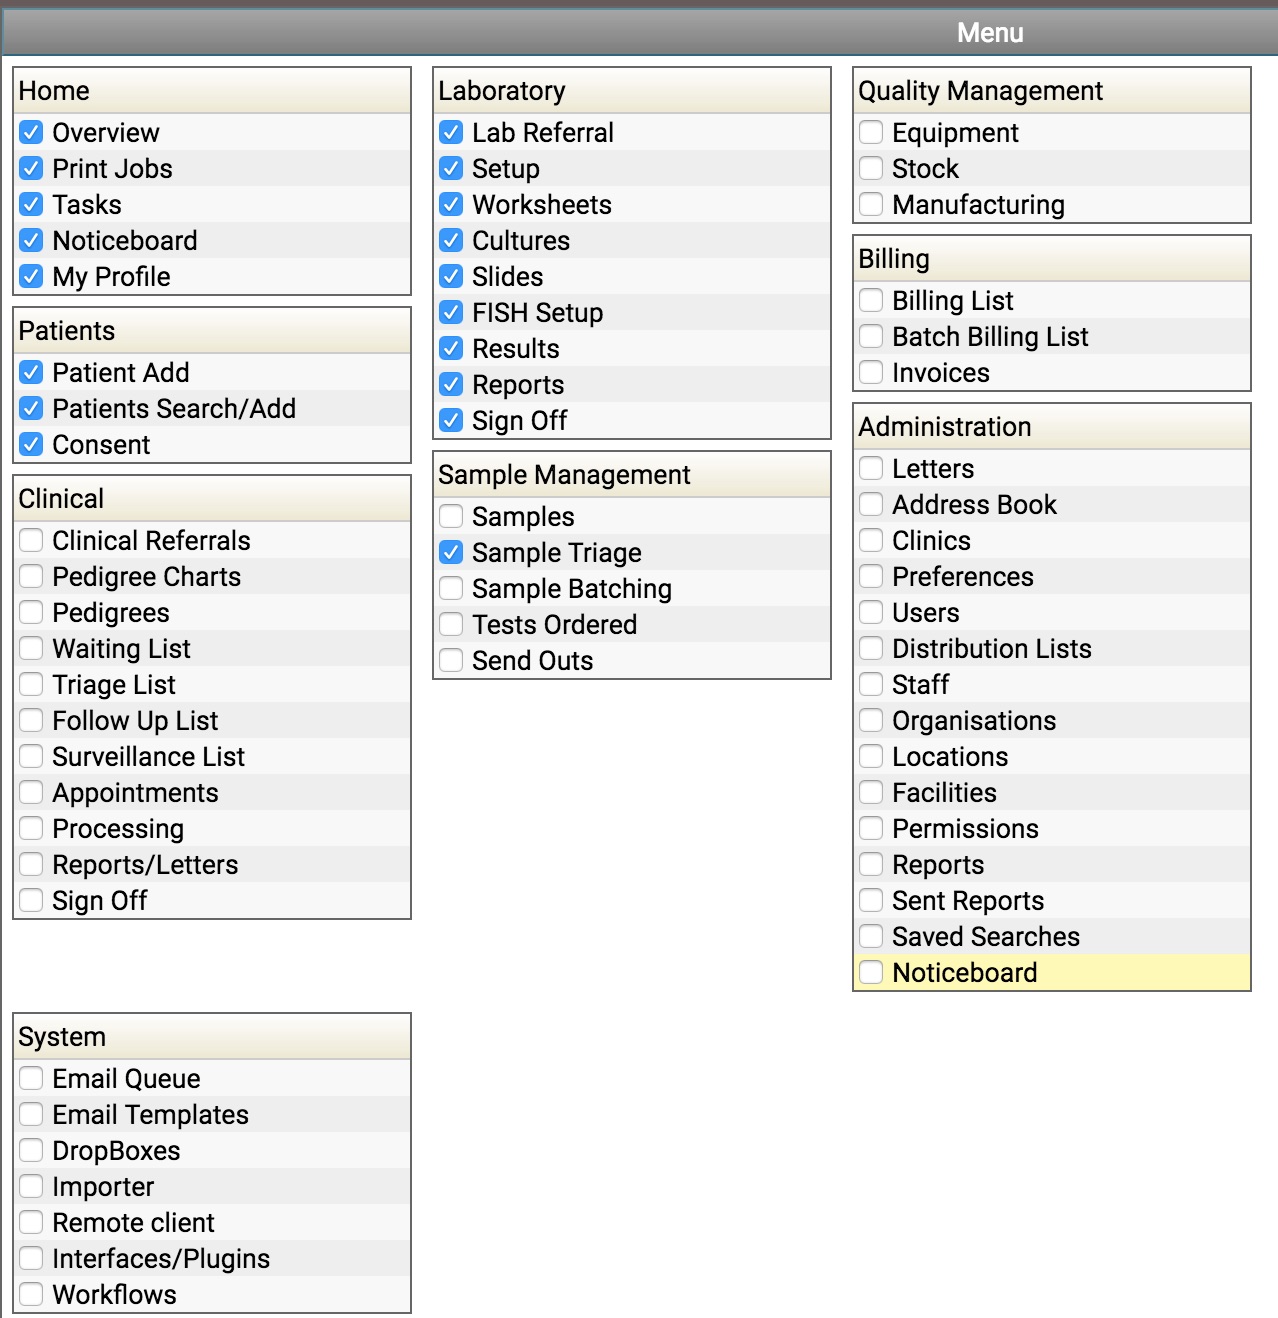
In the above configuration, most of the unused areas have been deselected, this changes the user’s navigation bar to look like the below:

Since the Sample Management Module now has only one visible child module Sample Triage, the top-level navigation bar only shows the sub-module
The module visibility settings are on a per-user setting and are not configurable on a site-wide basis. However, modules can be completely hidden using the permissions system (the user won’t see the module at all in either the navigation panel or the main menu).
The Tab Panel
The tab panel is generally used to show related data and sub areas inside a module, e.g. The Patient module will show tabs for demographics, events, attachments, etc.

The above tab panel shows the available tabs visible when opening a patient record. Each tab contains information related to the patient, e.g. The patient’s attachments or any events. The dashboard area also indicates which patient is open whilst navigating between different tabs.
Tabs can be opened by clicking on the relevant tab. Additionally, some tabs can be closed if they are no longer needed, e.g:

Selecting the small “X” symbol on the tab will close down the referral screen if it is no longer needed.
When navigating between tabs, it is advisable to save any changes before continuing. Some tabs will also reload/refresh their contents when they are selected, and this may force unsaved changes to be overwritten.
Tables
iGene uses a standard layout for tabular data throughout the application as shown below:
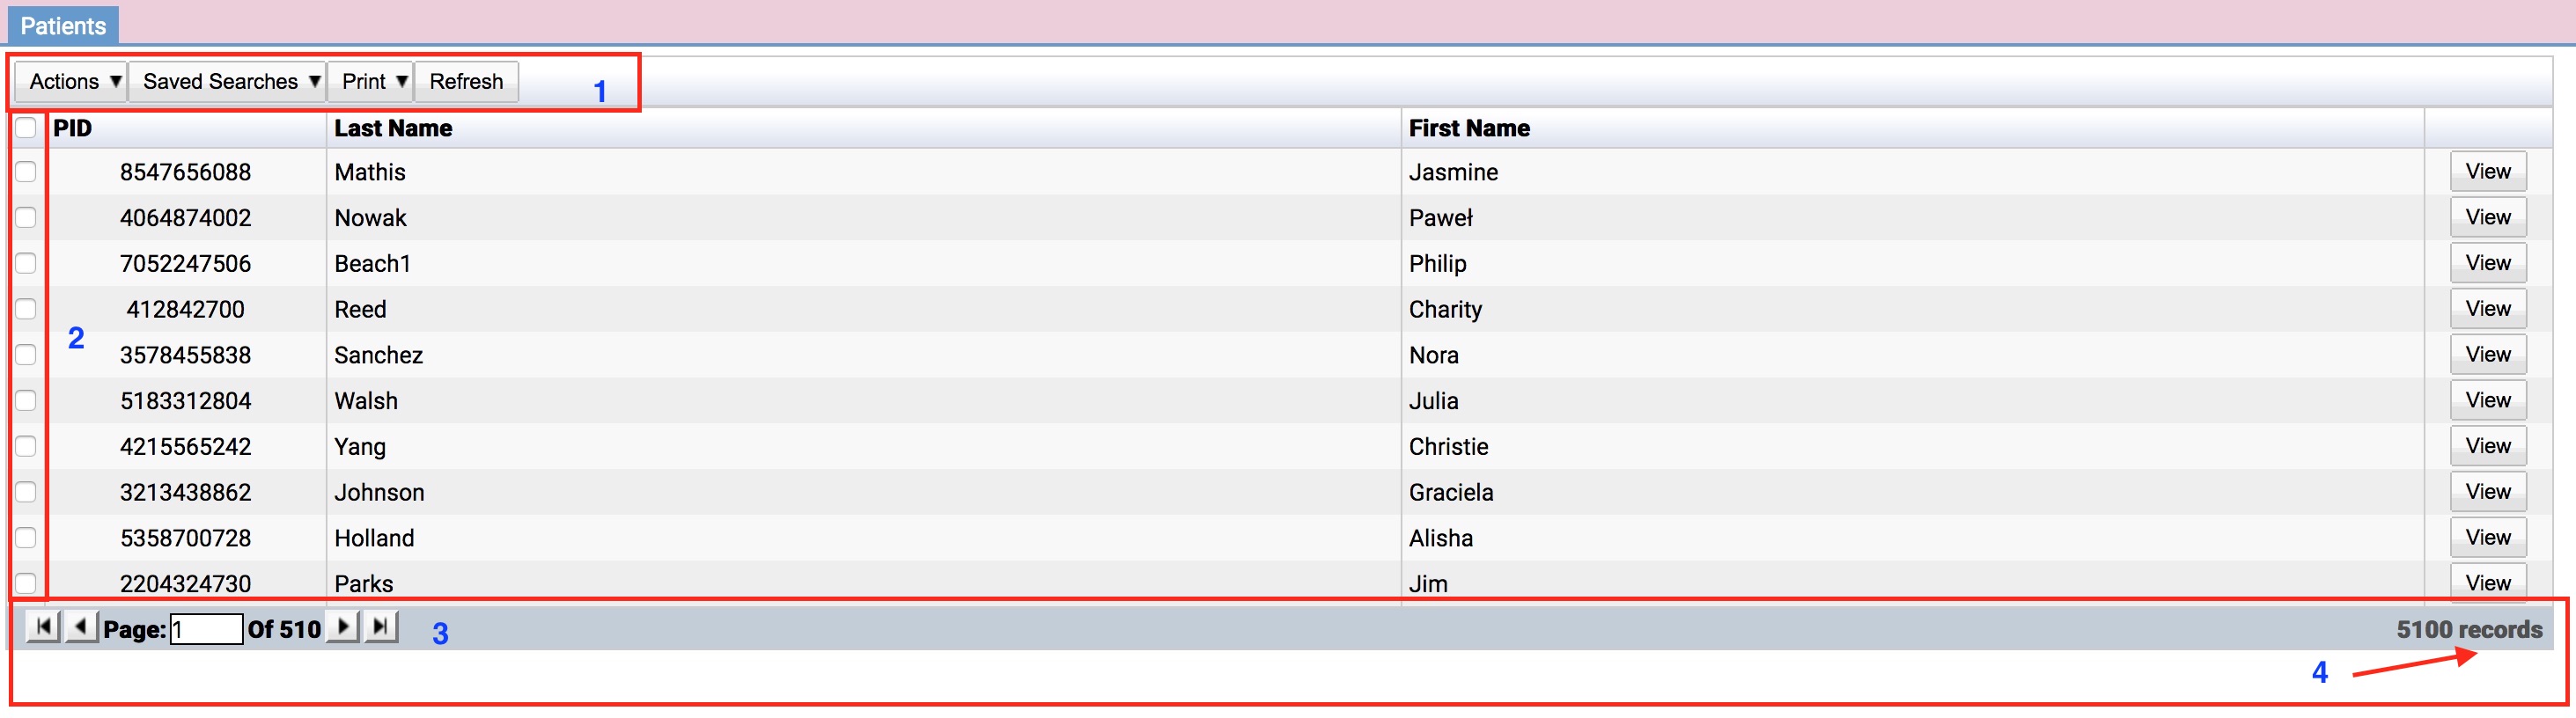
The toolbar: The toolbar contains the actions and buttons for table as well as the area where custom searches are defined (TODO link to searches)
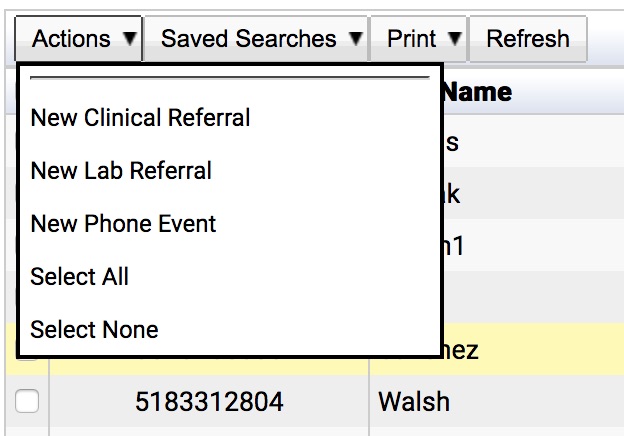 The actions button lists actions that can be performed on the table. e.g. Selecting New Lab Referral will add a lab referral to the currently selected patient.
Actions button and right-click
The actions button lists actions that can be performed on the table. e.g. Selecting New Lab Referral will add a lab referral to the currently selected patient.
Actions button and right-clickBecause selecting a single entry and performing an action from the Actions button is such a common task to perform, iGene allows users to instead use the right-mouse button to perform the same action, e.g. Right-clicking on a patient in the table will show the actions menu as above with the entry already selected. This is often preferable than using the selection area for single entries as discussed next.
Selection Area: The selection area allows entries in the table to be selected and is often used with the Actions button to apply a context to a specific action. e.g. Selecting 3 entries first and then selecting Actions -> Set As Inactive_ will marks the selected items as inactive. Many actions only work on one entry at a time, and some don’t require any items to be selected at all.
Navgiation Area: The navigation area is used to move around the table from page to page, each button is discussed below:

- Jump to the first page
- Go back one page
- The current page number and count. Typing a number into the box will jump to that page
- Go forward one page
- Go to the last page
Record Count: The number of items in total in the table
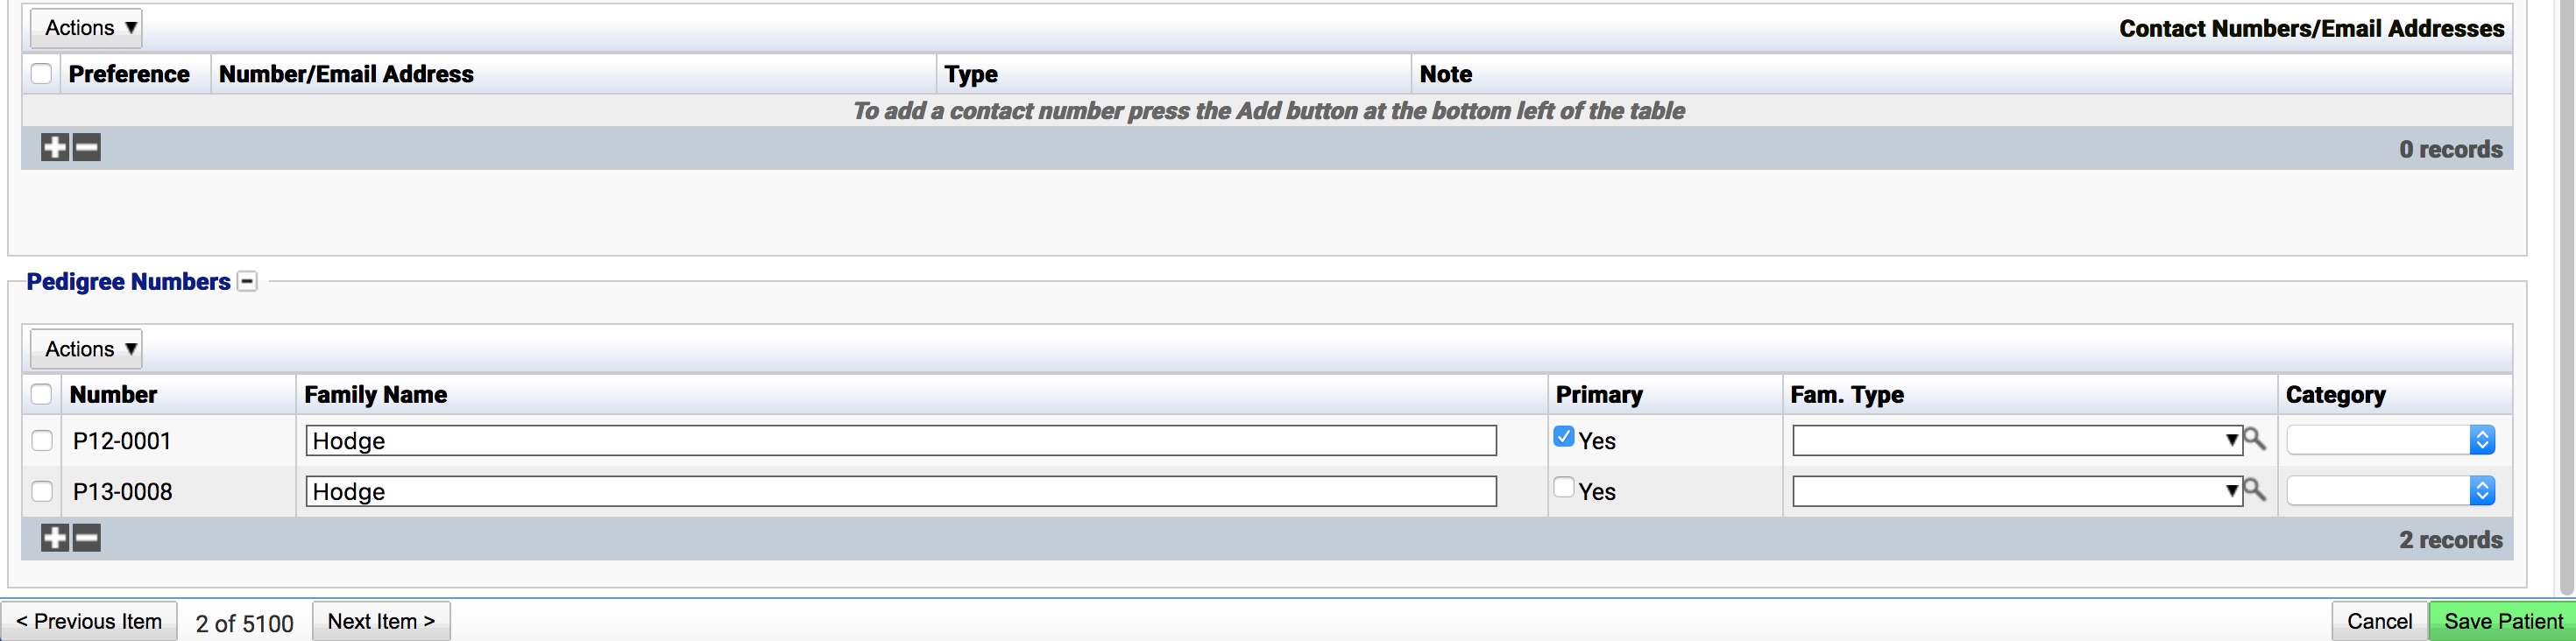
Many tables also include buttons to create or remove records as shown below:

Selecting + will create a new entry in the table. To delete an entry, select the entry or entries using the checkbox in the selection area and select the - button.
The columns in a table can be resized if the information being displayed is squashed or difficult to read. Selecting the small divider line with the mouse and dragging to the left or right will resize the column as shown below:


Once a column has been resized, iGene will remember this on a user level (i.e. The next time this table is viewed it will remember the column sizing previously applied).
Forms
iGene uses a consistent layout displaying data to the user via forms. A form is simply an area that displays or allows the editing of data in the system. Each form is often divided up into smaller sections called fieldsets. Fieldsets group related information in the form and make finding or editing information easier:
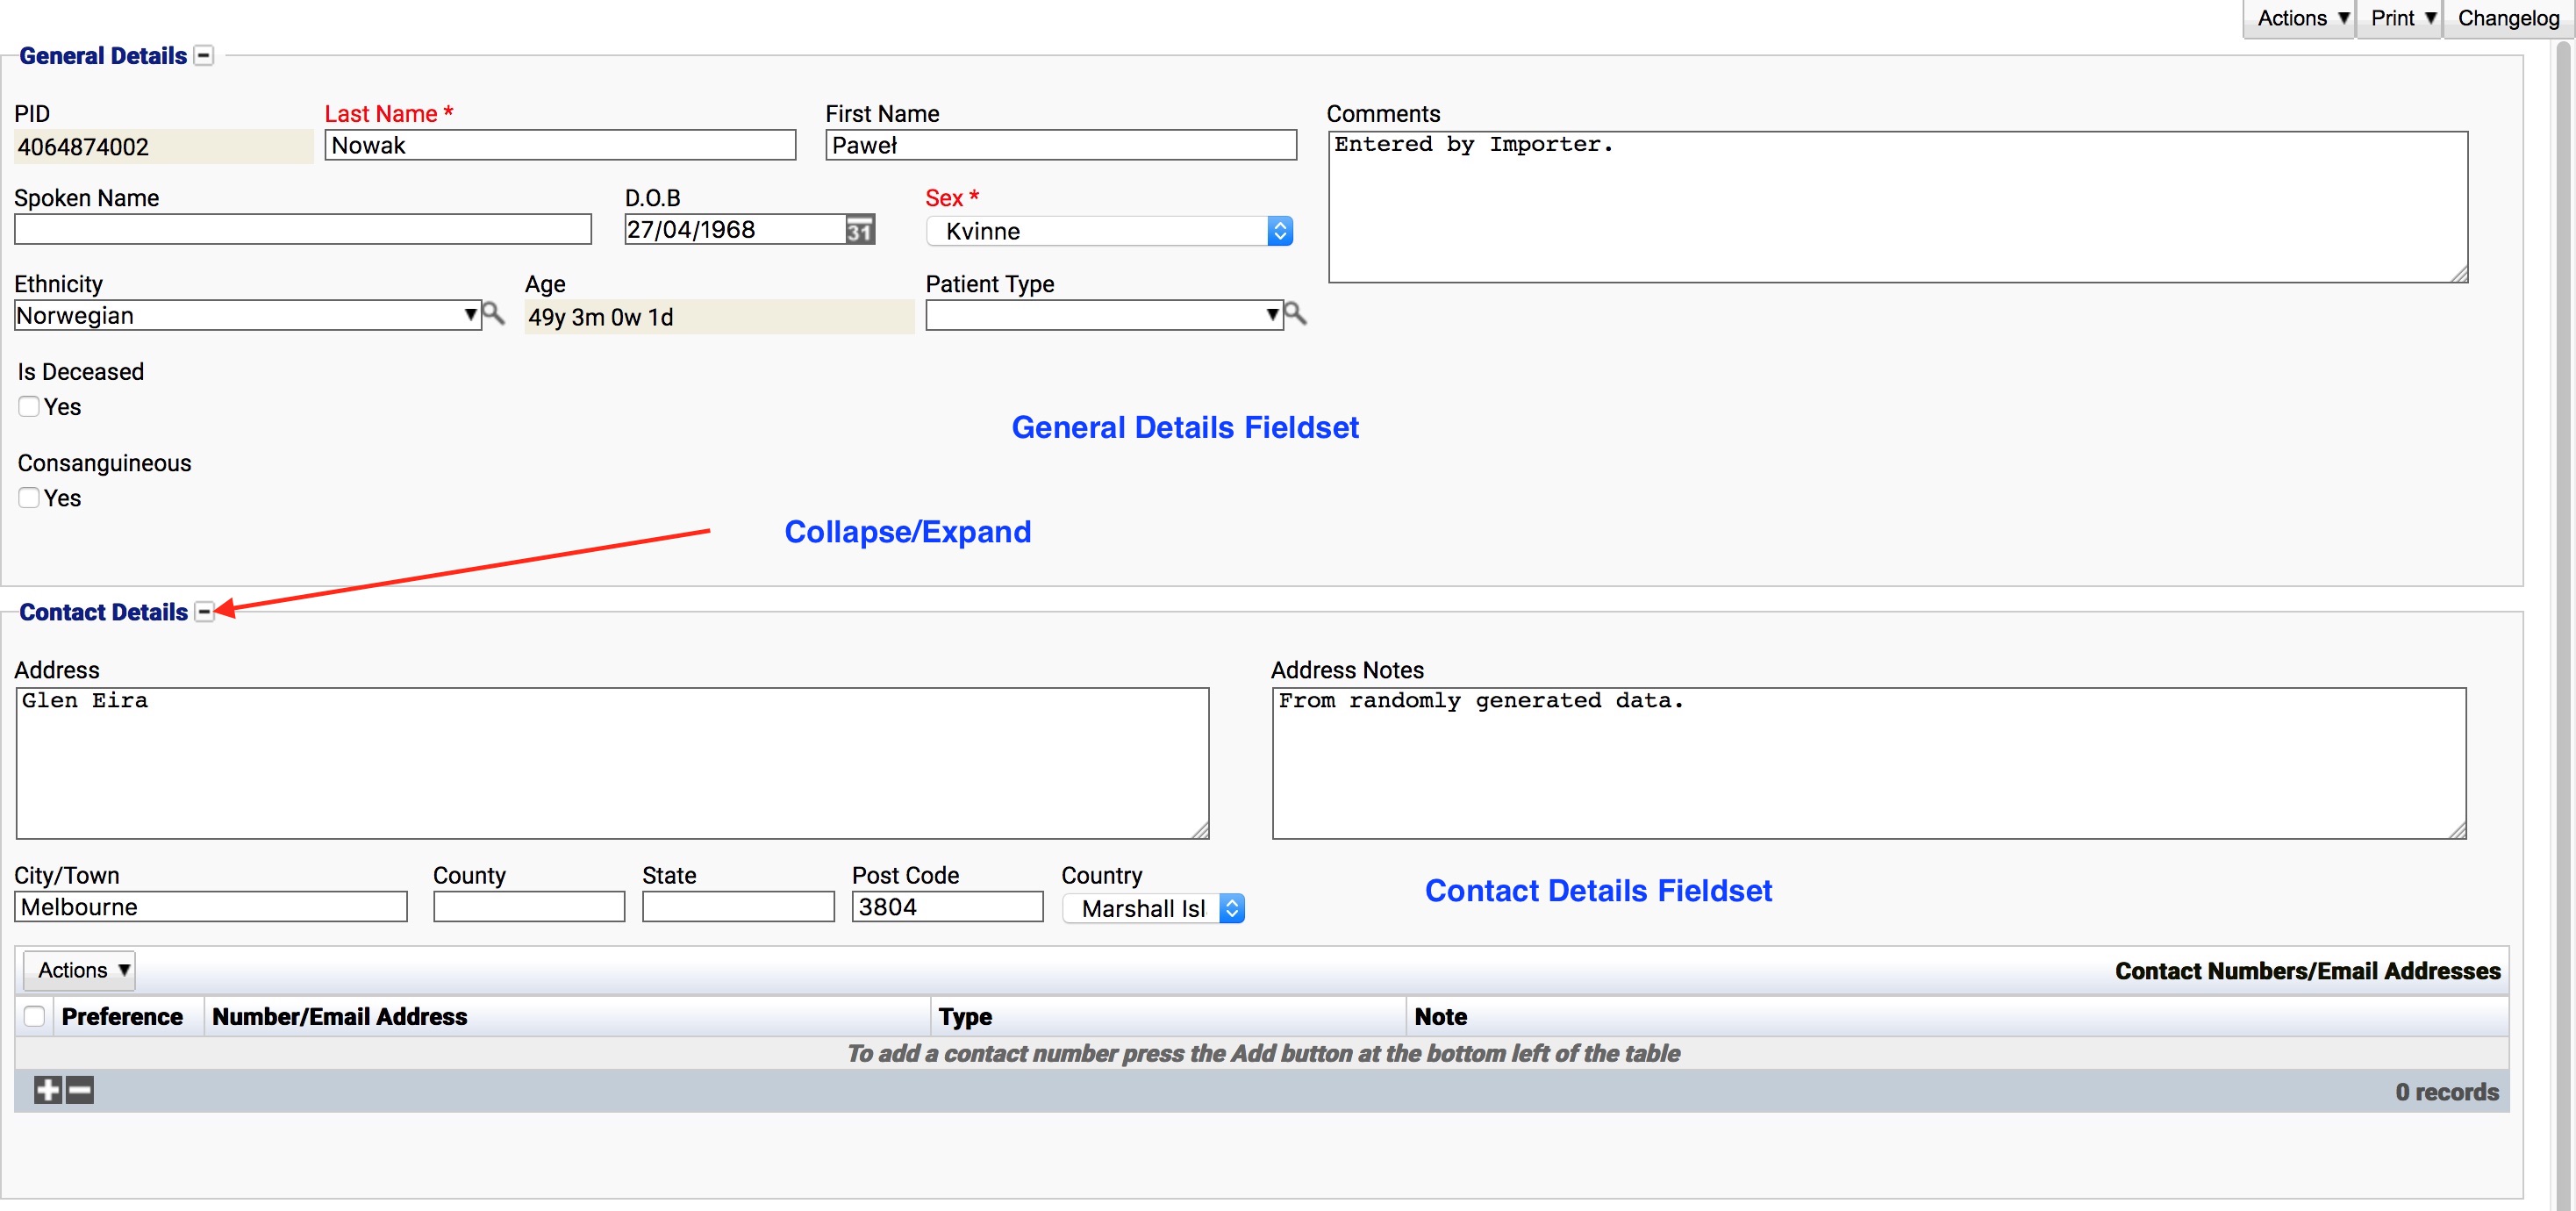
The above form is for modifying or viewing a patient’s details. The form is further divided into several fieldsets. Fieldsets can be collapsed or expanded by selecting the small + or - icons next to the title as indicated above. iGene will remember a fieldset’s display status per user, i.e. collapsing the contact details fieldset will save this as a user preference. Some site configurations will collapse fieldsets by default when they are not often used (this configuration can only be performed by Genial Genetics).
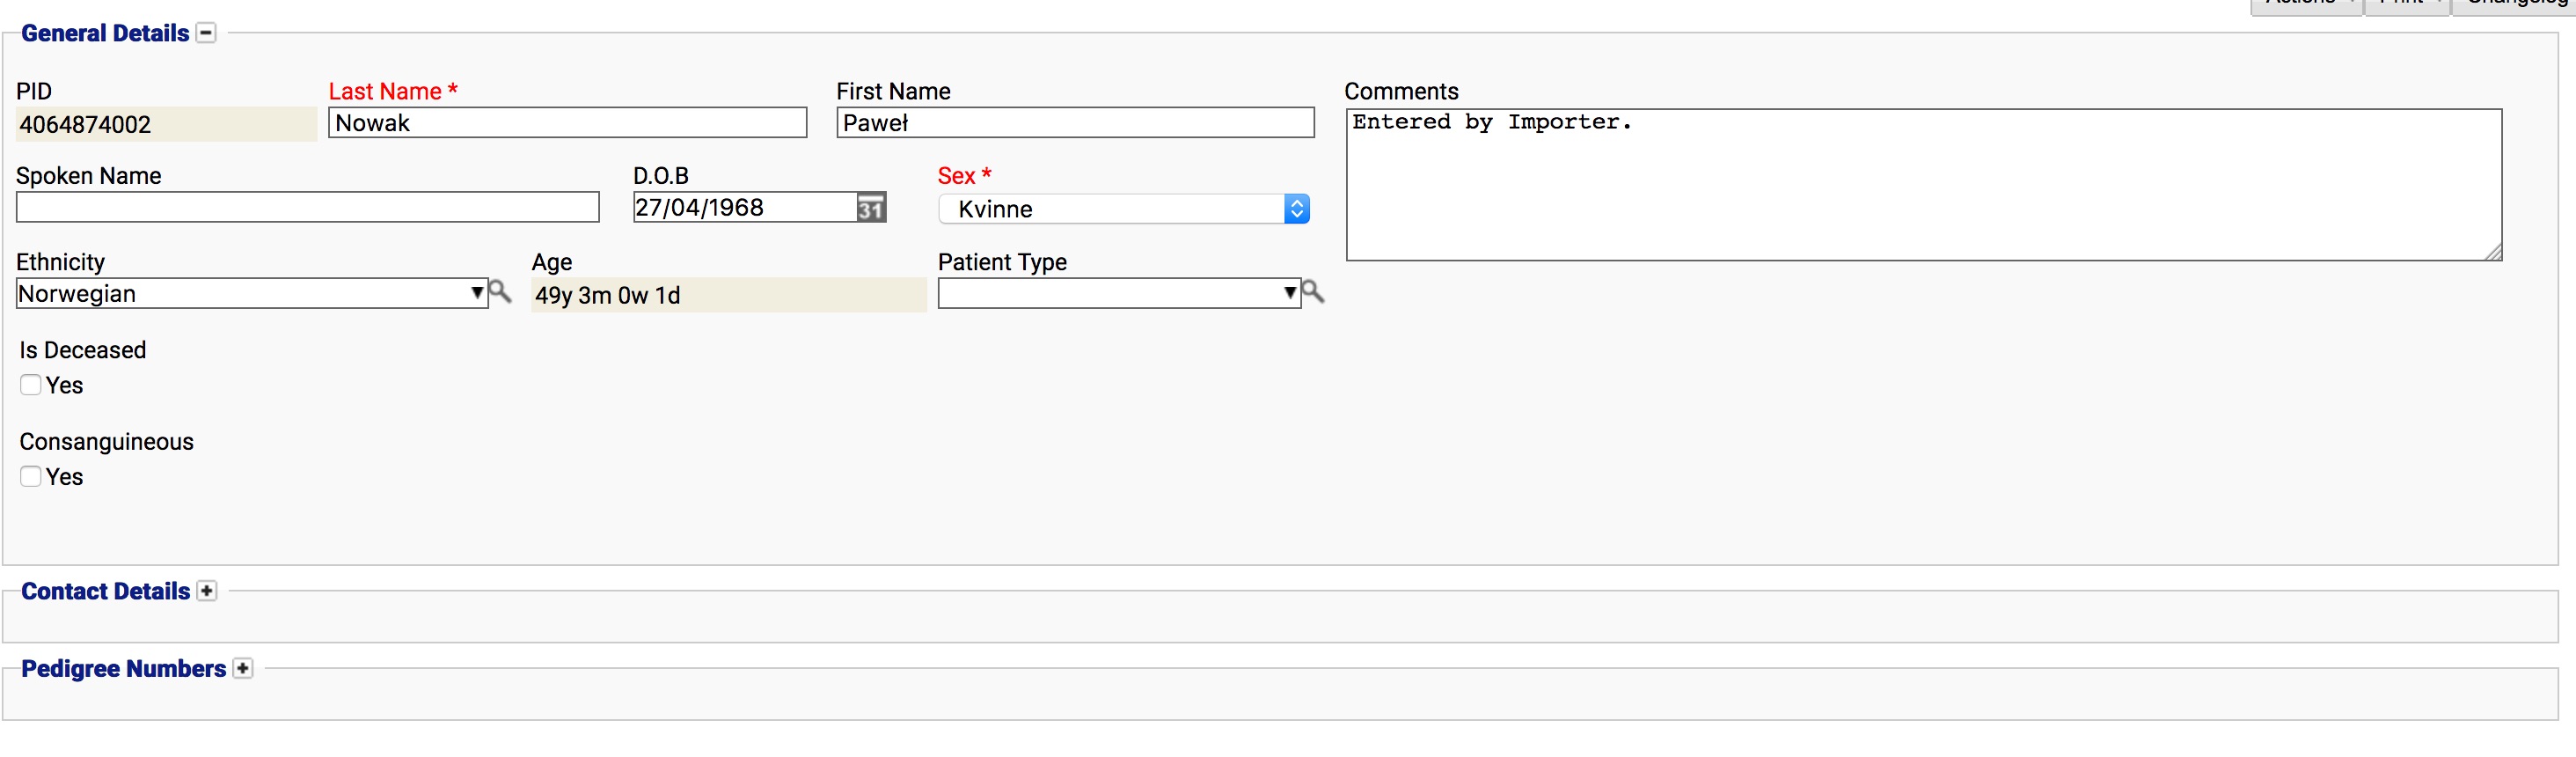
The above shows the contact details fieldset has been collapsed.
At the bottom of most forms is a toolbar which often contains buttons for saving or navigating to other records. The buttons visible here will vary based on the area being viewed and a user’s permissions: