Triage Samples
Triaging a test to a sample simply matches a test to the sample(s) the test will use.
It can also be used to update the test status as long as the After Triage option in the Test Status Template preference assigned to the test has been filled in.
Some tests do not require triaging.
Tests with the Is Control flag ticked, or the Bypass Triage flag ticked in the Test Preference prevent manual triaging of a test.
Instead, these tests, are automatically triaged to all samples in the referral.
Manage Samples tab
Before triaging a test a referral must have been created containing at least 1 sample and 1 test and then saved.
For information on creating a referral see the Referral page.
To access the triage screen go to the Tests Selected table in the referral and press Triage Tests.
The Sample Management > Sample Triage page within iGene displays a list of all referrals with tests that still require triaging.

This will open the Manage Samples tab.

Note: In this example there are no available tests to triage to. This is because the test has been marked as Bypass Triage but it will also appear like this when all tests have been triaged. All that is showing here is a list of samples in the referral.
This is the view when there are tests available to triage. Notice there are 2 tests that have appeared in a second table.
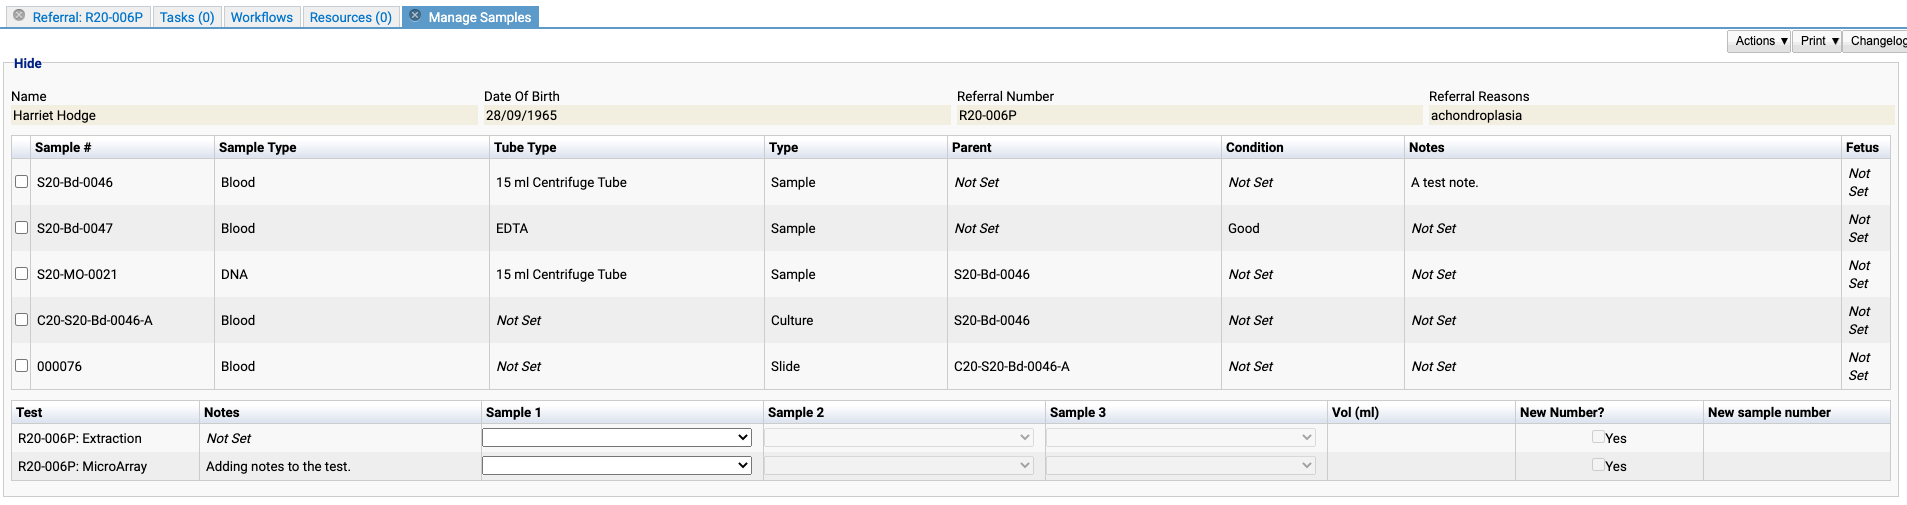
The Manage Sample tab contains:
Basic details from the referral - patient name, patient date of birth, the referral number and the referral reason.
A table listing the available samples containing these columns:
- Sample # - The sample number.
- Sample Type - The sample type.
- Tube Type - The sample container.
- Type - As it is possible to triage to samples, cultures and slides, all referral samples are displayed here.
- Parent - Secondary samples, cultures and slides are created from other samples and will have a parent sample number. If the sample is the original root sample (no parent sample) then this field will display ‘Not Set’.
- Condition - The condition of the sample. This can be set in the Sample Details.
- Notes - Additional notes added to the sample. Also set in the Sample Details.
- Fetus - is the sample is connected to a fetus, the fetus identifier will be visible here.
A table listing the tests available to triage:
- Test - The test available to triage.
- Notes - Additional notes added to the Test Details.
- Sample 1 - A sample available to be triaged to the test.
- Sample 2 - A sample available to be triaged to the test.
- Sample 3 - A sample available to be triaged to the test.
- Vol(ml) - Volume of sample to be used.
- New Number? - Ticking this will create a new secondary sample with the same sample type as the original sample. It will display in the Secondary Samples table in the referral and have a unique sample number.
- New sample number - This should show an example of the new sample number, when New Number? is ticked.
At the bottom of the Manage Tab view are 4 buttons used to confirm the triaged tests or exit the tab without saving.

- Triage - Triages the test(s) to the selected sample(s) and leaves the Manage Samples tab open.
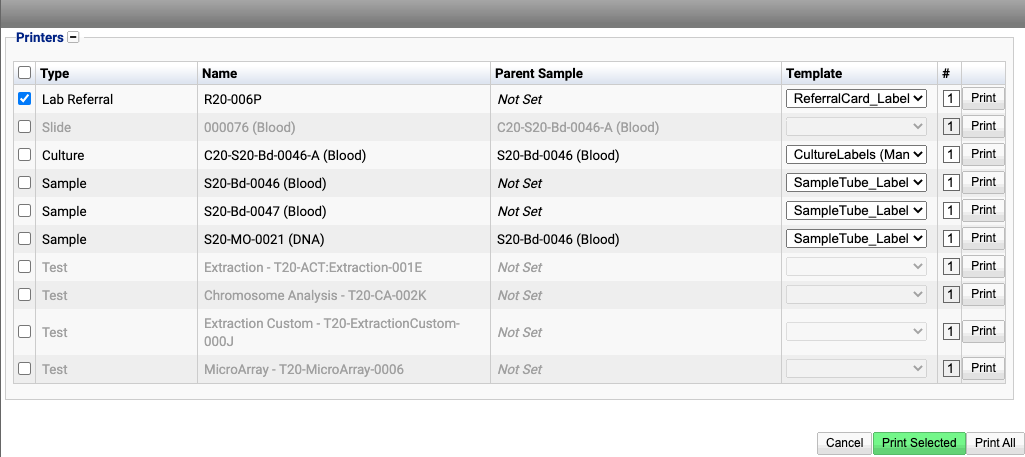
- Triage and Print Labels - Triages the test(s) to the selected sample(s), closes the Manage Samples tab and opens a printing pop up containing a list of samples from the referral to print labels for. To print from here, tick the required labels and press Print Selected.
- Cancel - Closes the Manage Samples tab without saving any changes and returns to the referral.
- Triage and Close - Triages the test(s) to the selected sample(s) and closes the Manage Samples tab.
Triaging a Test
Single Samples
- In a test row, click on the drop down in Sample 1.
- Select a sample from the list.
- Press Triage and Close.
This will assign one sample to the test.
The test will no longer show in the Manage Samples tab.

Multiple Samples
There are 2 ways to manually triage to multiple samples;
1) vertically in the same sample column,
2) horizontally using 2 or more sample columns.
Vertical Samples
Adding multiple samples in the same sample column, (Sample 1,) will triage multiple individual samples to the same test.
If New Number? has been ticked for these samples, it will create a new secondary sample for each sample that has been ticked. They will show in the Secondary Samples table.
For example, selecting a sample in Sample 1 and another directly underneath it, (also in the Sample 1 column) while ticking New Number ? will create 2 output secondary samples, each with a separate parent sample.

Horizontal Samples
Adding multiple samples using separate sample columns will cause an output sample to have multiple parent samples.
This means, selecting a sample to Sample 1 and another to Sample 2 while ticking New Number ? will give 1 output secondary sample with 2 parent samples.

Remember to press Triage, Triage and Print Labels or Triage and Close when samples have been assigned to the tests currently required.