Custom Tests
When creating a new test in iGene, a test type must be chosen that decides the type of fields a test will have. iGene supports the following test types:
- Chromosome Analysis
- FISH
- Generic
- Custom
- Clinical Appointment
- Genomics
This guide will discuss the Custom test type which is the most powerful test type available and one that allows full customisation of the test. The features of a custom test are discussed below and compared to the other test types:
- Custom Field Support: The other test types all have fixed fields that vary based on the test type, e.g. FISH tests have fields for probes, Chromosome Analysis have cell count fields, etc. On the other hand, custom tests are not specialised to any particular test. The user defines the fields the test should have in order to match the types of results that they record.
- Custom Layout Support: The other test types all have fixed layouts that are decided upon during the application customisation stage of deployment. Custom tests however allow complete control over how various fields are displayed and can be changed without needing a new version of the application.
- Worksheet Support: In order for a test to be placed on a worksheet it must be a custom test. The custom test will display the custom fields when entering results on a worksheet, but also each test type can have a different layout for displaying in the worksheet cells.
Custom Fields can be found by going into Administration -> Preferences -> Search Test/Orders -> find or create a Test that has the ‘Test Type’ as ‘Custom’. An example of a custom test is shown below with several custom fields and a display template:
When viewing a result, the custom fields are visible with a custom designed layout:
Custom Fields
A custom field defines a value that is recorded against a test, e.g. A comments field or list of markers. The custom field is assigned a unique code and name that is used to identify the field in the display template as well as reports. Each of the options for a custom field are discussed below:
- Code (Required) The code field is a short (less than 255 characters) unique label for the field. The code should be short but descriptive as the custom field is referenced using this code. e.g. Calling the fields field1, field2 and field3 will make the fields much harder to identify later on when designing the template or report.
A code should only contain alphanumeric characters, underscores or dashes. It is recommended to keep the code as short as possible and to avoid using any special symbols. Some examples are given below:
- comments
- score
- protein
- mutation1
- mutation2
Name (Required) The name field is an internal description of the field and although not used when designing the report or template, the name field helps describe what the field does in case the shortened code is not clear. The name field should be unique and less than 255 characters long.
Default Value (Optional) The default value defines a value to insert into the field initially when the result is created. This is useful in cases where a field may contain a certain value 90% of the time, and only the odd few cases a different value would be entered. If a field should not have a default value then it can be left blank. Not all field types can have default values, e.g. A table of mutations cannot have a default value.
Result Type (Required) The result type defines: the type of field, any restrictions for that field and the values that it may contain. A result type must be chosen for the field. Results types are discussed later in this document (Result Types).
Default From Previous (Optional) The default from previous option allows the custom field value to be automatically populated from the previous test result. When enabled and a new result is created, iGene will check if there is a previous test of this type and copy the value from that result into the new result.
Result Types
A result type defines the type of custom field and any restrictions for that field. The restrictions will vary based on the type of field. Result types can be reused across multiple custom fields and tests can be: quite specific (limiting usage to only one field) or quite generic and reusable (e.g. A comments field).
To add/edit a Result Type can be found by going into Administration -> Preferences -> Type in ‘Result Types’. iGene supports the following result types:
- Number: A floating point or integer value with an optional allowed range (e.g. 0 to 100)
- String: A field containing plain text. String fields can also have an optional minimum and maximum length range.

- File: A file attachment. e.g. Attaching a PDF to a result, or images. (Not used in custom tests)
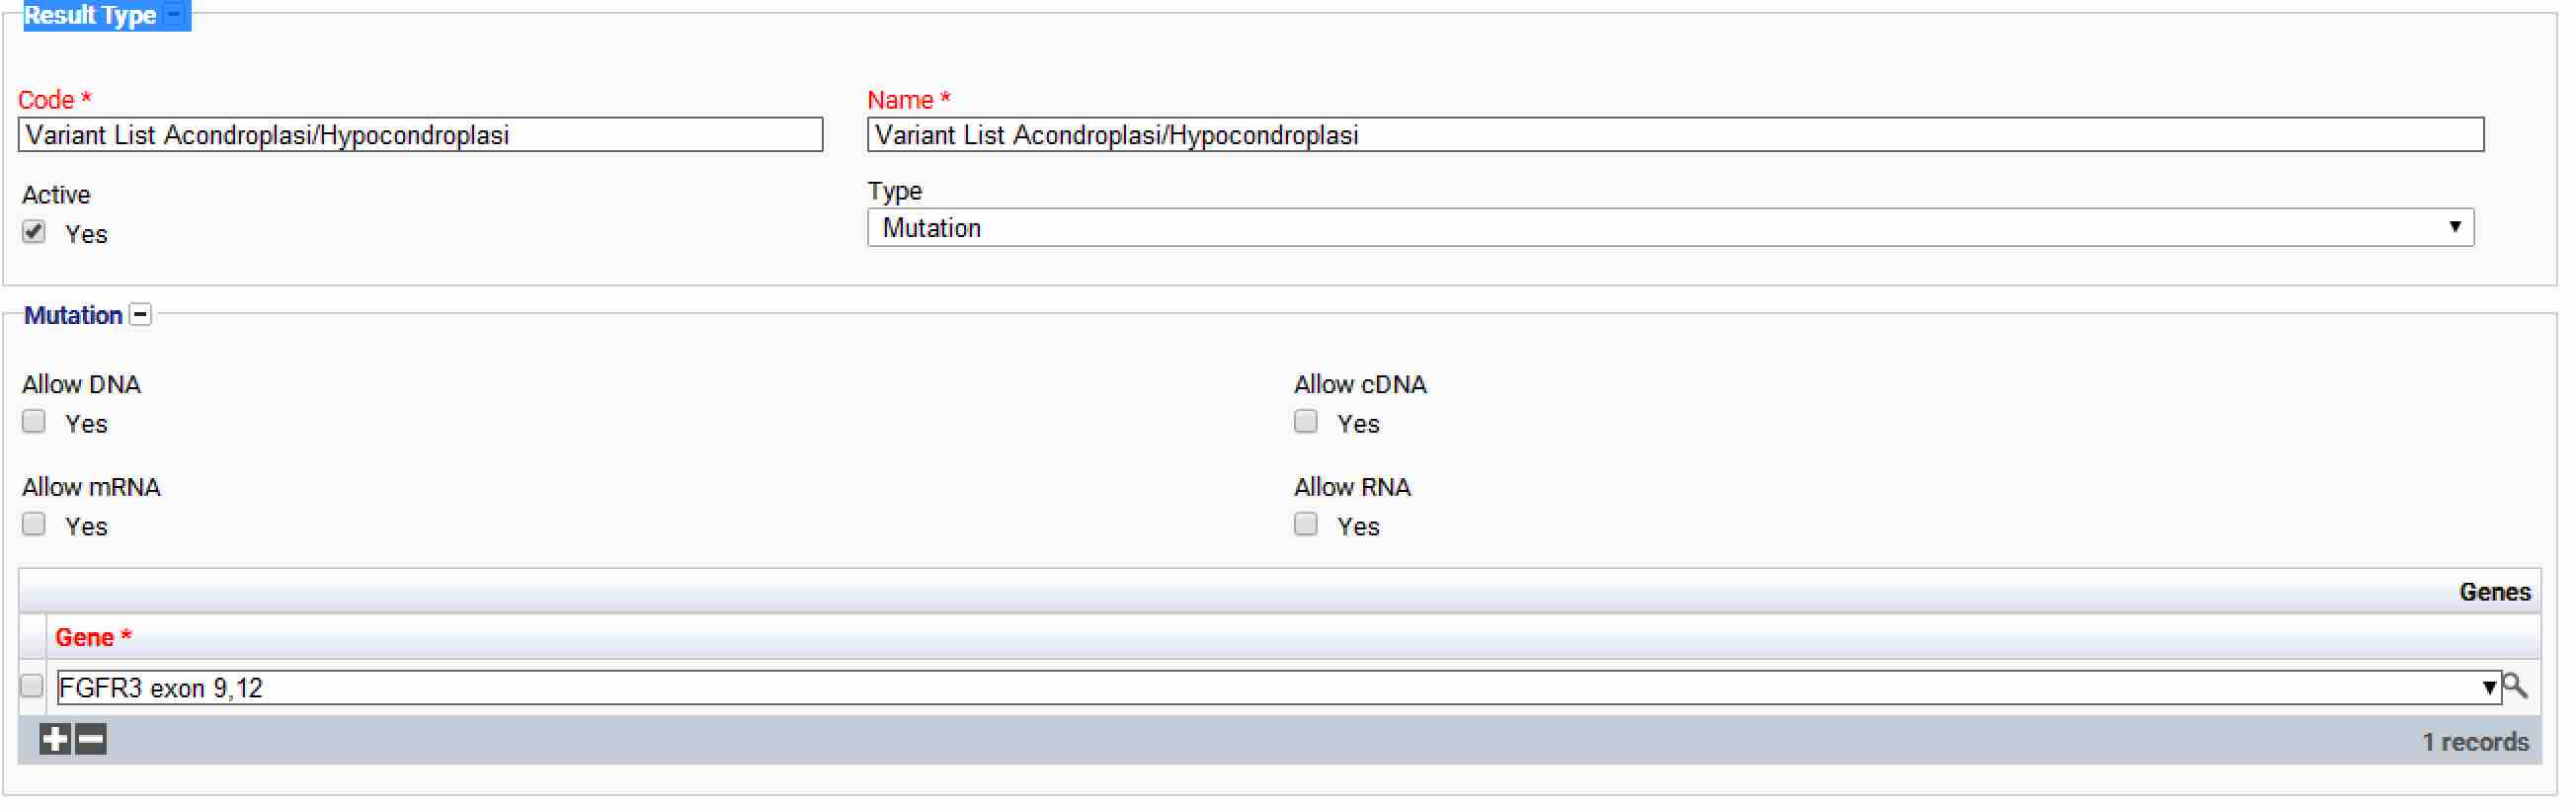
- Mutation: A single mutation field. The list of mutations is limited via a table of genes. Genes and mutations are defined in the Gene Preferences area.
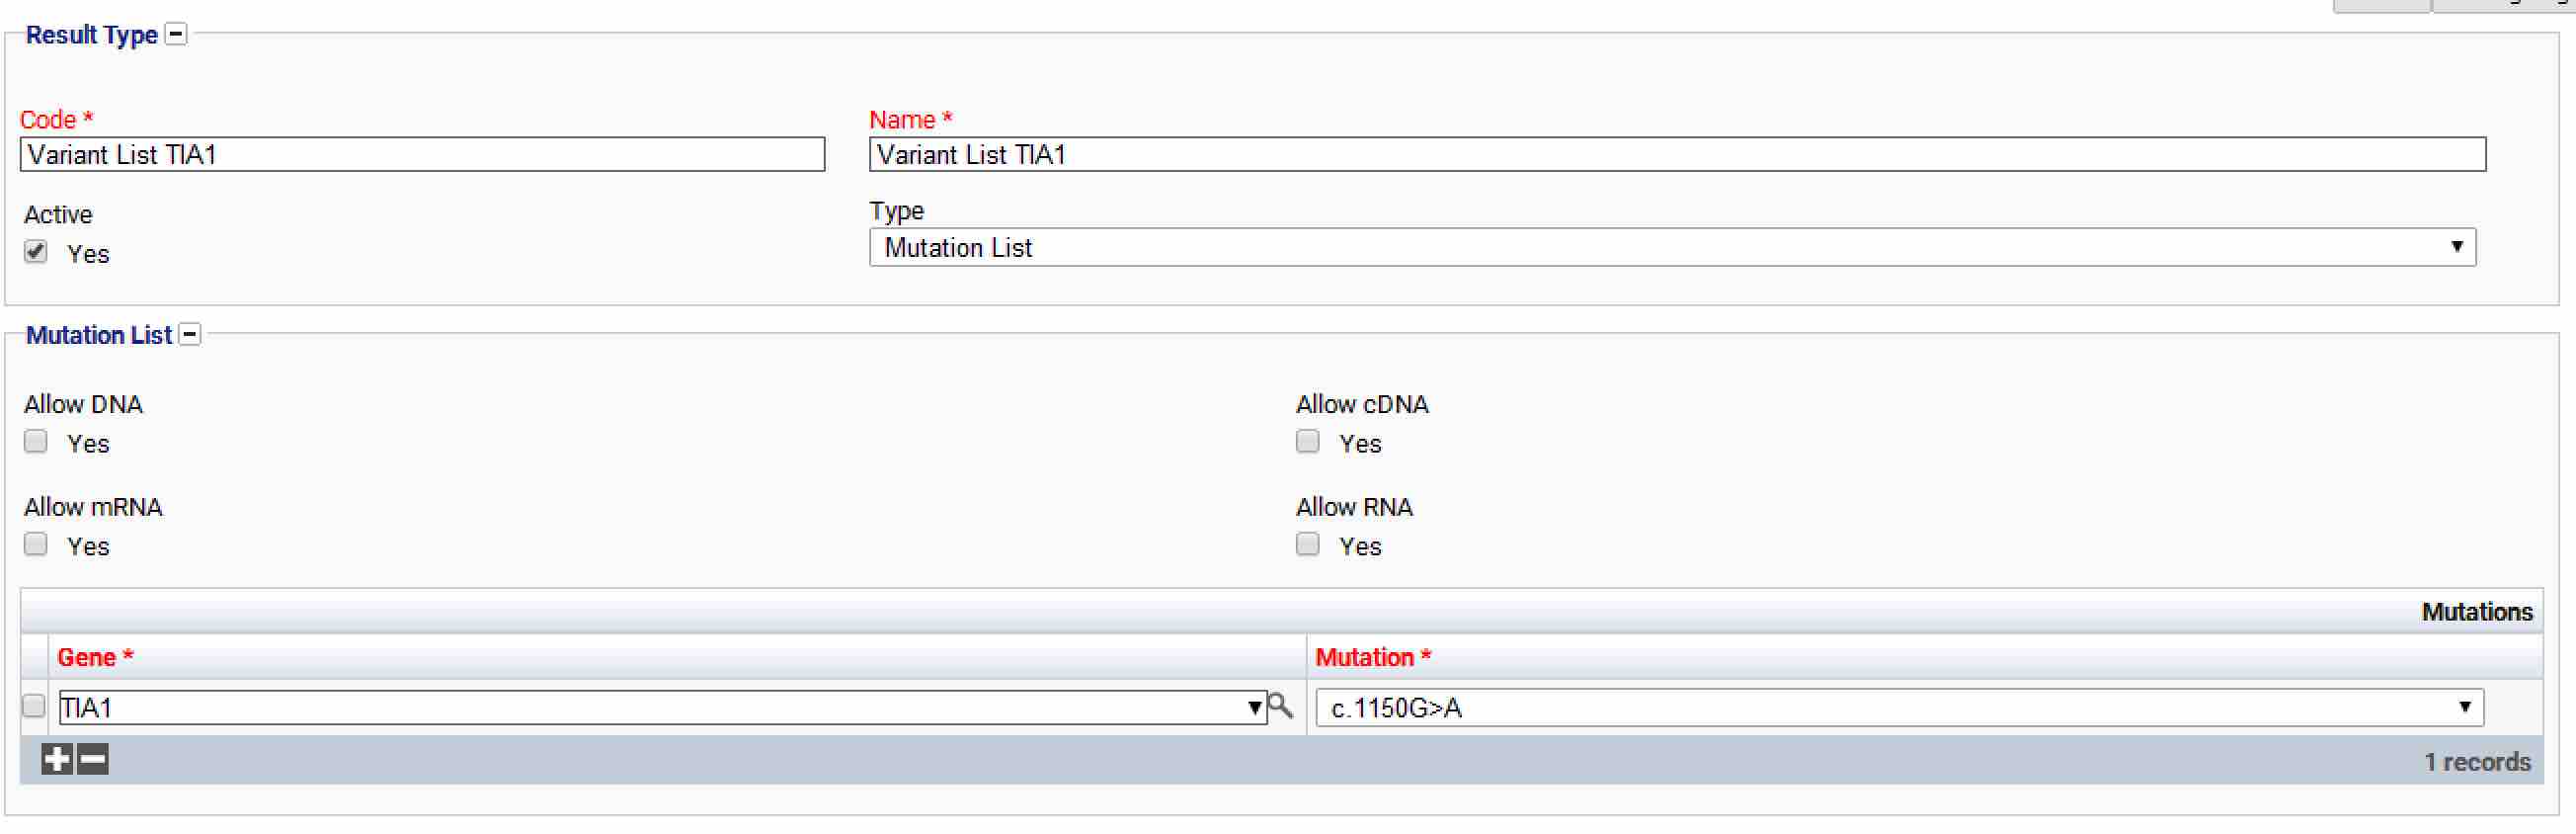
- Mutation List: Similar to mutation, but rather provides a list table where multiple mutations can be added.
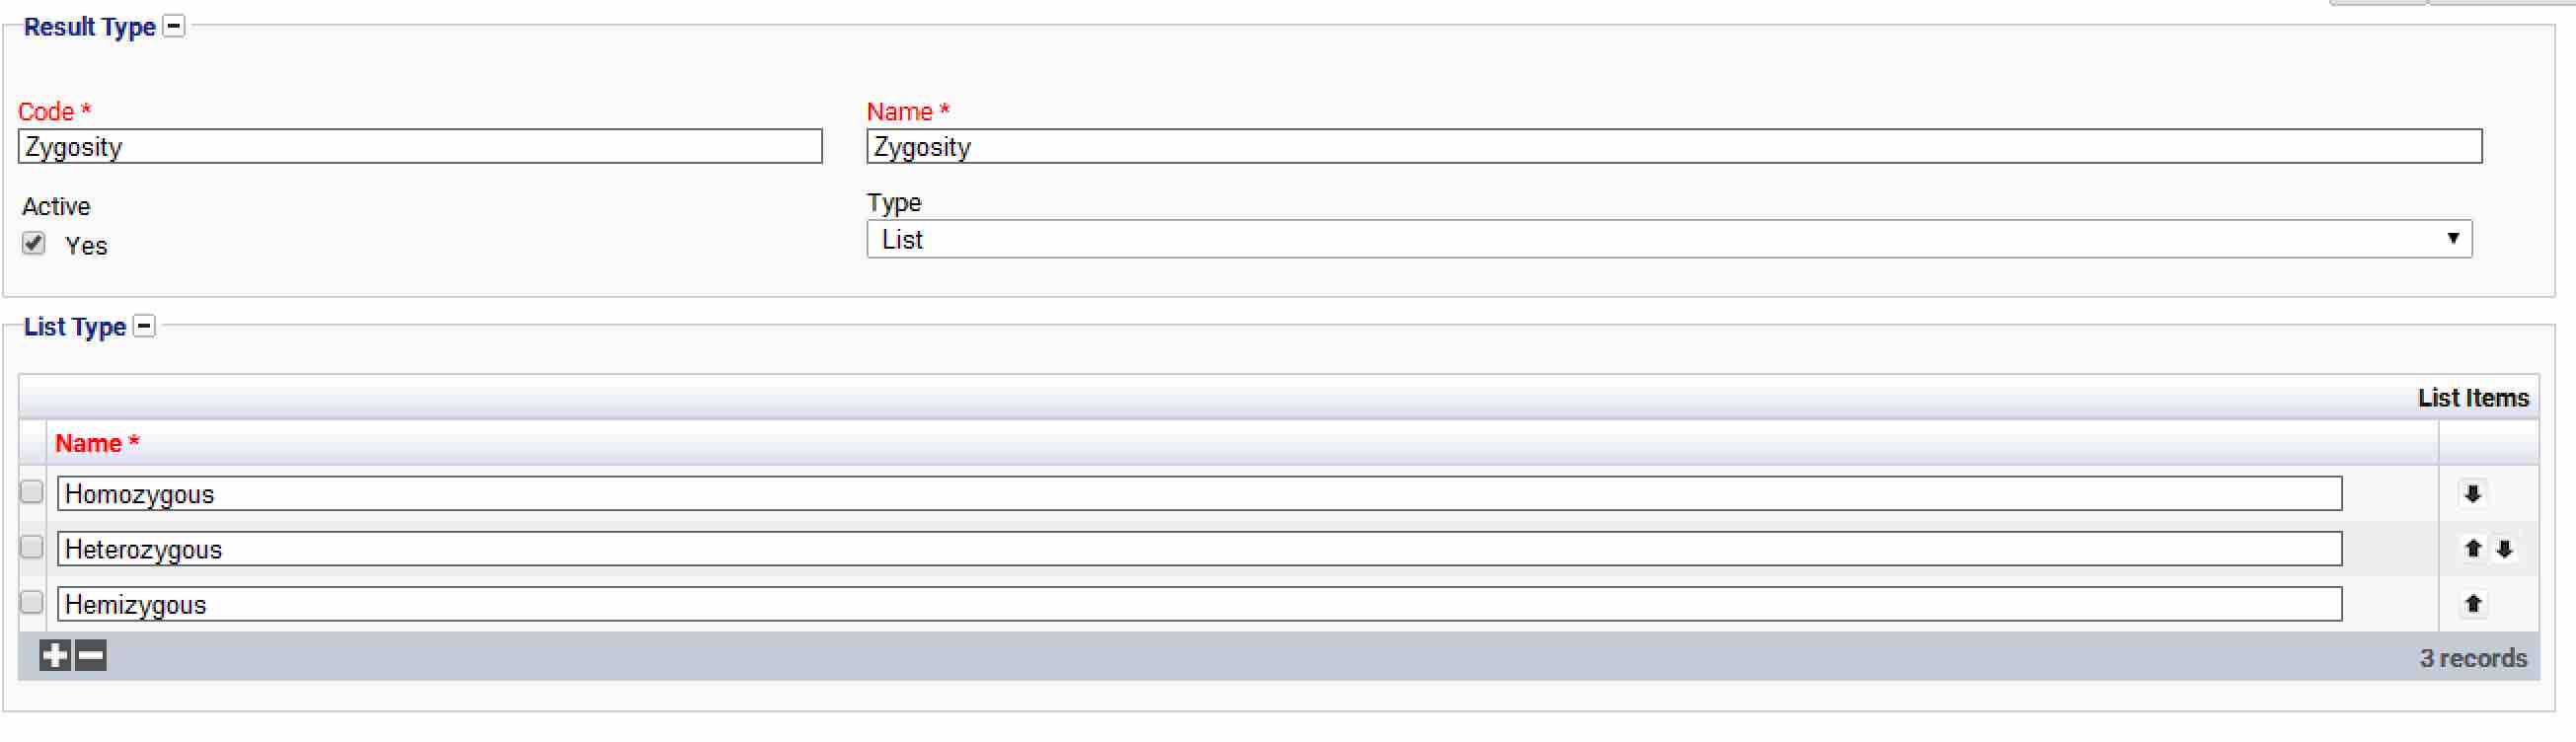
- List: A predefined list of possible values selectable from a dropdown list.
- Equipment: An autocomplete value defining a piece of equipment (Not used in custom tests)
(See Result Type Preferences TODO for more details about this preference)
Understanding Basic HTML
Before discussing and creating templates, it is important to understand the very basics of HTML which is the language used to display websites on the Internet and is also used within custom tests to determine how the results and worksheet cells should be displayed. At its most simplest form and for templating purposes, HTML provides:
- A way to mark which parts of the text should be bold, italic, underlined, etc.
- A way to layout items in a table.
- A way to choose fonts, font sizes and font colours.
- For organising text into paragraphs and adding headers, lines, etc.
HTML works using a simple markup format. Formatting is enclosed in a pair of tags and everything between the tags is displayed according to the tags, e.g.
The following text should be in <b>bold</b>.
This snippet of HTML would display “The following text should be in bold”. The <b> tag shows where the bolded text starts, and the </b> shows where it ends. The <i></i> tag can be used for italic text, and <u></u> can be used for underlined text, e.g.
This text uses <i>Italics</i> <u>Underlines</u> and <b>Bold</b> text.
The above snippet would display as “This text uses Italics Underlines and Bold”. Tags can be nested together to mix multiple styles, e.g.
This text is <b><u>bold underlined</u></b>.
The above snippet would display as “This text is bold underlined”. It’s important when creating HTML that the tags are closed in the correct order, e.g.
This text is <b><u>bold underlined</b></u>.
This snippet is invalid because the b and u tags are not closed in the correct order and may produce incorrect results.
Some useful tags for basic formatting are shown below
| Tag | Description | Example |
|---|---|---|
| b | Display text in bold | This is <b>bolded</b> text |
| i | Display text in italics | This is <i>italic</i> text |
| u | Display text in underline | This is <i>underlined</i> text |
| strike | Display text with a |
This is <strike>strikethrough</strick> text |
| sub | Display text in subscript, e.g o2 | We need <sub>o</sub>2 to breath |
| sup | Display text in subscript, e.g 24 | 2<sup>4</sup> is 16 |
| p | Displays text in a paragraph spaced on a new line | <p>This is a paragraph of text</p> |
An example of all of the above is shown below:
<p>This is a new paragraph of text.</p>
<p>This is another paragraph of text. This is <b>Bold</b> text. This is <i>Italic</i> text. This is <u>underlined</u> text.
This is <strike>strikethrough</strike> text.</p>
<p>Yet another paragraph. We need O<sub>2</sub> to breath. 2<sup>4</sup> is 16.</p>
The above snippet would produce the following text:
This is a new paragraph of text.
This is another paragraph of text. This is Bold text. This is Italic text. This is underlined text.
This is strikethrough text.
Yet another paragraph. We need O2 to breath. 24 is 16.
Normally, HTML will ignore new lines when entering text. e.g.
<p>This is paragraph.
  I was expecting this sentence to be on a new line, but it isn't</p>
The above snippet would produce “This is paragraph. I was expecting this sentence to be on a new line, but it isn’t”. To force new lines, place each line into a separate paragraph, e.g.
<p>This is paragraph</p>
<p>This will appear on a new line</p>
or
<p>This is paragraph <br />
  This will appear on a new line</p>
This snippet would produce the desired result. The <br /> is a new line break used in HTML it is classed as a Self Closing Tag and is the same as writing <br></br>.
For inserting extra blank lines, the <pre> also comes in useful. This tag is for displaying preformatted text, e.g.
<p>This is paragraph</p>
<pre>
  Whatever I type in here including new lines will be displayed.


  I have put two spaces above me.
</pre>
<p>This is another paragraph</p>
In the above example, everything between the pre tags would be displayed as it looks in the code, i.e
Whatever I type in here including new lines will be displayed.


I have put two spaces above me.
Another useful feature of HTML which is often needed for templates are tables. Creating a table in HTML is a little more complicated, but follows a predictable pattern. Tables use the following tags:
- <table> Defines the beginning of the table
- <tr> Defines a new table row
- <th> Defines a new table header
- <td> Defines a new table column
Each tag is nested inside the other to build up a tree which defines how the table should look. An example of a simple table is shown below:
<table>
  <tr>
    <th>Header 1</th>
    <th>Header 2</th>
  </tr>
  <tr>
    <td>Column 1</td>
    <td>Column 2</td>
  </tr>
</table>
This would produce a table similar to the following:
| Header 1 | Header 2 |
|---|---|
| Column 1 | Column 2 |
The entire table must be enclosed in table tags, and then each new row in the table is given a tr tag. Inside the tr tags are each column (either th for a header column, or td for a standard column). Each additional row in the table must have the same number of columns otherwise the table may layout strangely or unexpectedly. Each column by default is divided equally, i.e. Two columns would be given 50% of the width of the entire table.
To override the widths of the columns, a width= property can be used as shown below:
<table>
  <tr>
    <th width="10%">Header A 10%</th>
    <th width="30%">Header B 30%</th>
    <th width="60%">Header C 60%</th>
  </tr>
  <tr>
    <td>Column 1a</td>
    <td>Column 1b</td>
    <td>Column 1c</td>
  </tr>
  <tr>
    <td>Column 2a</td>
    <td>Column 2b</td>
    <td>Column 2c</td>
  </tr>
</table>
This would produce the following table:
| Header A 10% | Header B 30% | Header C 60% |
|---|---|---|
| Column 1a | Column 1b | Column 1c |
| Column 2a | Column 2b | Column 2c |
The width=% value only needs to be defined on one of the cells and not repeated for each row.
There is much more to HTML than covered here, but the above should be enough to create some basic template layouts. There are plenty of much more detailed tutorials on HTML available on the Internet and Genial Genetics can also help provide some starting templates which can be copied and used again.
iGene has Zurb Foundation template within the style sheets. It is possible for advanced users to utilise this layout method if they wished.
Worksheet Cell Display Templates
Custom Tests are the only type of test in iGene to work with the worksheets module. For working with worksheets, a custom test requires a Worksheet Cell Display Template. This template defines how the test will be displayed in a worksheet cell, as shown below:
In most instances the default template provided by iGene should work, however many sites choose to display tests differently and show more relevant information when viewing the worksheet.
The worksheet cell display template uses (HTML) TODO discussed earlier to layout the worksheet cell. As well as HTML, iGene uses a simple templating language called Freemarker to display field values (variable replacements). e.g. In a template, a user might want the test name, icon and referral number displaying. Using this method, it is possible to display any accessible field inside a worksheet cell. An example of a simple template is shown below:
<p><b>${test.name}</b></p>
<p>${testNumber}</p>
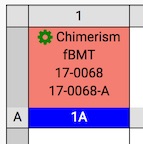
This will produce the following cell:
The first variable replacement shows the name of the test ${test.name} in bold, and the following line shows the test number ${testNumber}. N.B. Each separate line must be in paragraph <p> tags otherwise they will both be displayed on the same line.
Another example is shown below:
<p>${displayIcon}${test.name}</p>
<p>${referral.referralNumber}</p>
<p>${testNumber}</p>
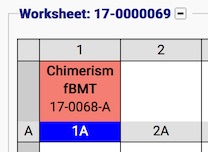
This will produce the following:
In the above example, there are 3 paragraphs (N.B. The first paragraph has wrapped as it is too large to fit in one line). The first paragraph displays the test’s icon and name ${displayIcon}${test.name}, the following paragraph displays the referral number ${referral.referralNumber} and the final one displays the test number ${testNumber}.
A final, slightly more complicated example is shown below:
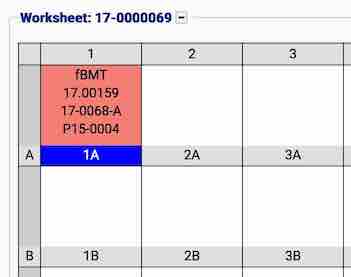
<p>${test.code}</p>
<p>${referralTestSampleTubes[0].sample.tubeNumber}</p>
<p>${testNumber}</p>
<p>${referral.patient.patientPedigrees[0].pedigree.number}</p>
This will produce the following:
The variable replacements used in the template are the same as those used elsewhere in the application, such as when designing reports or creating custom search filters. For the worksheet cell display template, the root model is the test ReferralTest. (TODO add link to document on model paths)
A few common variable replacements are listed below:
| Variable | Description |
|---|---|
| ${displayIcon} | The test’s icon |
| ${test.name} | The test’s full name, e.g. Chimerism |
| ${test.code} | The test’s unique code, e.g. CH |
| ${testNumber} | The unique number of the test |
| ${referral.referralNumber} | The referral number |
| ${referral.patient.medicareNumber} | The patient identifier (i.e. NHS Number, PID, NHI Number, etc..) |
| ${referral.patient.identifier} | The system generated unique patient identifier |
| ${referral.patient.patientPedigrees[0].pedigree.number} | The patient’s first family/pedigree number |
| ${referral.patient.pedigreeNumberList} | The patient’s list of of family/pedigree numbers separated by commas |
| ${referral.patient.currentPatientDetails.firstName} | The patient’s first name |
| ${referral.patient.currentPatientDetails.lastName} | The patient’s surname |
| ${referral.patient.sex.name} | The patient’s gender |
| ${referral.patient.sex.code} | The patient’s gender code |
| ${referralTestSampleTubes[0].sample.tubeNumber} | The sample number of the first sample triaged to this test |
| ${referralTestSampleTubes[0].sample.sampleType.code} | The sample type code of the first sample triaged to this test, e.g. D |
| ${referralTestSampleTubes[0].sample.sampleType.name} | The sample type name of the first sample triaged to this test, e.g. DNA |
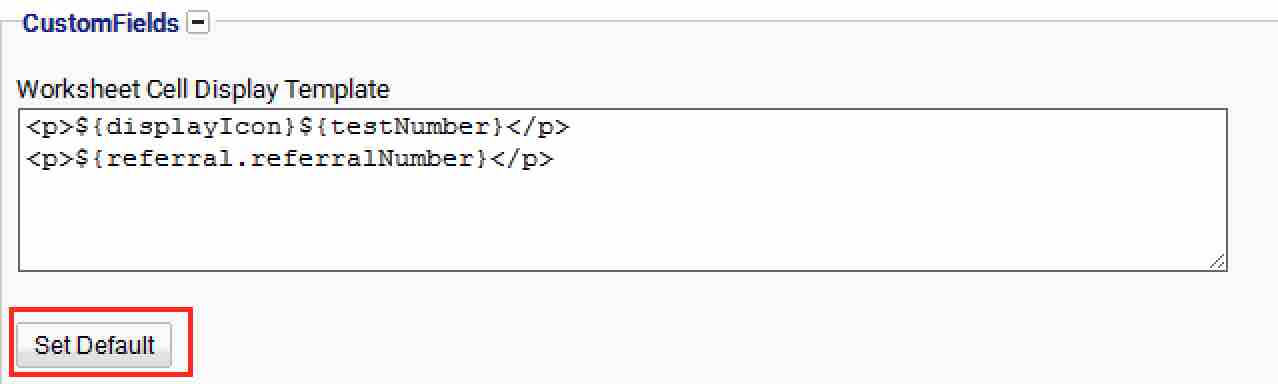
The worksheet cell display template is set inside the CustomFields area of test preferences (See Test Preferences for more details about this preference):

If the template is left blank then the worksheet cell will be empty. To insert a default template, select the Set Default button which will insert the standard template used.
Field Display Templates
The field display template is used to display the test’s custom fields on the results screens. It uses a combination of (HTML) TODO and Freemarker variable replacements to describe the layout of the results screen. The variable replacements use the unique code assigned to each custom field to replace the variable with the actual field.
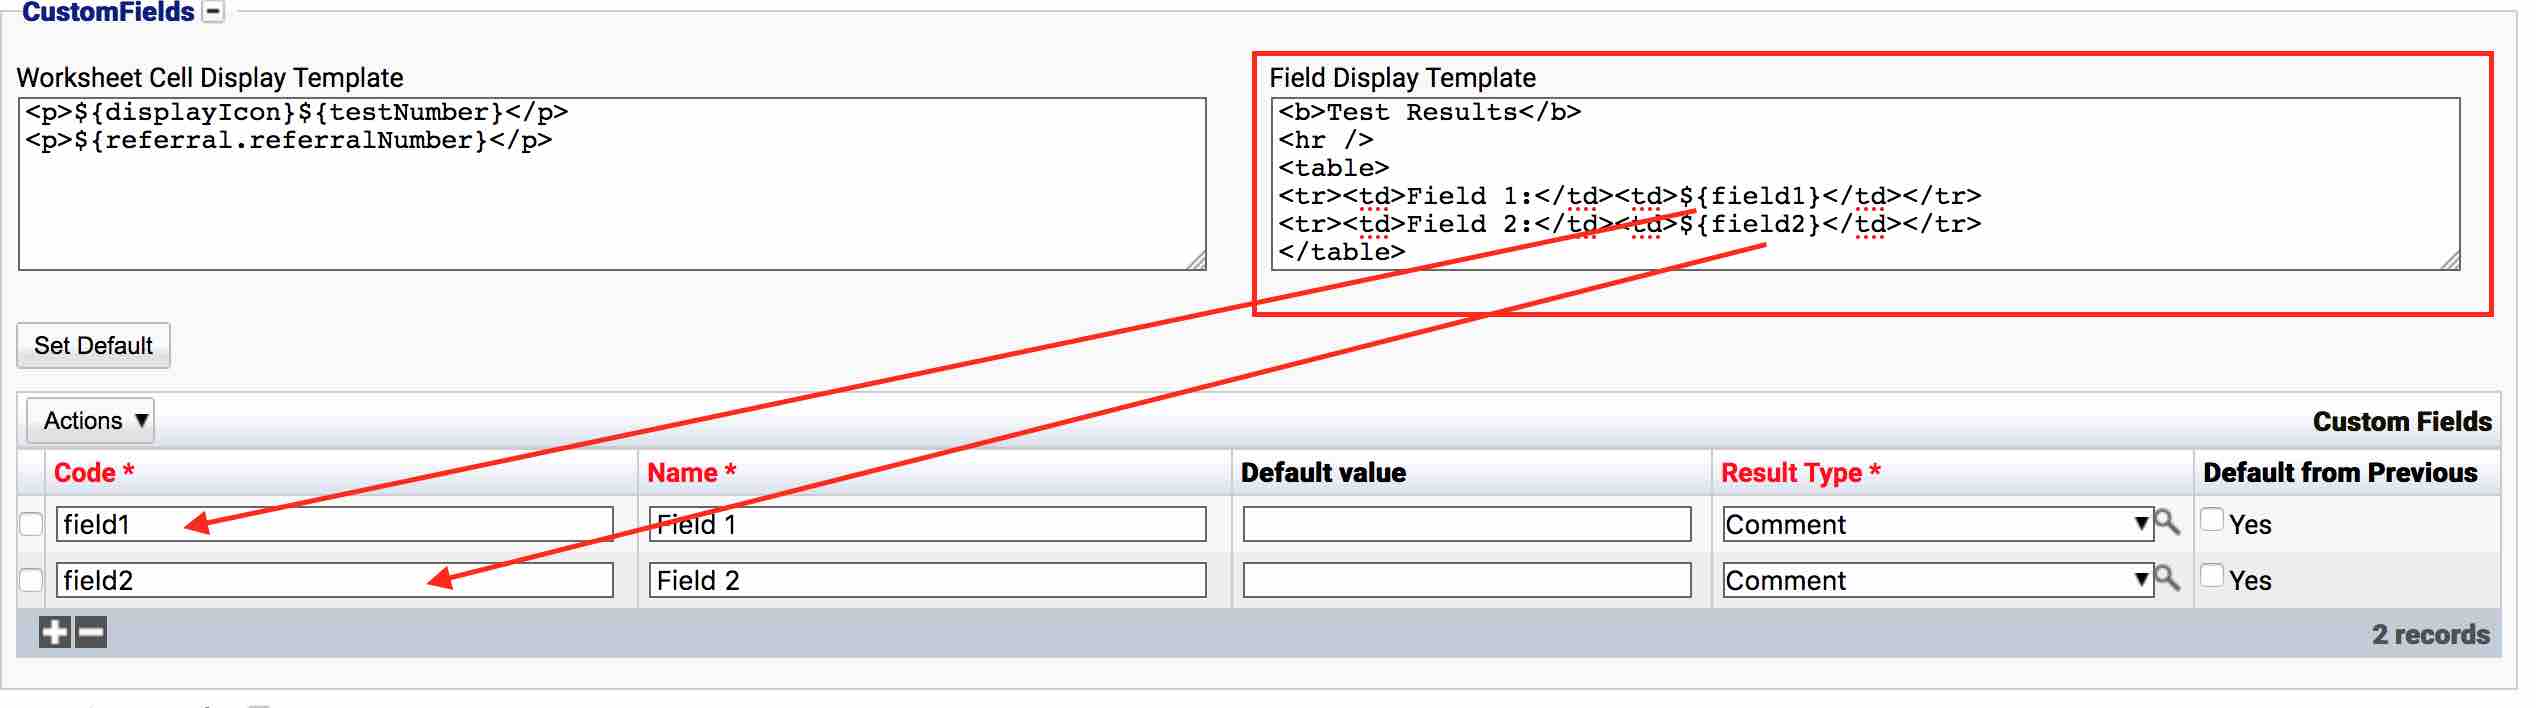
An example of a simple template is shown below:
<p><b>Test Results</b></p>
<hr />
<table>
  <tr>
    <td>Field 1:</td>
    <td>${field1}</td>
  </tr>
  <tr>
    <td>Field 2:</td>
    <td>${field2}</td>
  </tr>
</table>
Each variable replacement points to one of the custom fields and uses the unique code:
The template will produce the following basic result:
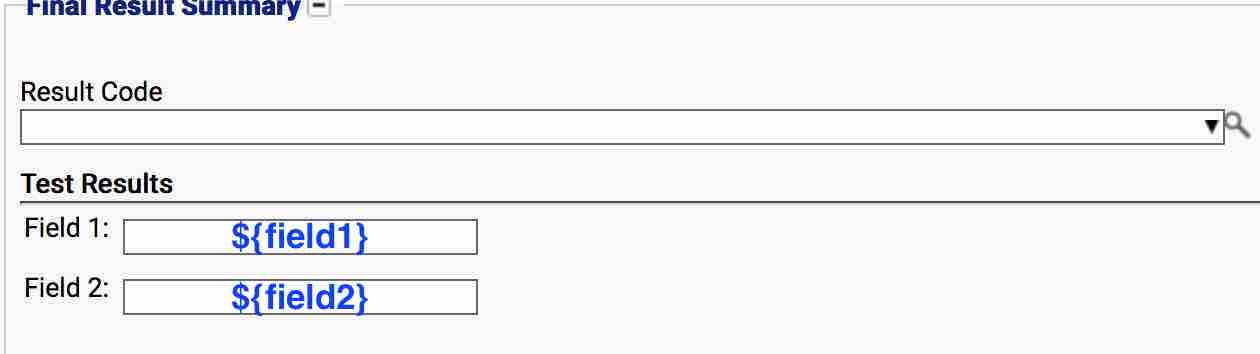
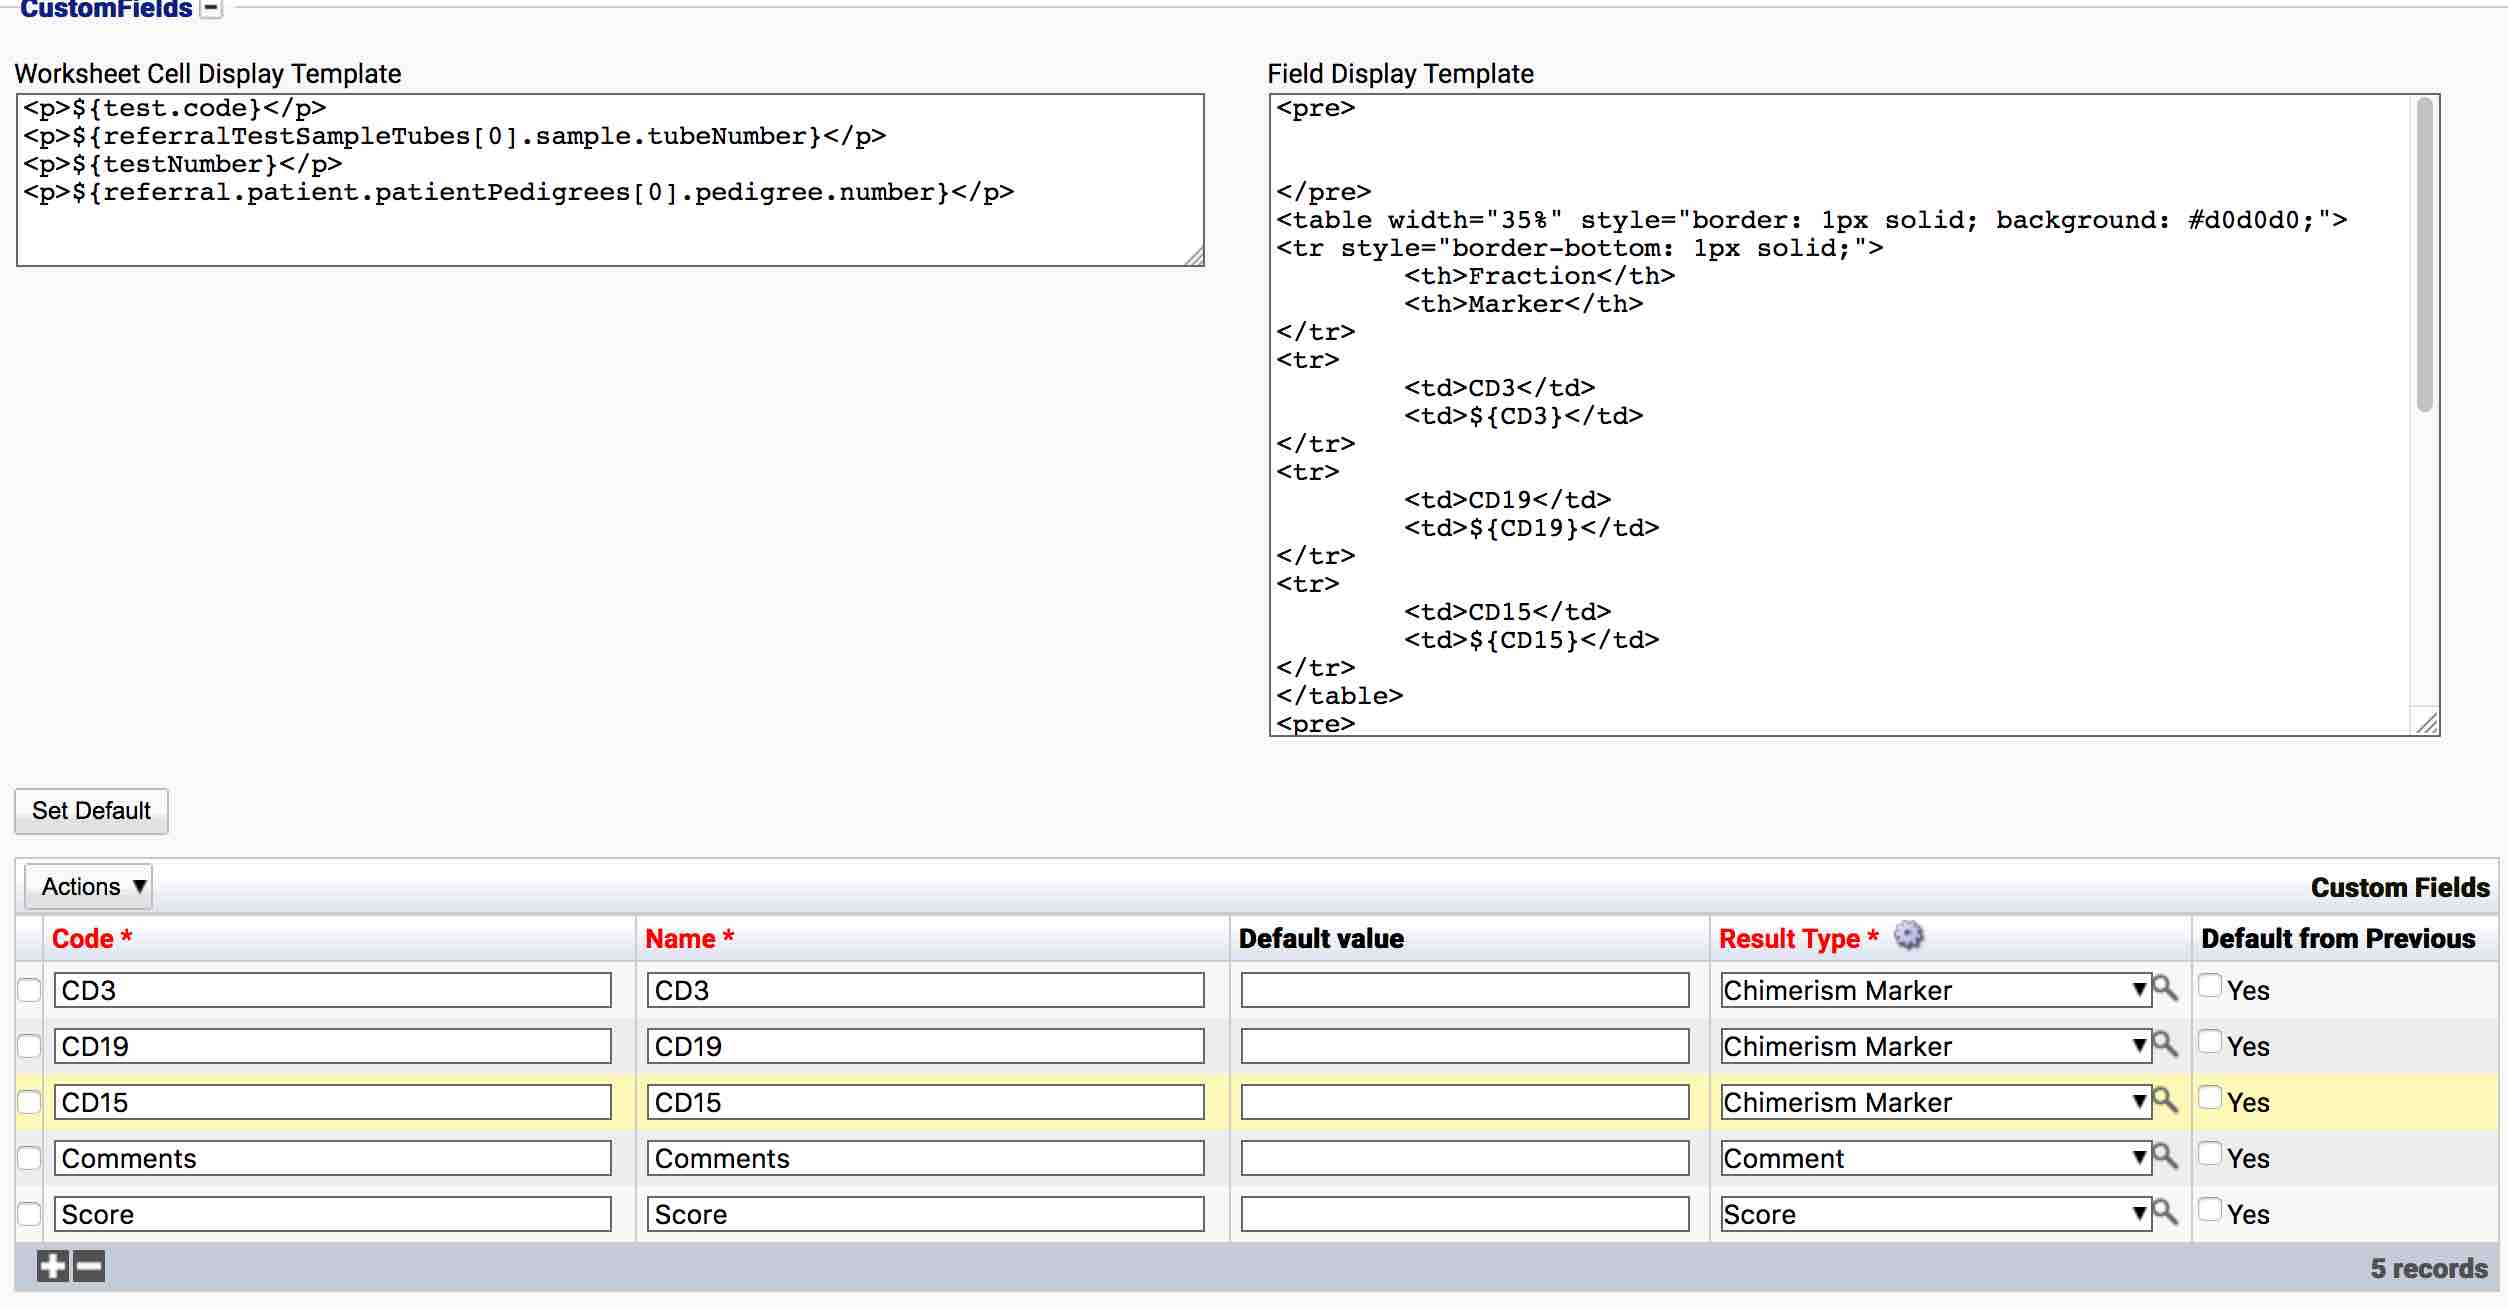
A more complicated example with more fields is shown below:
<pre>


</pre>
<table width="35%" style="border: 1px solid; background: #d0d0d0;">
  <tr>
    <th>Fraction</th>
    <th>Marker</th>
  </tr>
  <tr>
    <td>CD3</td>
    <td>${CD3}</td>
  </tr>
  <tr>
    <td>CD19</td>
    <td>${CD19}</td>
  </tr>
  <tr>
    <td>CD15</td>
    <td>${CD15}</td>
  </tr>
</table>
<pre>


</pre>
<table width="50%">
  <tr>
    <td width="25%">Comments</td>
    <td>${Comments}</td>
  </tr>
  <tr>
    <td width="25%">Score</td>
    <td>${Score}</td>
  </tr>
</table>
<pre>


</pre> 
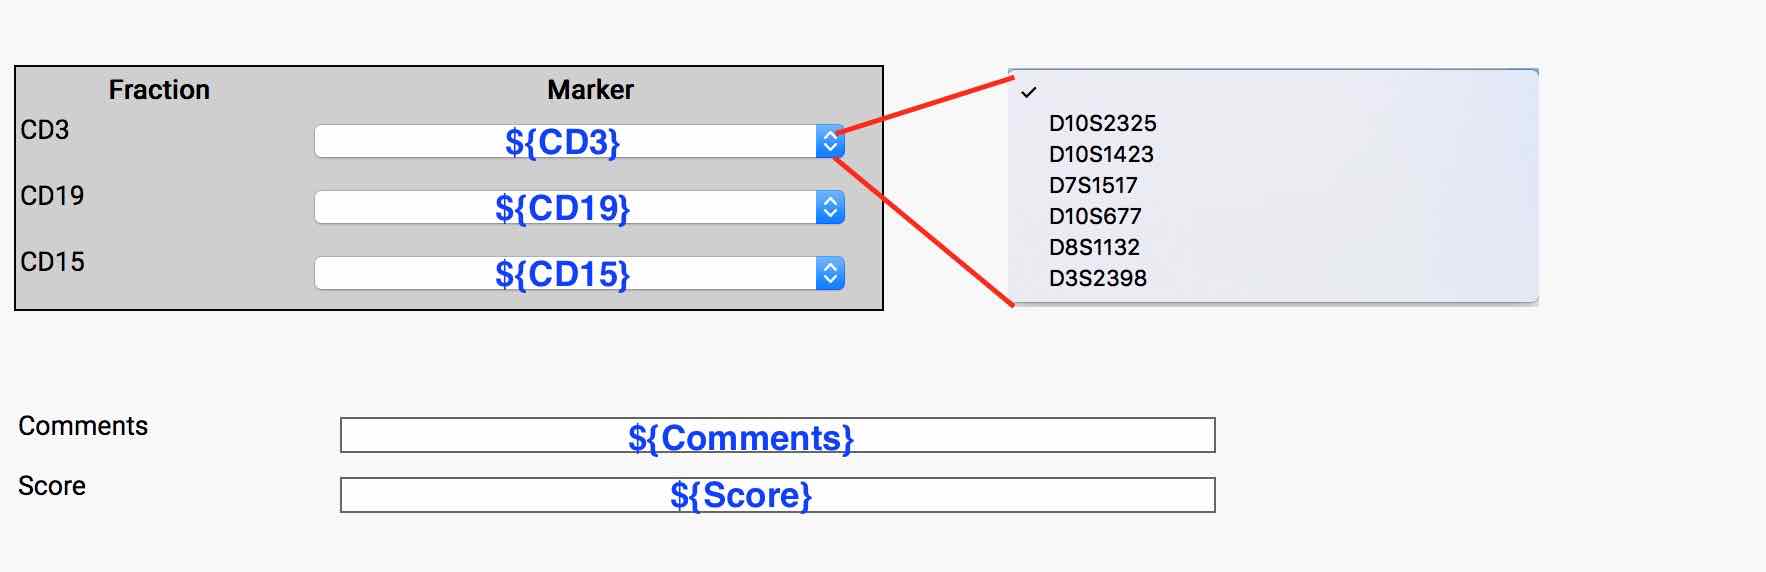
This example uses a combination of tables and style settings to produce the below result screen:
If the template is left blank then the result screen will also be blank (only showing a result code). A template must be created before the result fields can be used.
Always ensure that the code of the field in the variable replacement matches exactly. If the code is invalid or the HTML contains invalid tags, an error will be displayed when attempting to view the result.
Designing a Custom Test
This walkthrough will show how a custom test is designed and setup on the system. For this example, a custom test for Chimerism fBMT will be setup along with: the custom fields, display templates and worksheet cell display.
To perform the following tasks, the following are required:
- Permission to use the administration area.
- A working test status template (See Test Statuses for more details)
- An understanding of performing searches, entering test results and basic navigation.
The first thing to do is to decide which information needs to be recorded. For this example, the following fields are needed:
- Chimerism Marker CD3: A predefined list of markers (e.g. D10S2325, D10S1423).
- Chimerism Marker CD9: As above, a list of markers.
- Chimerism Marker CD15: As above, a list of markers.
- Comments: A comments field for entering plain text.
- Score: A single number field which allows a value between 0 and 100.
Each custom field in a test has a result type that defines the type of field, e.g. A dropdown list. The three chimerism marker fields will all use the same list values, therefore in this instance, three new result types will be needed:
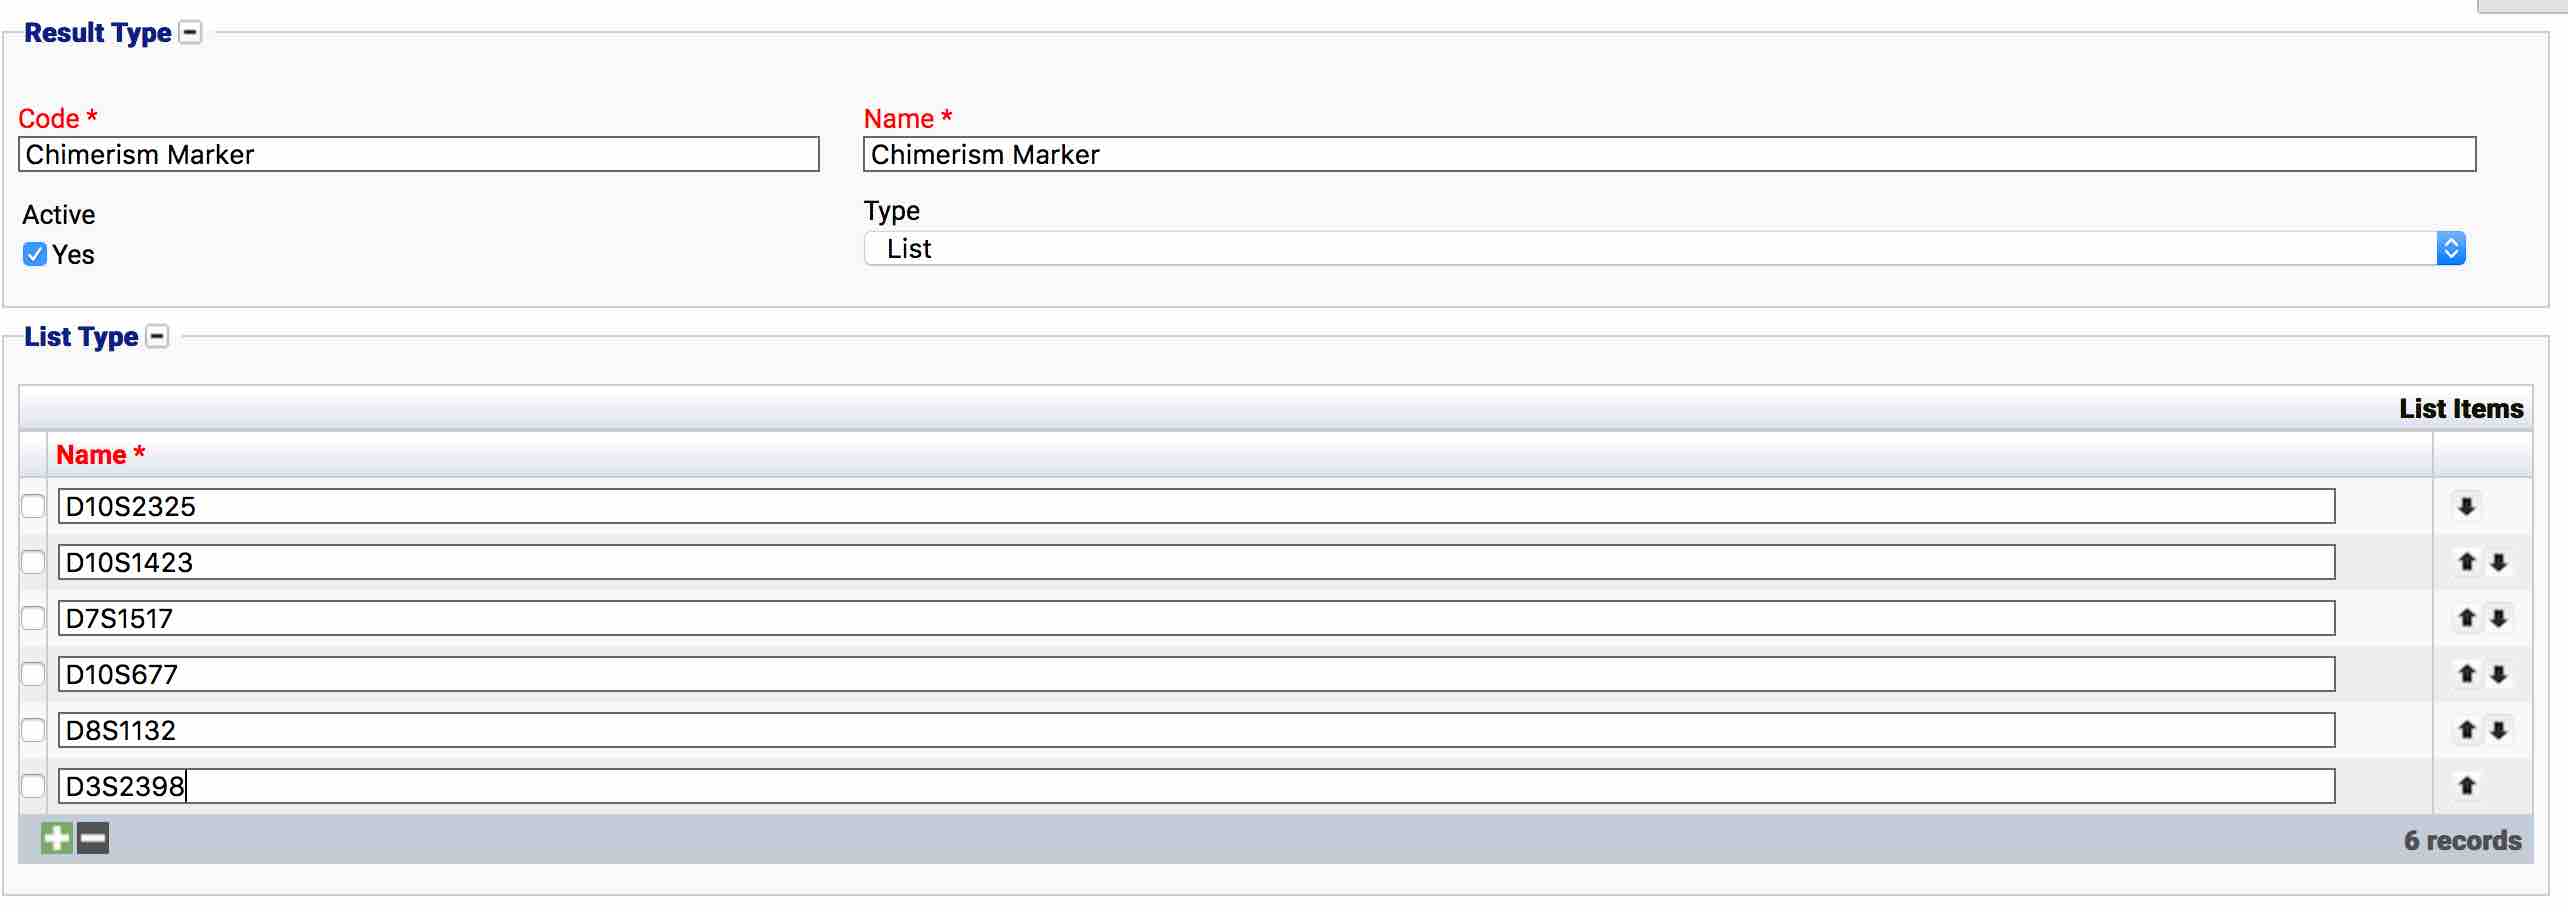
- A list of markers for the CD3, CD9, and CD15 field. The list needs the following values (D10S2325, D10S1423, D7S1517, D10S677, D8S1132, D3S2398).
- A string result type used for the Comments field.
- A number result type field for the Score field. This field should be limited to values between 0 and 100.
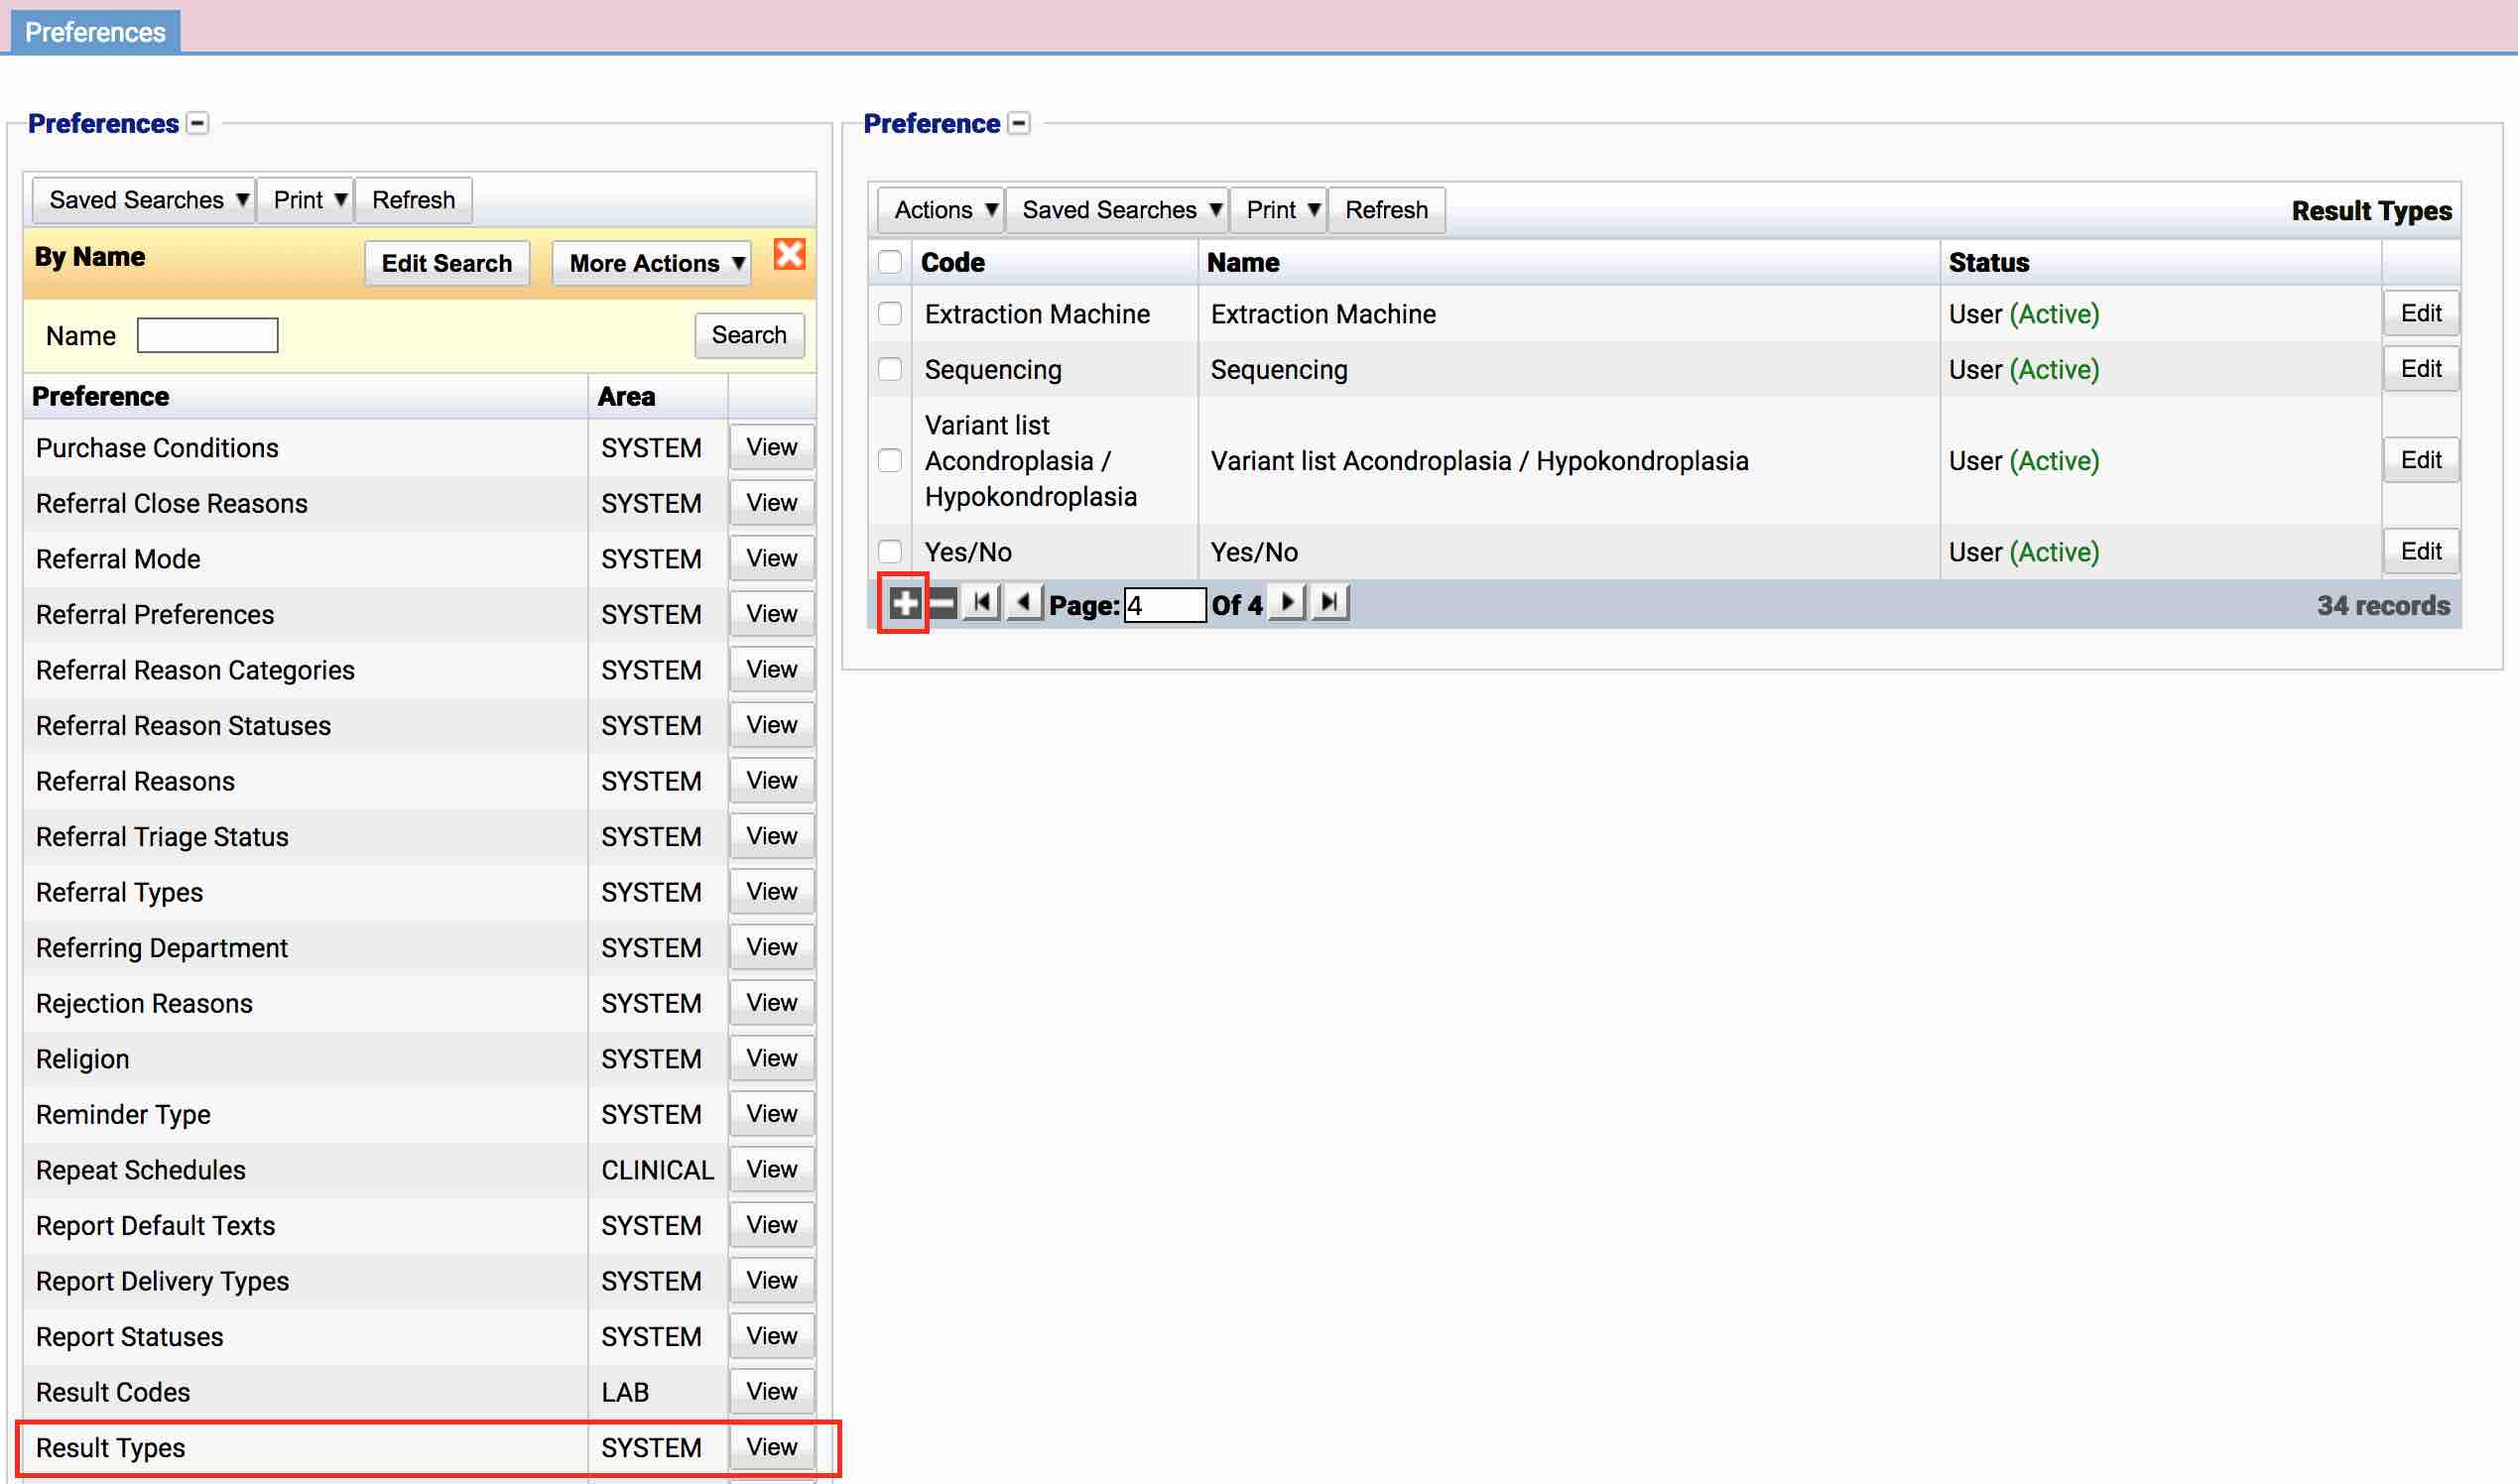
To begin, the list type field will be created and named Chimerism Marker. Locate the result type preferences in Administration -> Preferences -> Result Types (See Result Type Preferences for more details about this preference) and select the + button to create a new result type:
Provide a name and code for the result type, e.g. Chimerism Marker. From the Type dropdown, select the List value which will reveal the List Type fieldset.
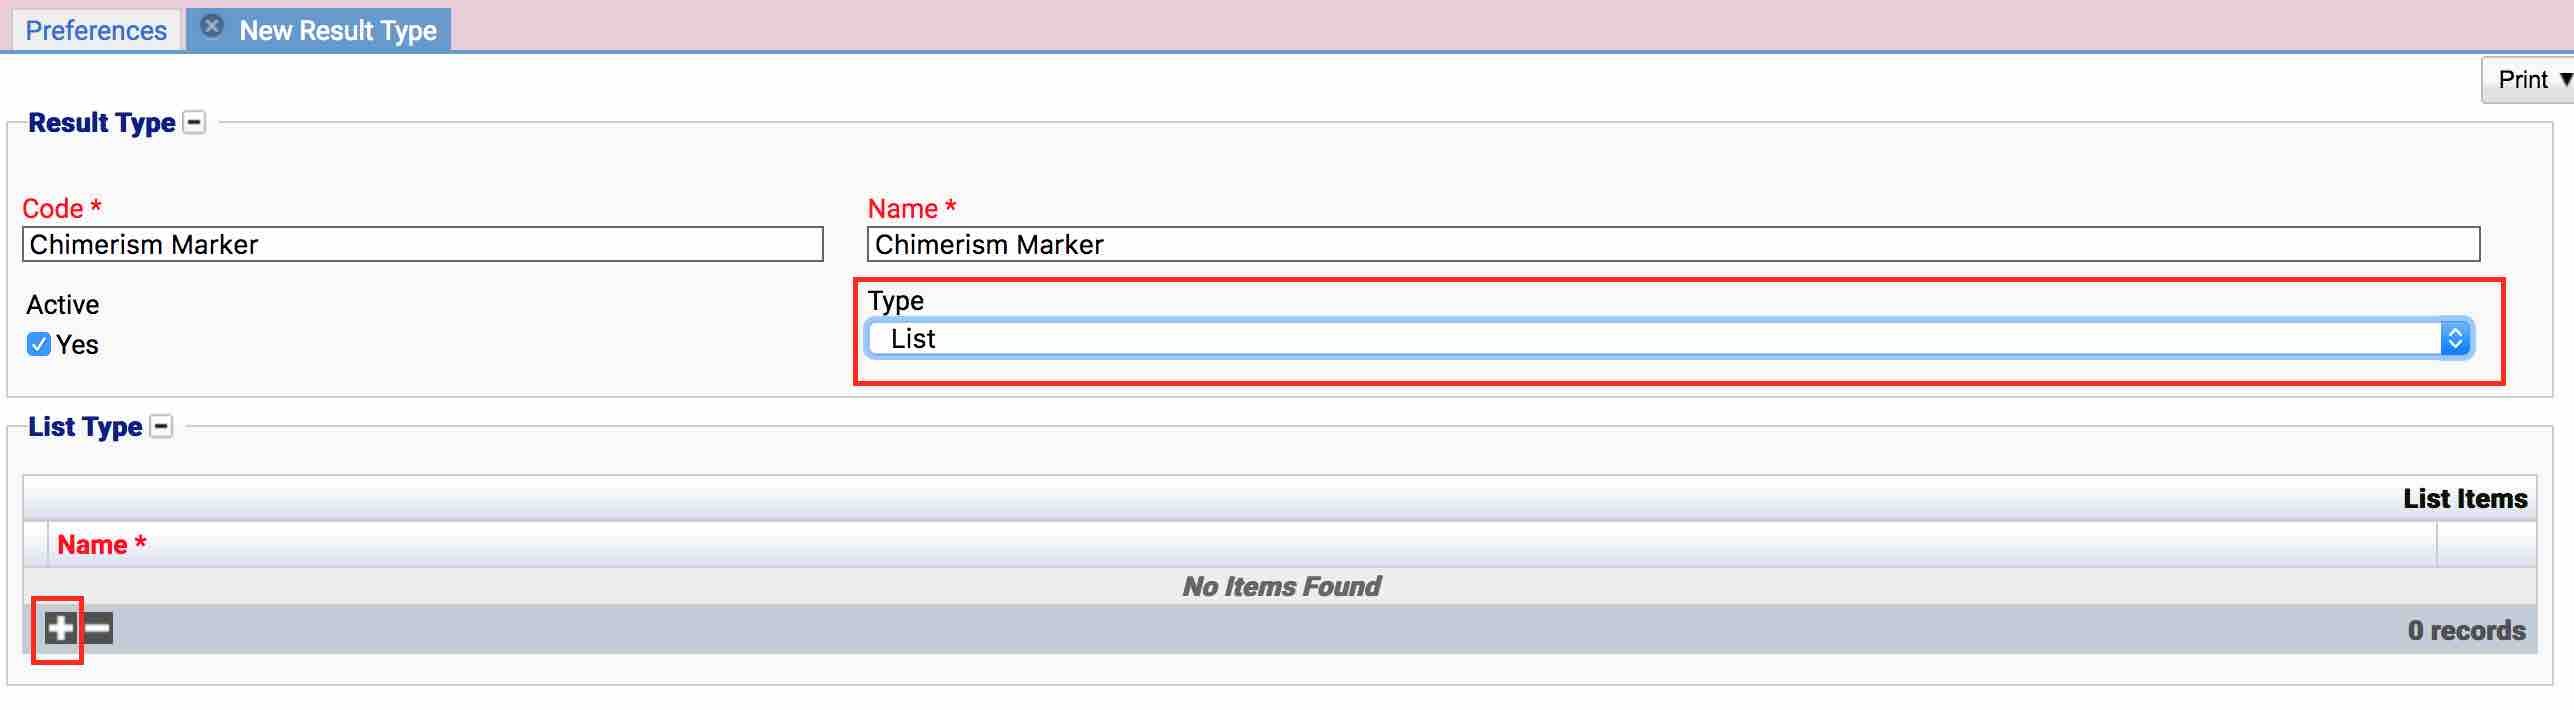
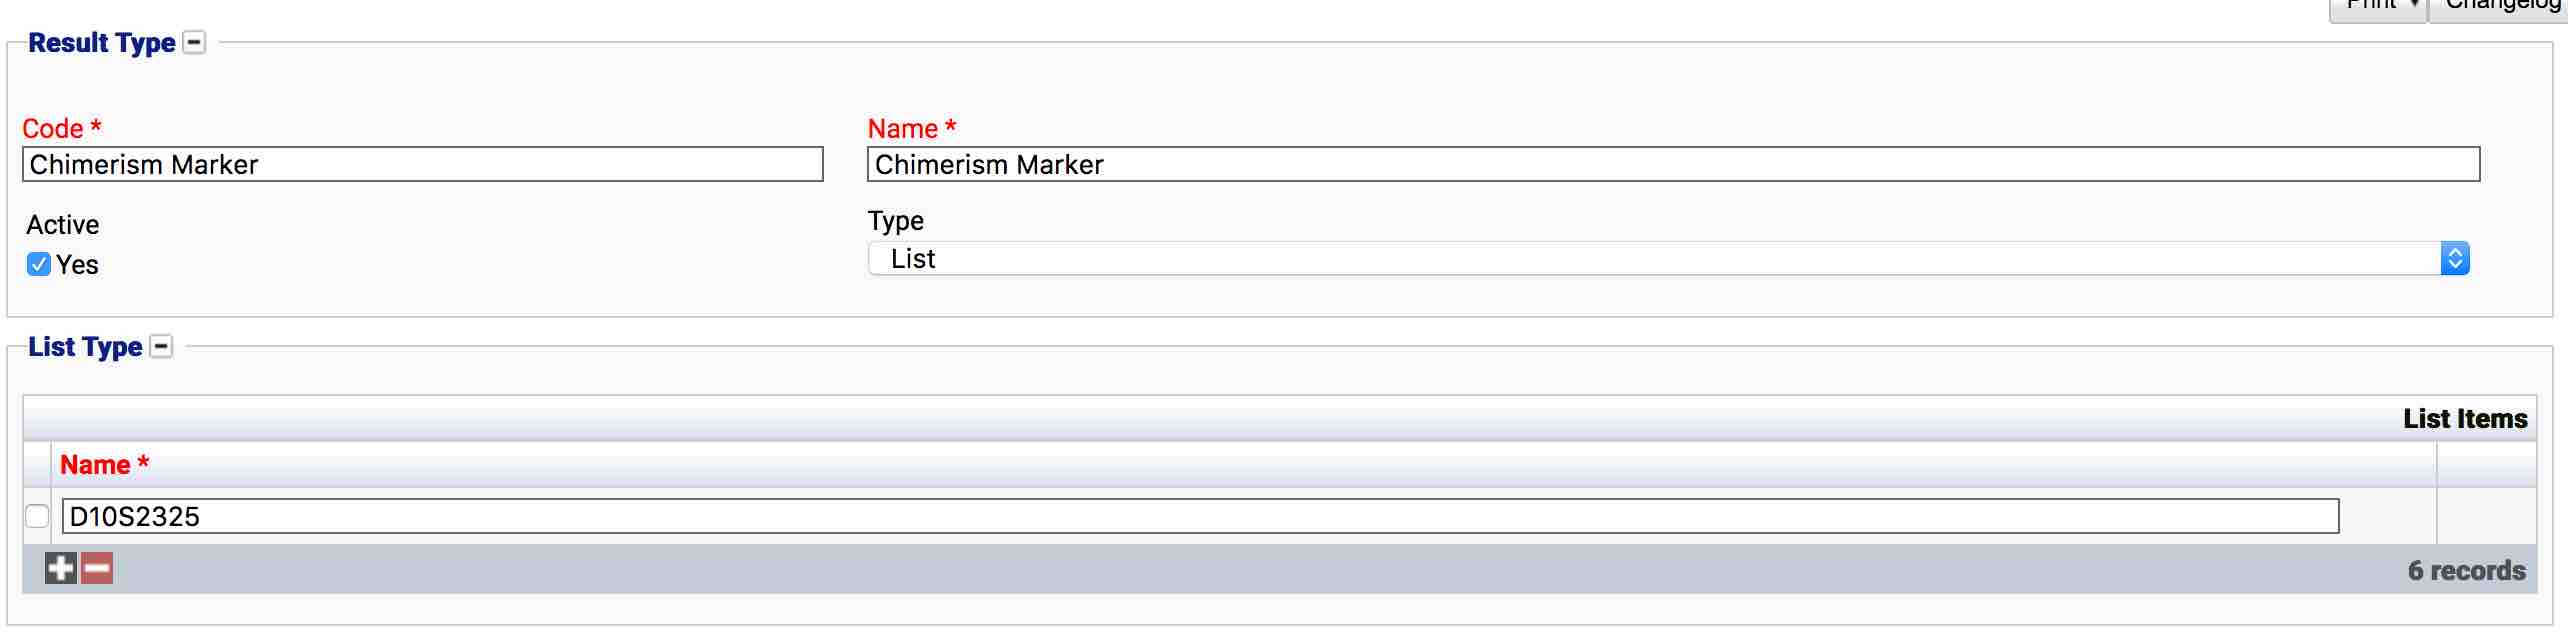
In the List Items table, select the + button to add a new entry to the table and specify the first value that will appear in the dropdown list, i.e. D10S2325.

Add the rest of the items to the table. Once completed, save the result type using the Save Button.
For the Comments result type, create a new result type with the name and code of Comments and a Type of String.

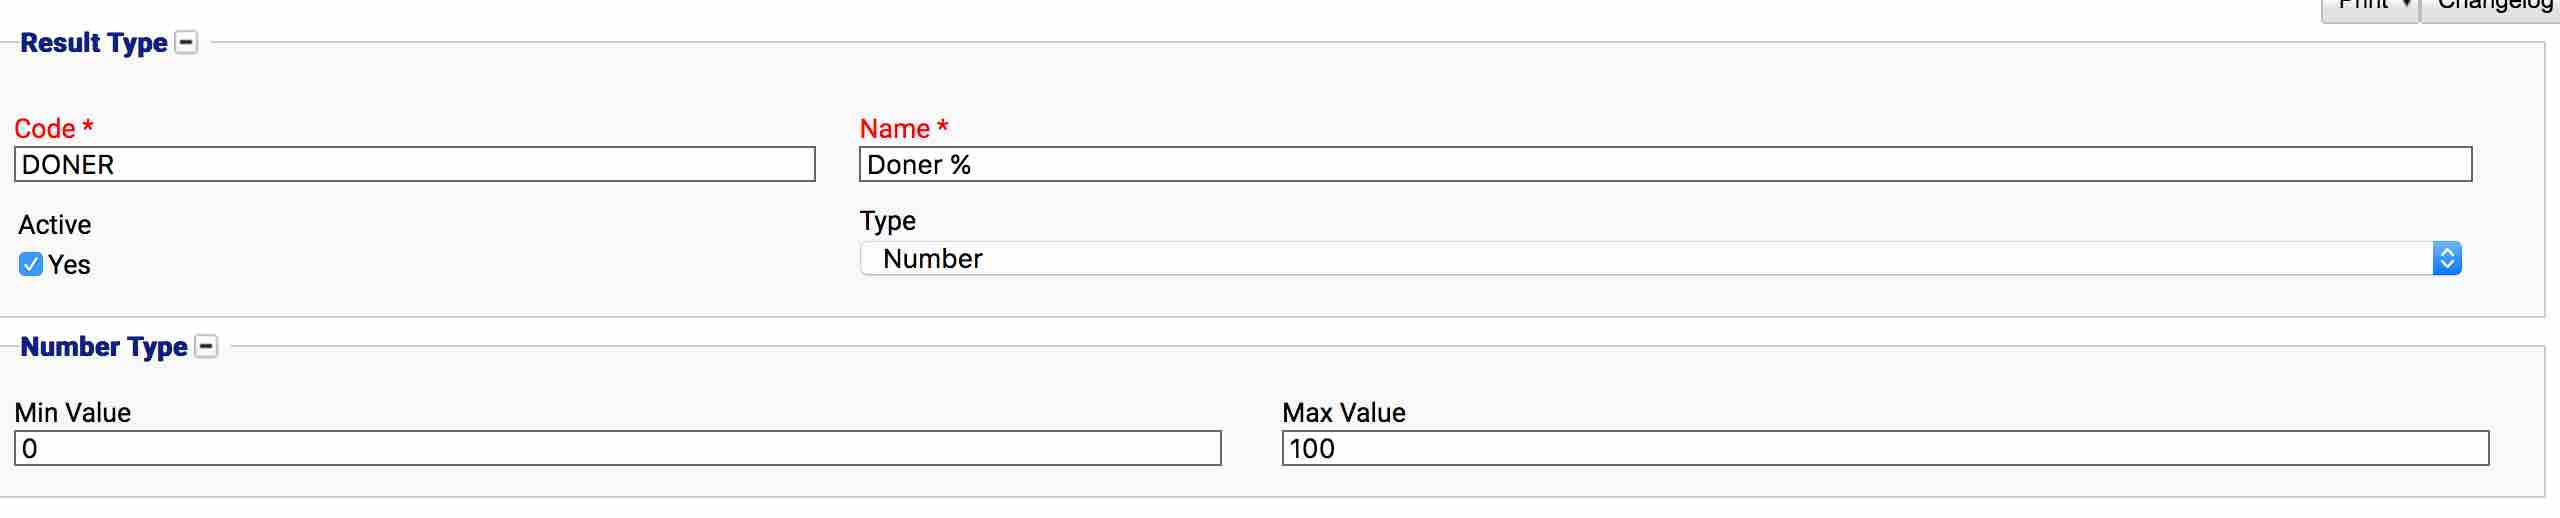
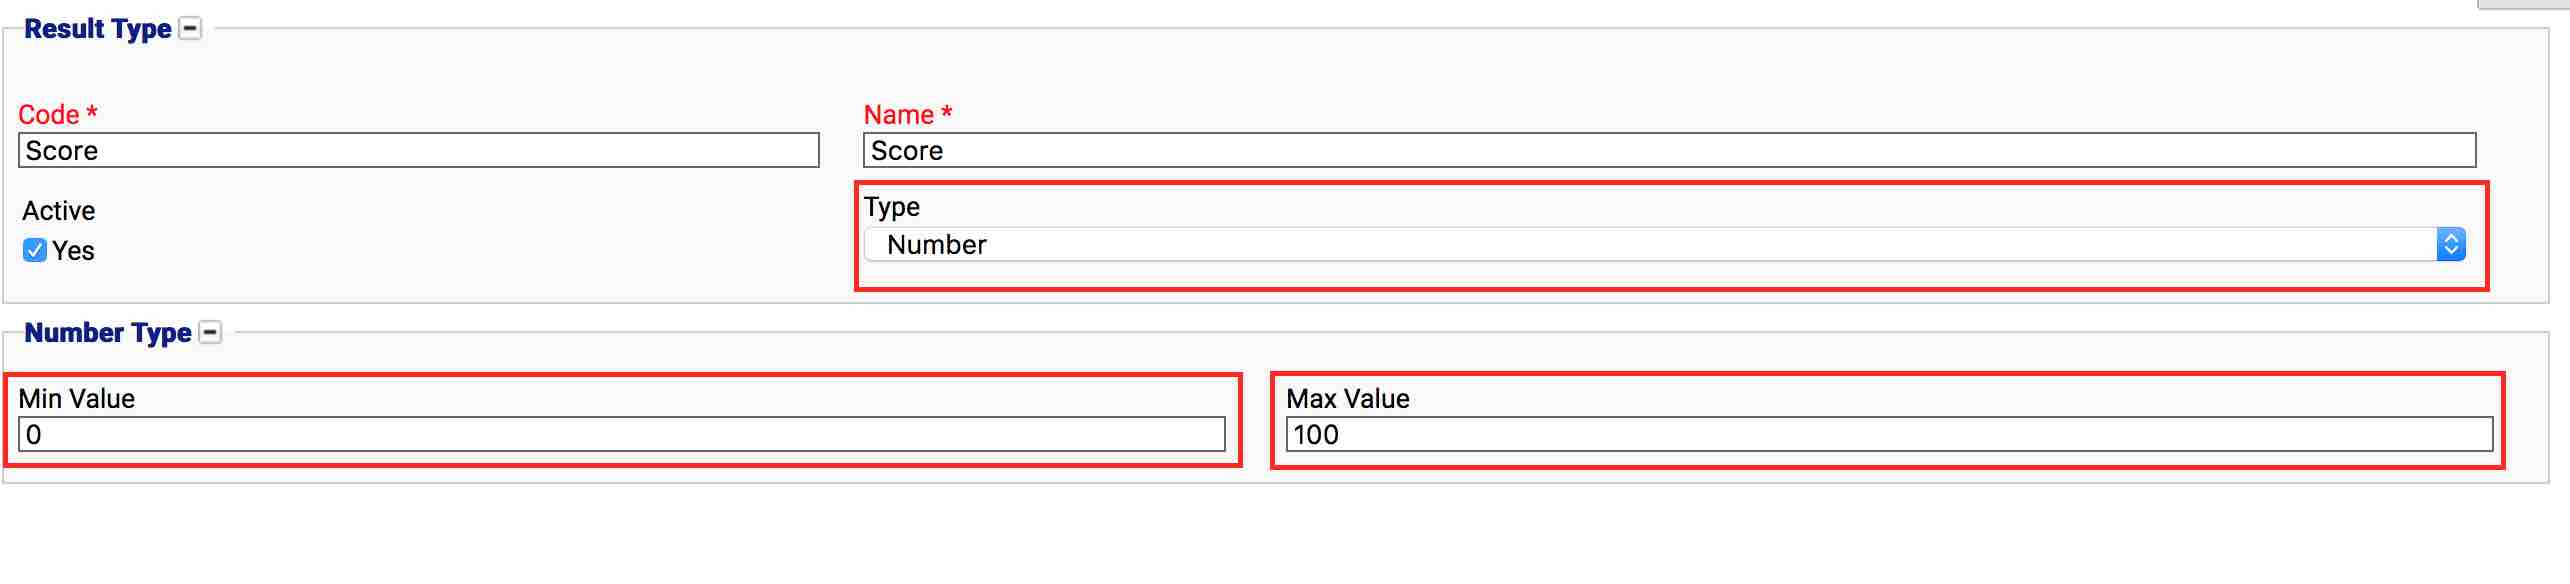
For the Score result type, create a new result type with the name and code of Score and a Type of Number. Since the requirement is to have this field limited between 0 and 100, specify a Min Value of 0 and a Max Value of 100:
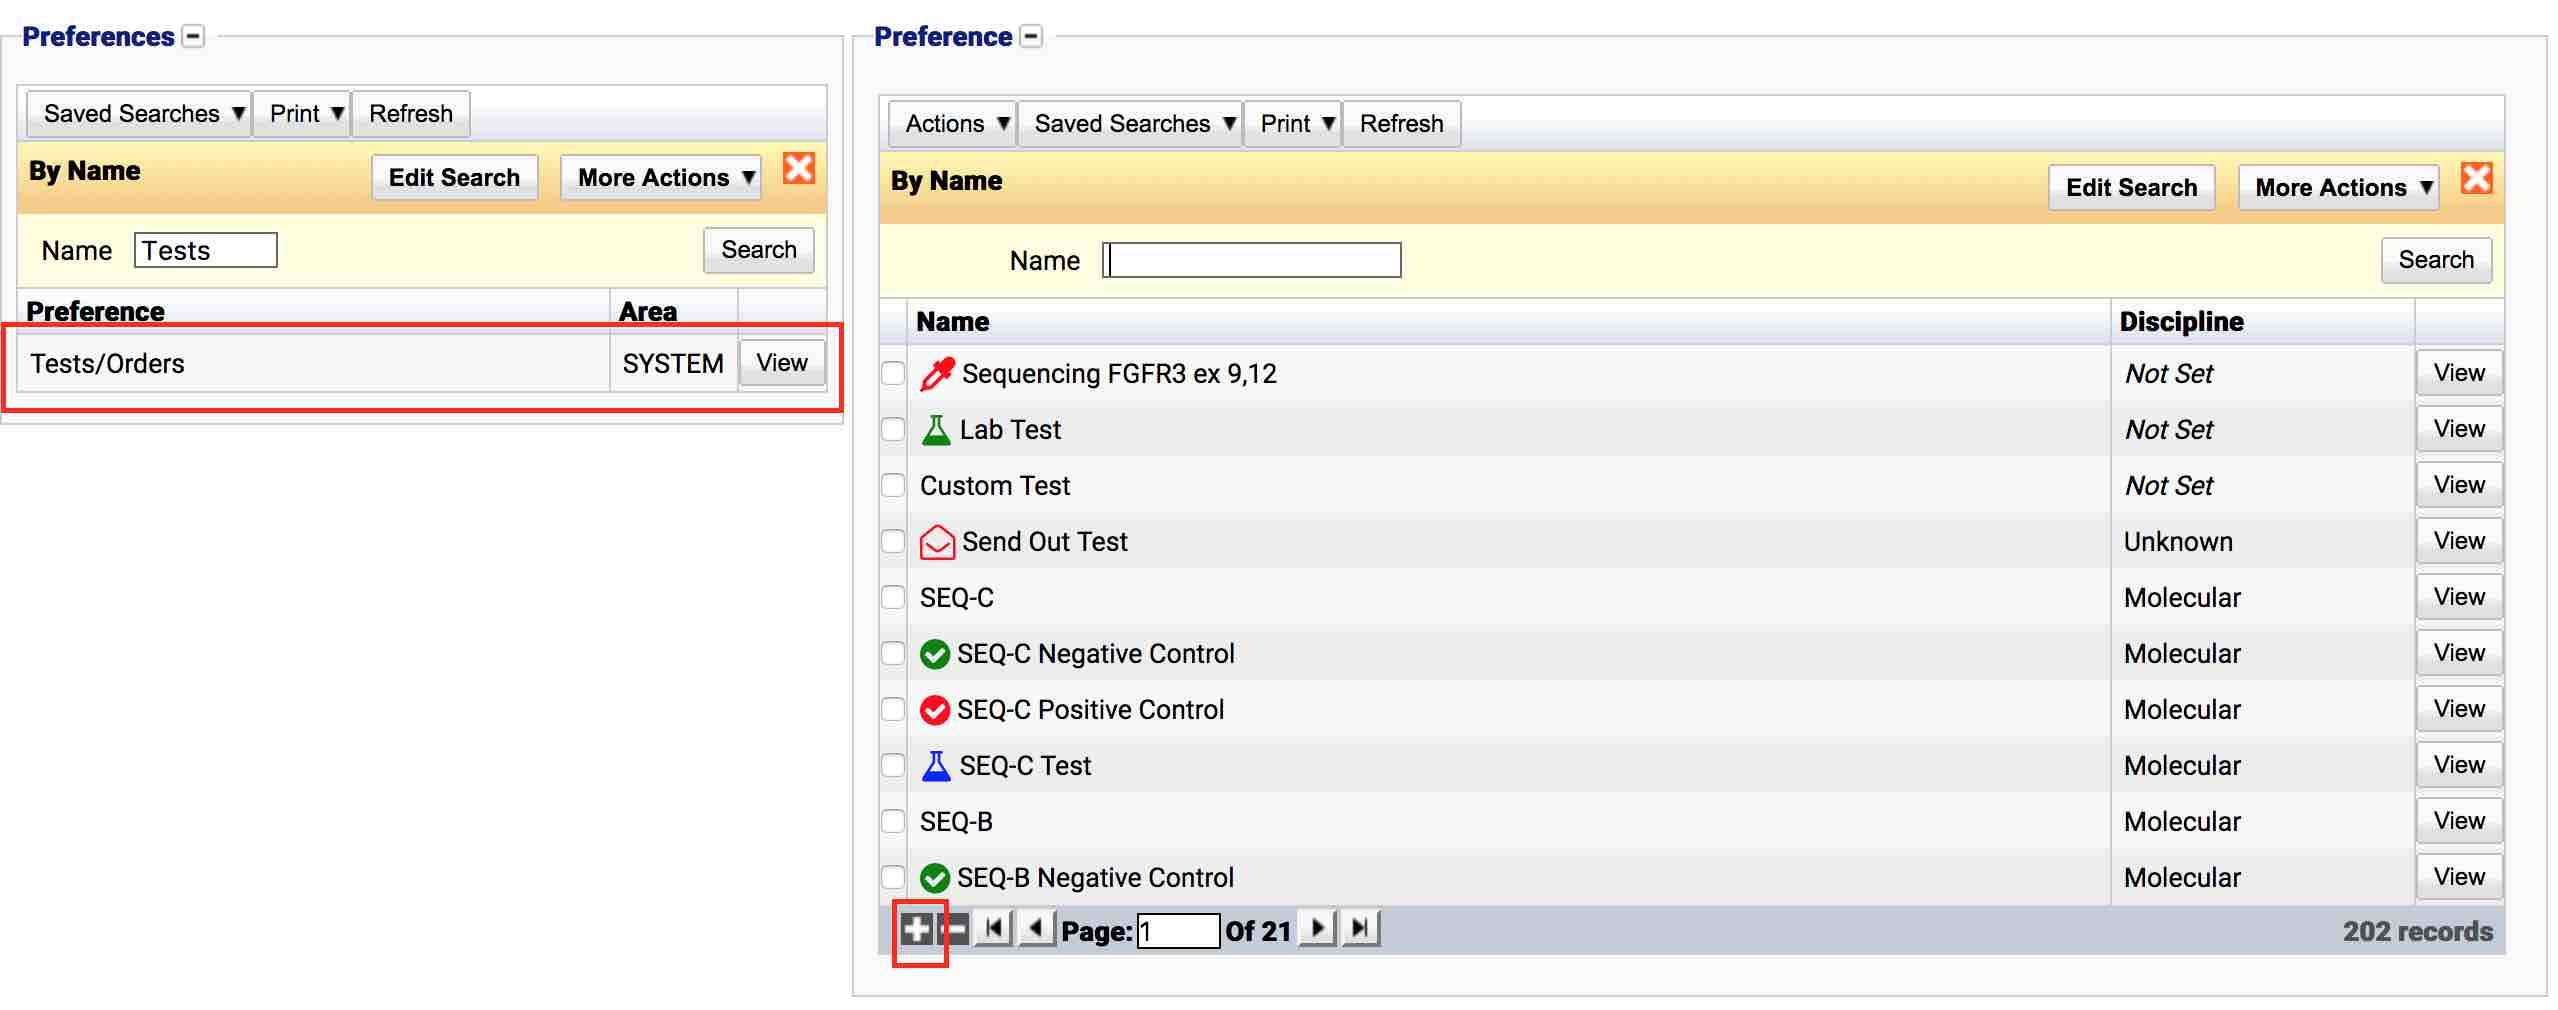
Now that the result types have been created, it’s time to create the new custom test and add the custom fields. Locate the Tests/Orders preferences in Administration -> Preferences -> Tests/Orders (See Test Preferences for more details about this preference) and select the + button to create a new test:
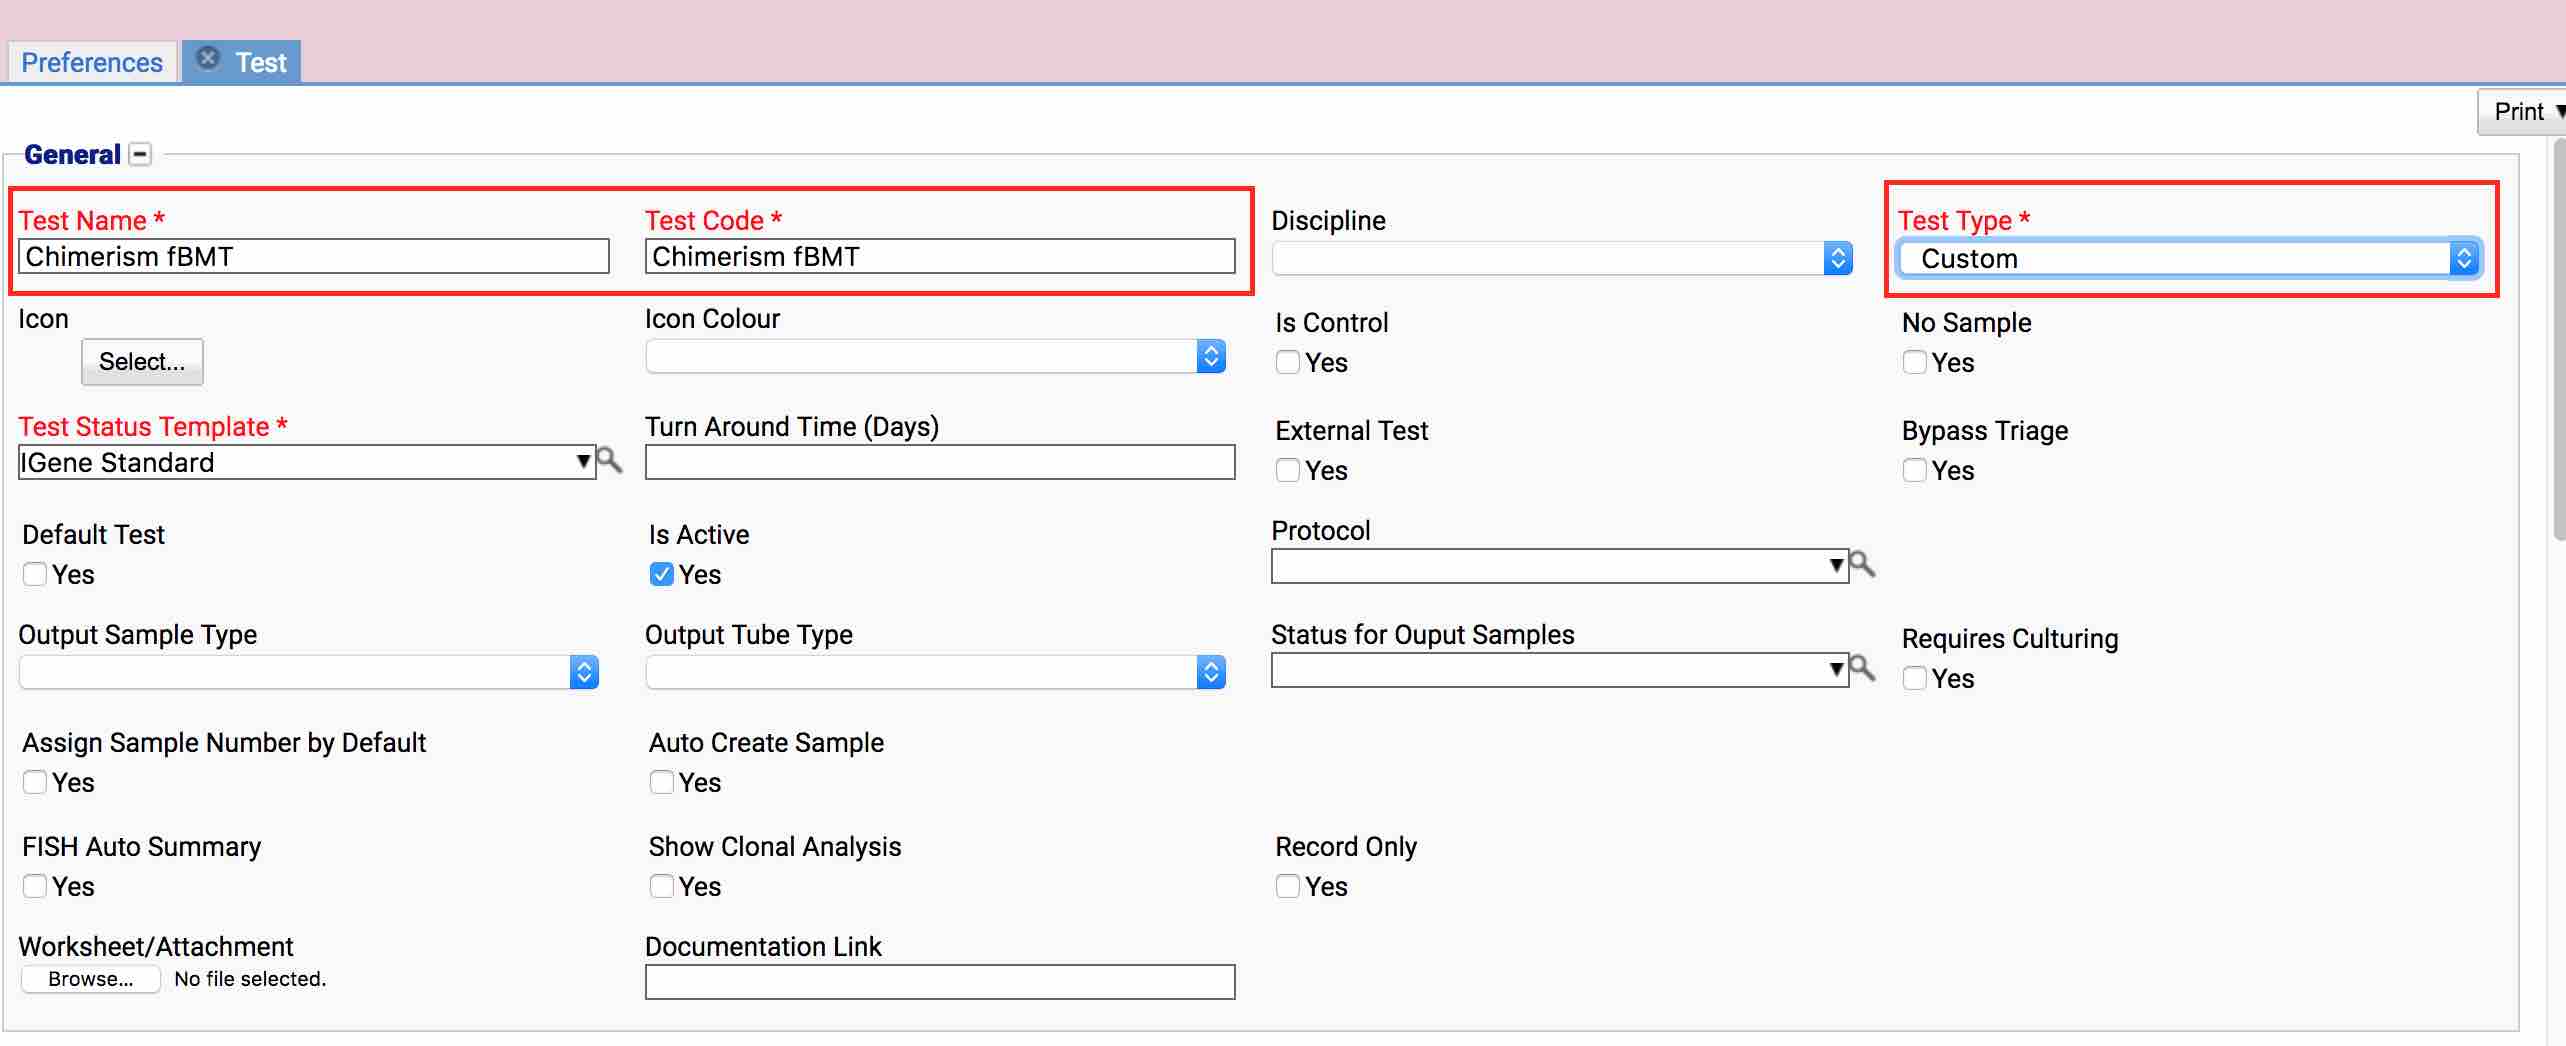
Choose a Name and Code for the test, e.g. Chimerism fBMT. For the Test Type choose Custom:
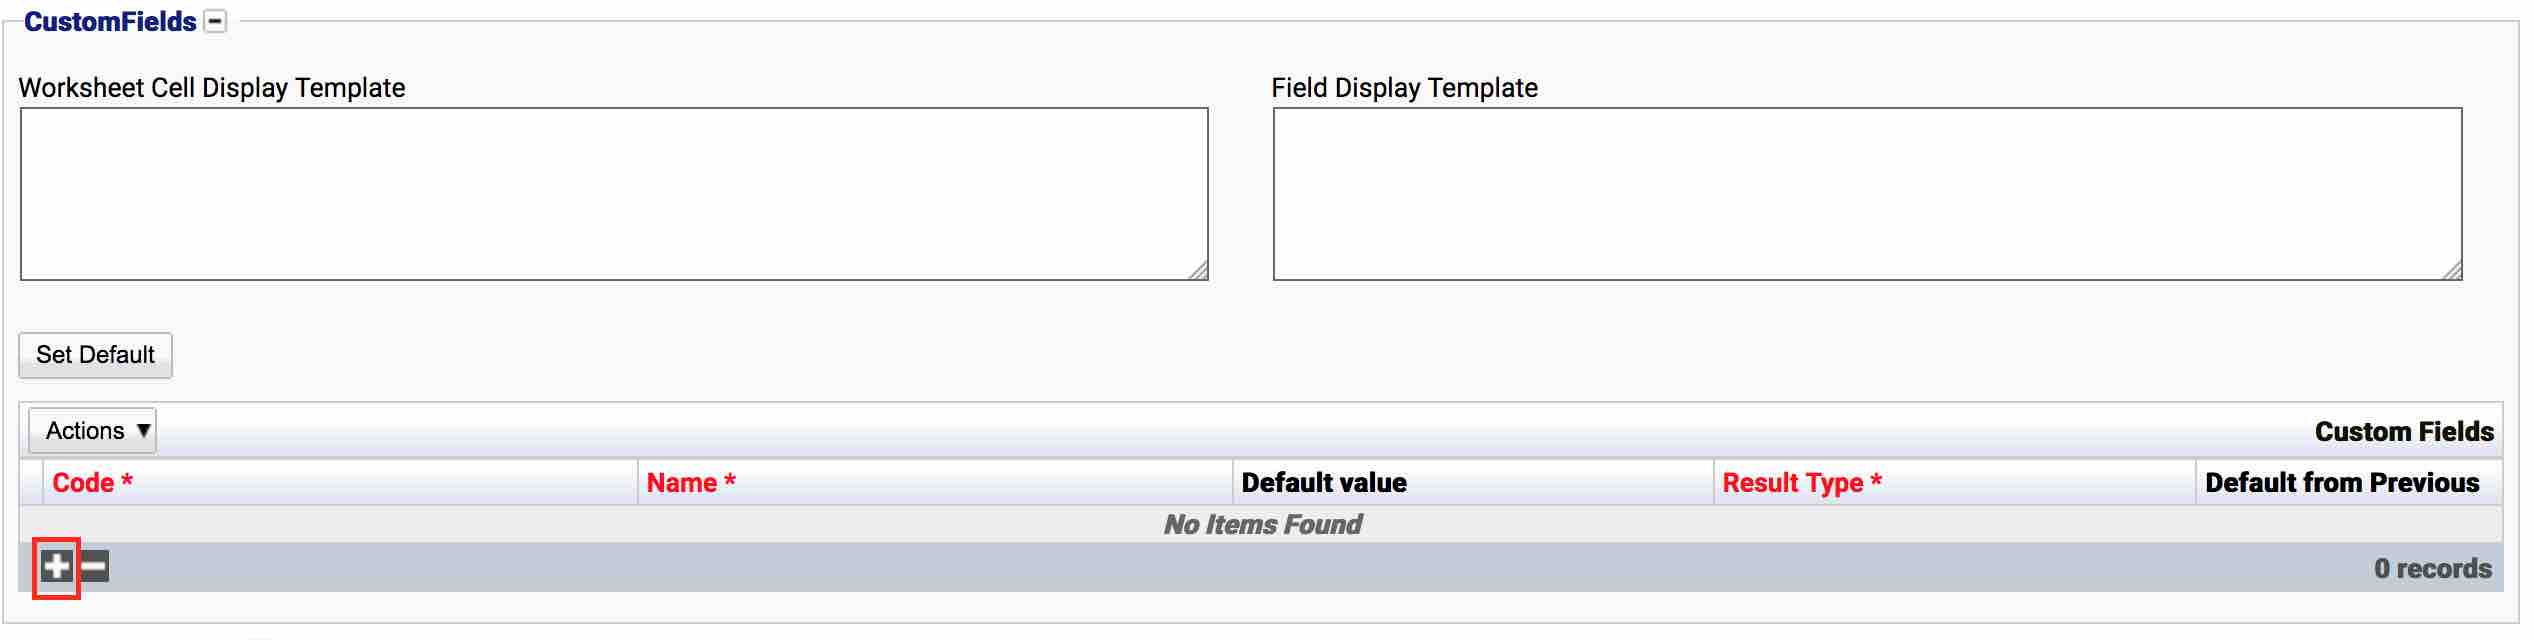
Scroll down to the CustomFields area. In this area, the custom fields and templates will be defined for the Chimerism Test. Select the + button at the bottom of the Custom Fields table:
To start, the field CD3 will be created. Specify the Code as CD3, the name as CD3 and the Result Type as Chimerism Marker which is the result type created earlier:


Add CD19 and CD15 using the same method. Ensure that each field is using the Chimerism Marker result type.

Next is the Comments field. This field will use the Comment result type created earlier:

The final field is the Score field. This field will use the Score result type created earlier:

Once the custom fields have been created, select Save to save the new test.
At this point, it is possible to use the test, however as shown below, none of the custom fields will be visible when viewing a result. This is because the display templates have yet to be defined, and therefore iGene does not know how to layout or display these fields:
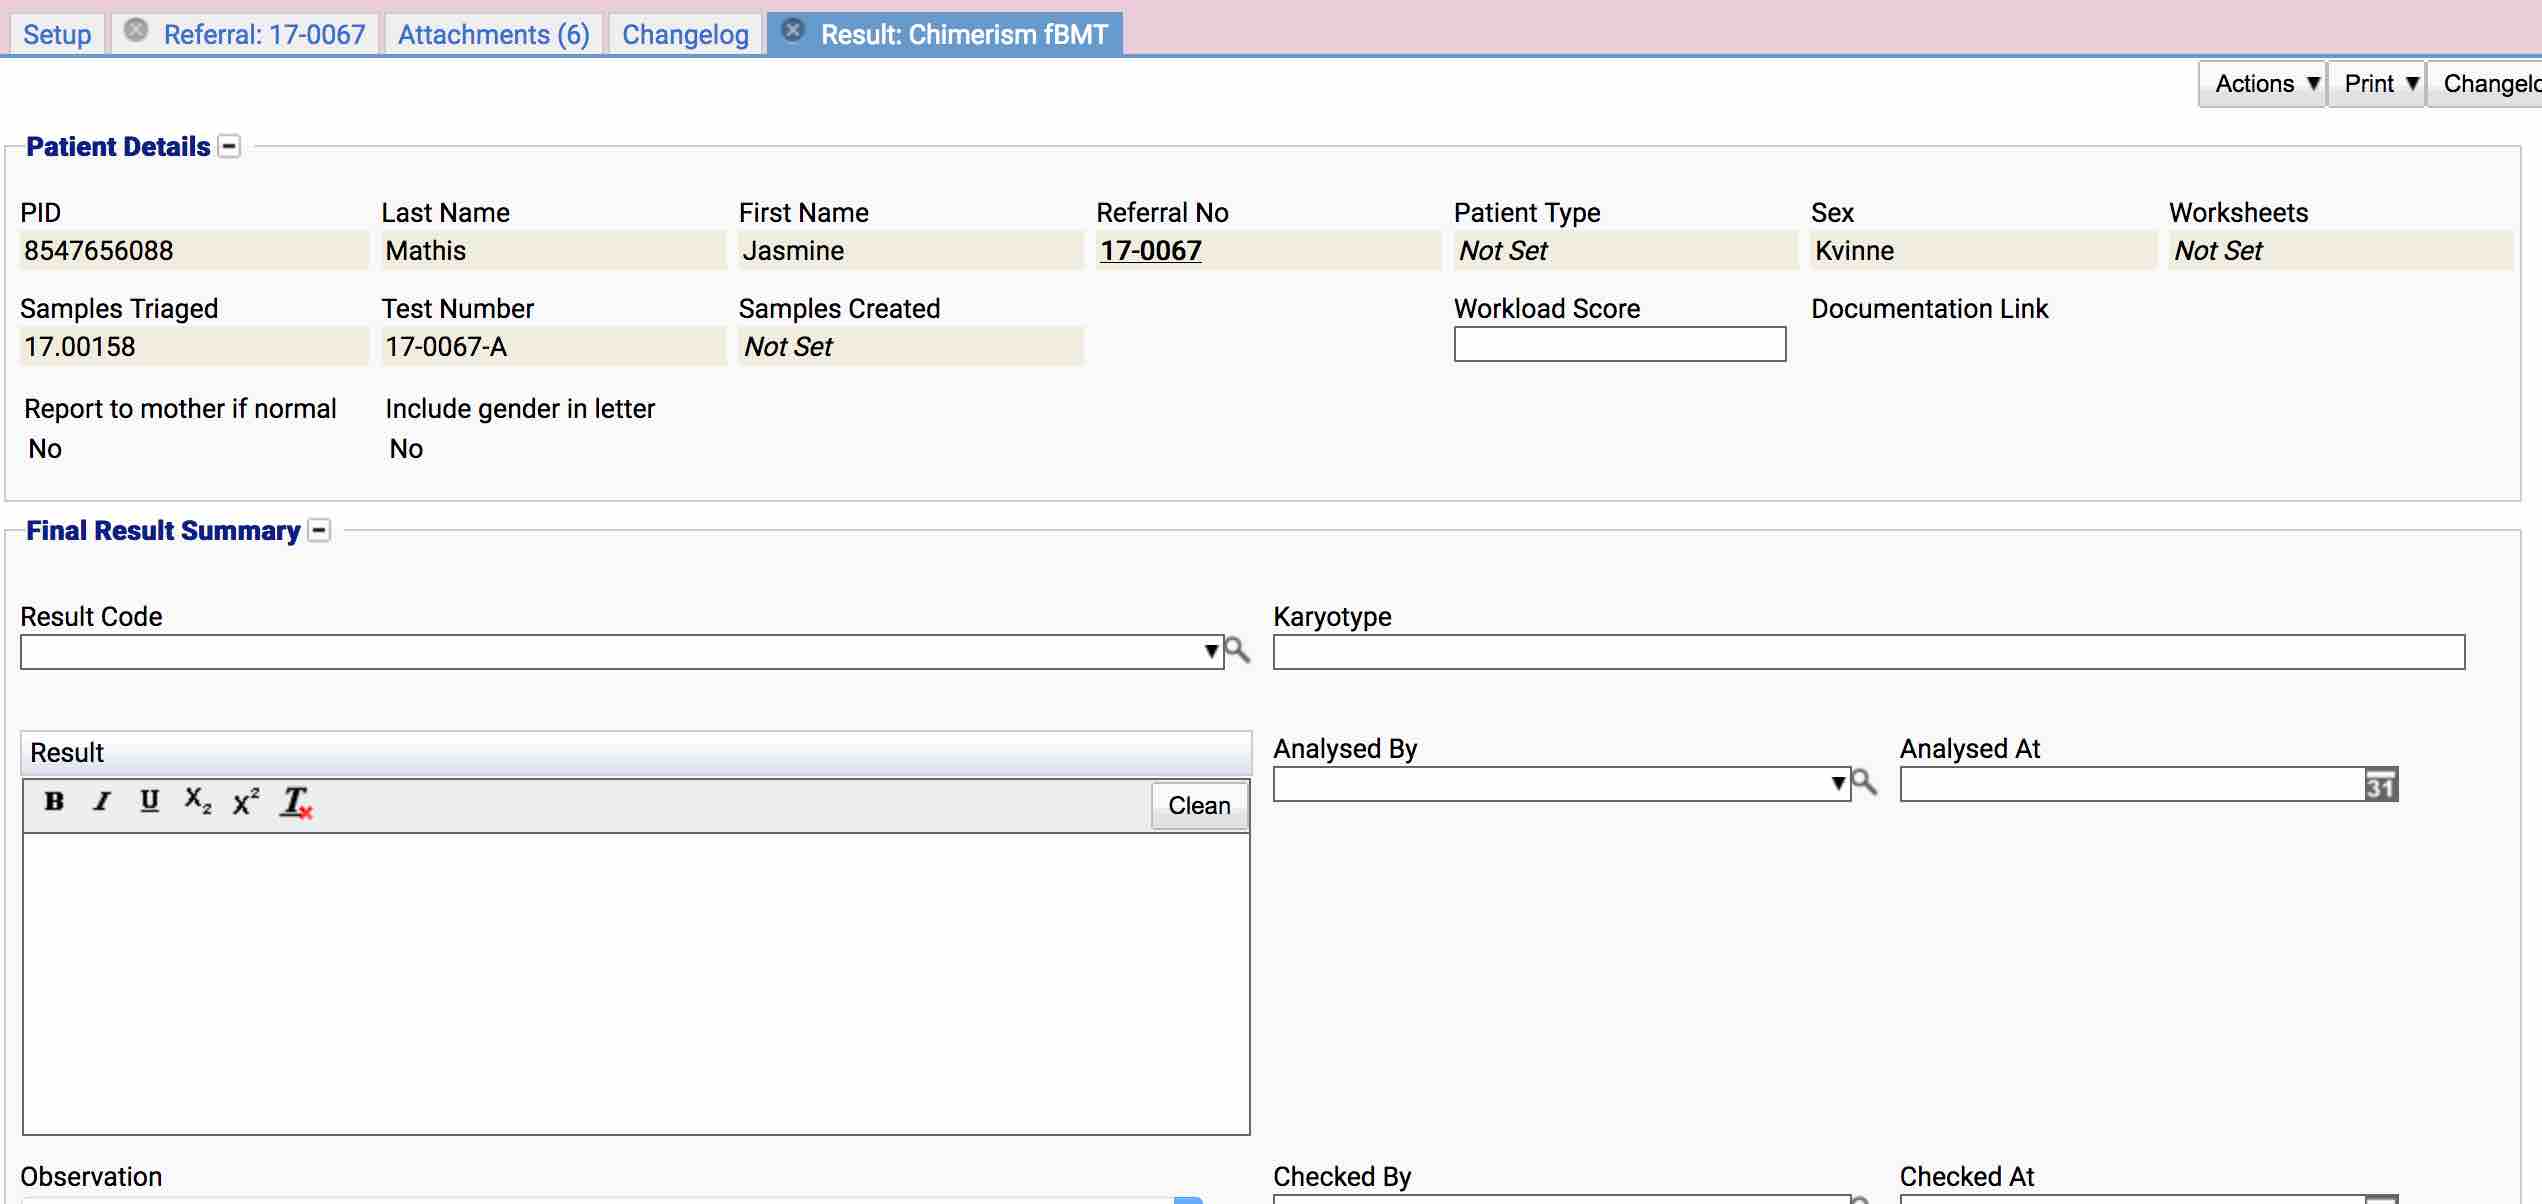
For the results screen, the following layout is required:
| Fraction | Marker |
|---|---|
| CD3 | CD3 Dropdown |
| CD19 | CD19 Dropdown |
| CD15 | CD15 Dropdown |
| Comments | Comments Field |
| Score | Score Field |
This uses two separate tables. The upper table contains 4 rows with 2 columns, and the bottom table uses 2 rows and 2 columns. In addition, the top table has a custom background colour.
For the first table, the following HTML is created:
<table>
  <tr>
    <th>Fraction</th>
    <th>Marker</th>
  </tr>
  <tr>
    <td>CD3</td>
    <td>${CD3}</td>
  </tr>
  <tr>
    <td>CD19</td>
    <td>${CD19}</td>
  </tr>
  <tr>
    <td>CD15</td>
    <td>${CD15}</td>
  </tr>
</table>
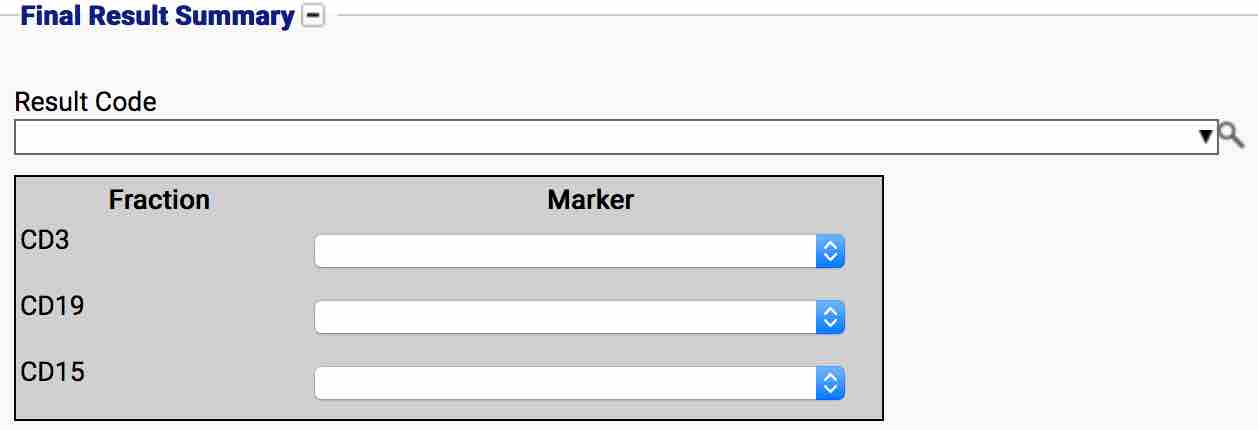
This shows that the top table will consist of 4 rows (tr). The first row contains two headers (th), followed by 3 separate rows for the CD3, CD19 and CD15 fields. This code produces the following result:

Although the table is displayed, it lacks the background colour and border in the original design, and appears too small. The template is updated to add some styling information and sizing to the table:
<table width="35%" style="border: 1px solid; background: #d0d0d0;">
  <tr>
    <th>Fraction</th>
    <th>Marker</th>
  </tr>
  <tr>
    <td>CD3</td>
    <td>${CD3}</td>
  </tr>
  <tr>
    <td>CD19</td>
    <td>${CD19}</td>
  </tr>
  <tr>
    <td>CD15</td>
    <td>${CD15}</td>
  </tr>
</table>
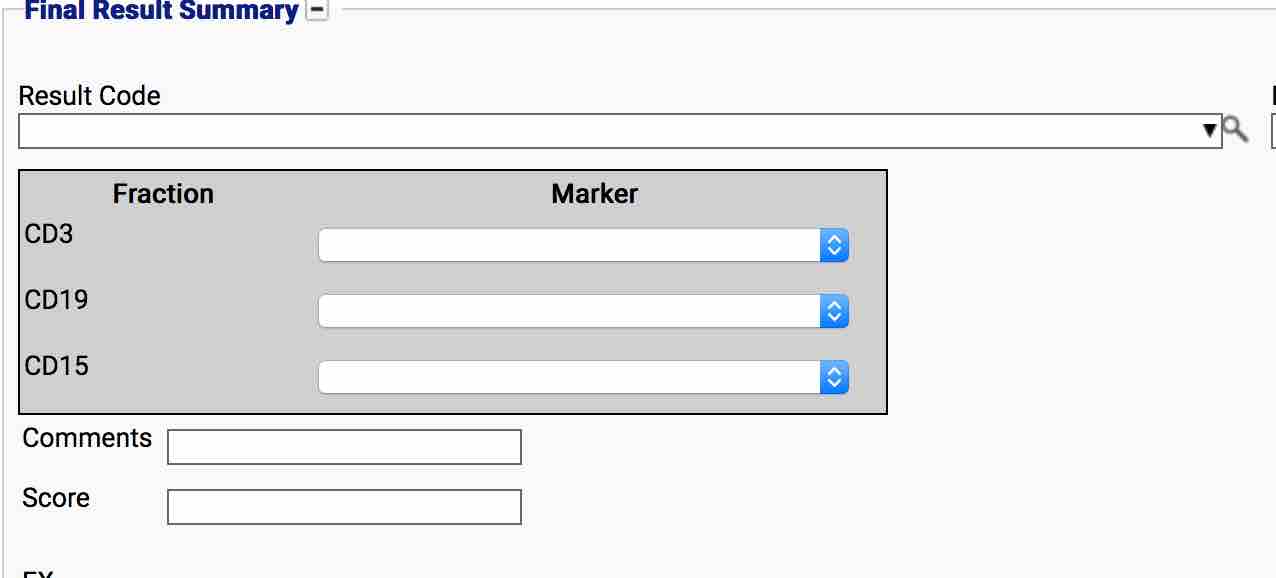
The style=“border: 1px solid; background: #d0d0d0;” property on the table indicates that it should have a solid black border which is 1 pixel wide and the background colour of the table should be a light grey colour #d0d0d0. This code produces the following result:
This now looks better. The second table for the comments and score is fairly simple. Adding this to the template produces the following result:
<table width="35%" style="border: 1px solid; background: #d0d0d0;">
  <tr style="border-bottom: 1px solid;">
    <th>Fraction</th>
    <th>Marker</th>
  </tr>
  <tr>
    <td>CD3</td>
    <td>${CD3}</td>
  </tr>
  <tr>
    <td>CD19</td>
    <td>${CD19}</td>
  </tr>
  <tr>
    <td>CD15</td>
    <td>${CD15}</td>
  </tr>
</table>
<table>
  <tr>
    <td>Comments</td>
    <td>${Comments}</td>
  </tr>
  <tr>
    <td>Score</td>
    <td>${Score}</td>
  </tr>
</table>
The fields are now displayed, however there are still two issues:
- The bottom table is using too little space. The Comments label is too close to the comments field.
- Both tables are too close together. In addition, the top table is too close to the Result Code field.
To resolve this:
- For the bottom table, give the table a width of approximately 50% so it takes up more space on the form.
- For the Comments td tag, specify a width of 25% for the label. This will leave 75% of space for the comments textbox.
- Insert some empty lines above and below table 1, and at the bottom of table 2 to add some extra padding. Using <pre> tags with new lines should achieve this.
The template is modified using the above points:
<pre>
</pre>
<table width="35%" style="border: 1px solid; background: #d0d0d0;">
<tr style="border-bottom: 1px solid;">
<th>Fraction</th>
<th>Marker</th>
</tr>
<tr>
<td>CD3</td>
<td>${CD3}</td>
</tr>
<tr>
<td>CD19</td>
<td>${CD19}</td>
</tr>
<tr>
<td>CD15</td>
<td>${CD15}</td>
</tr>
</table>
<pre>
</pre> 
<table width="50%">
<tr>
<td width="25%">Comments</td>
<td>${Comments}</td>
</tr>
<tr>
<td width="25%">Score</td>
<td>${Score}</td>
</tr>
</table>
<pre>
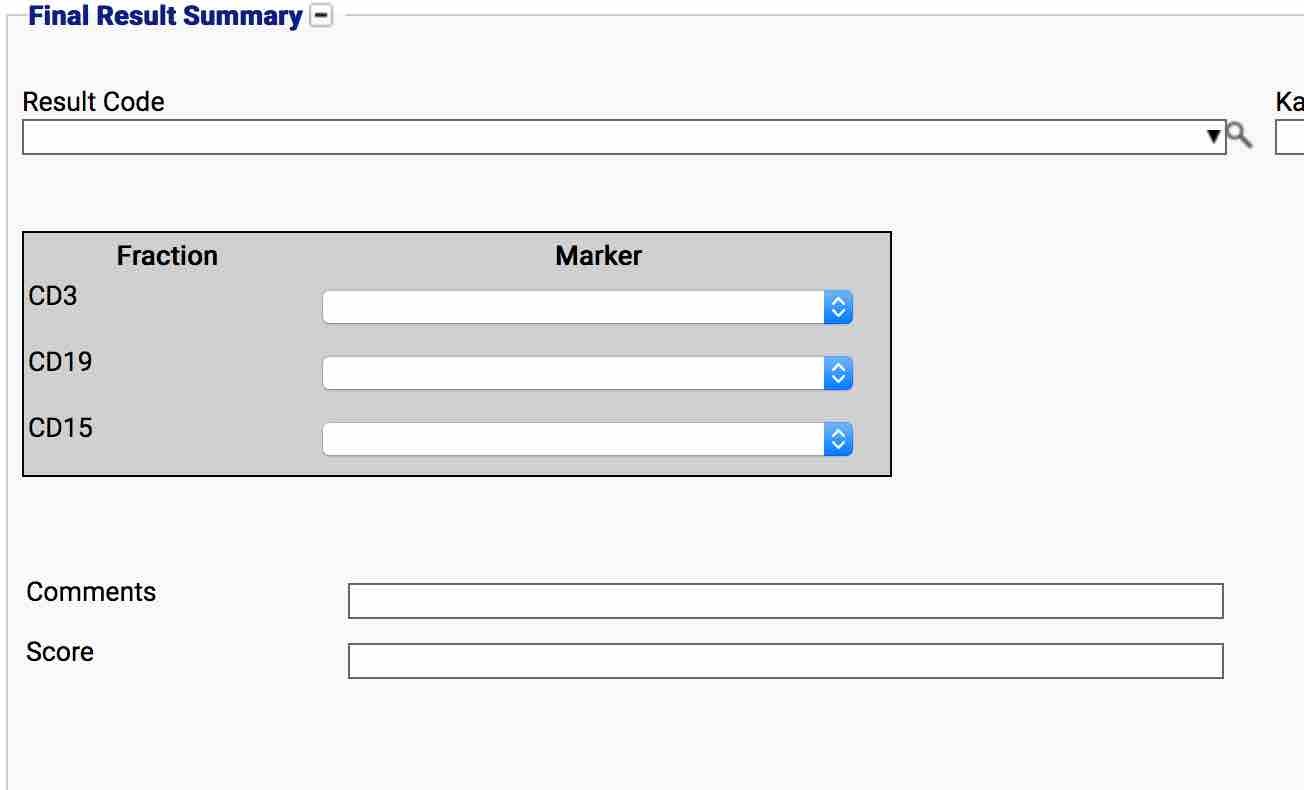
</pre>
This produces the following result screen which is close enough to the expected result:
The worksheet cell display template is a little easier to design. The laboratory staff decide that they would like to see the following fields in the worksheet cell when using this test:
- The test’s code
- The sample number (There should only ever be one sample triaged to this test)
- The unique test number
- The patient’s first pedigree number
They do not care for seeing the icon and would like to use the test’s code as it is smaller to display. Using the common variables table in (Worksheet Cell Display Templates) TODO, the following variables are chosen:
- ${test.code} The short code for the test.
- ${referralTestSampleTubes[0].sample.tubeNumber} The sample number of the first sample triaged to the test.
- ${testNumber} The unique test number.
- ${referral.patient.patientPedigrees[0].pedigree.number} The patient’s first pedigree number.
Each field should be on a separate line, therefore they’ll each be placed in their own <p> tags. The template is created as shown below:
<p>${test.code}</p>
<p>${referralTestSampleTubes[0].sample.tubeNumber}</p>
<p>${testNumber}</p>
<p>${referral.patient.patientPedigrees[0].pedigree.number}</p>
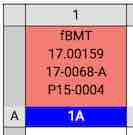
This produces the following worksheet cell:
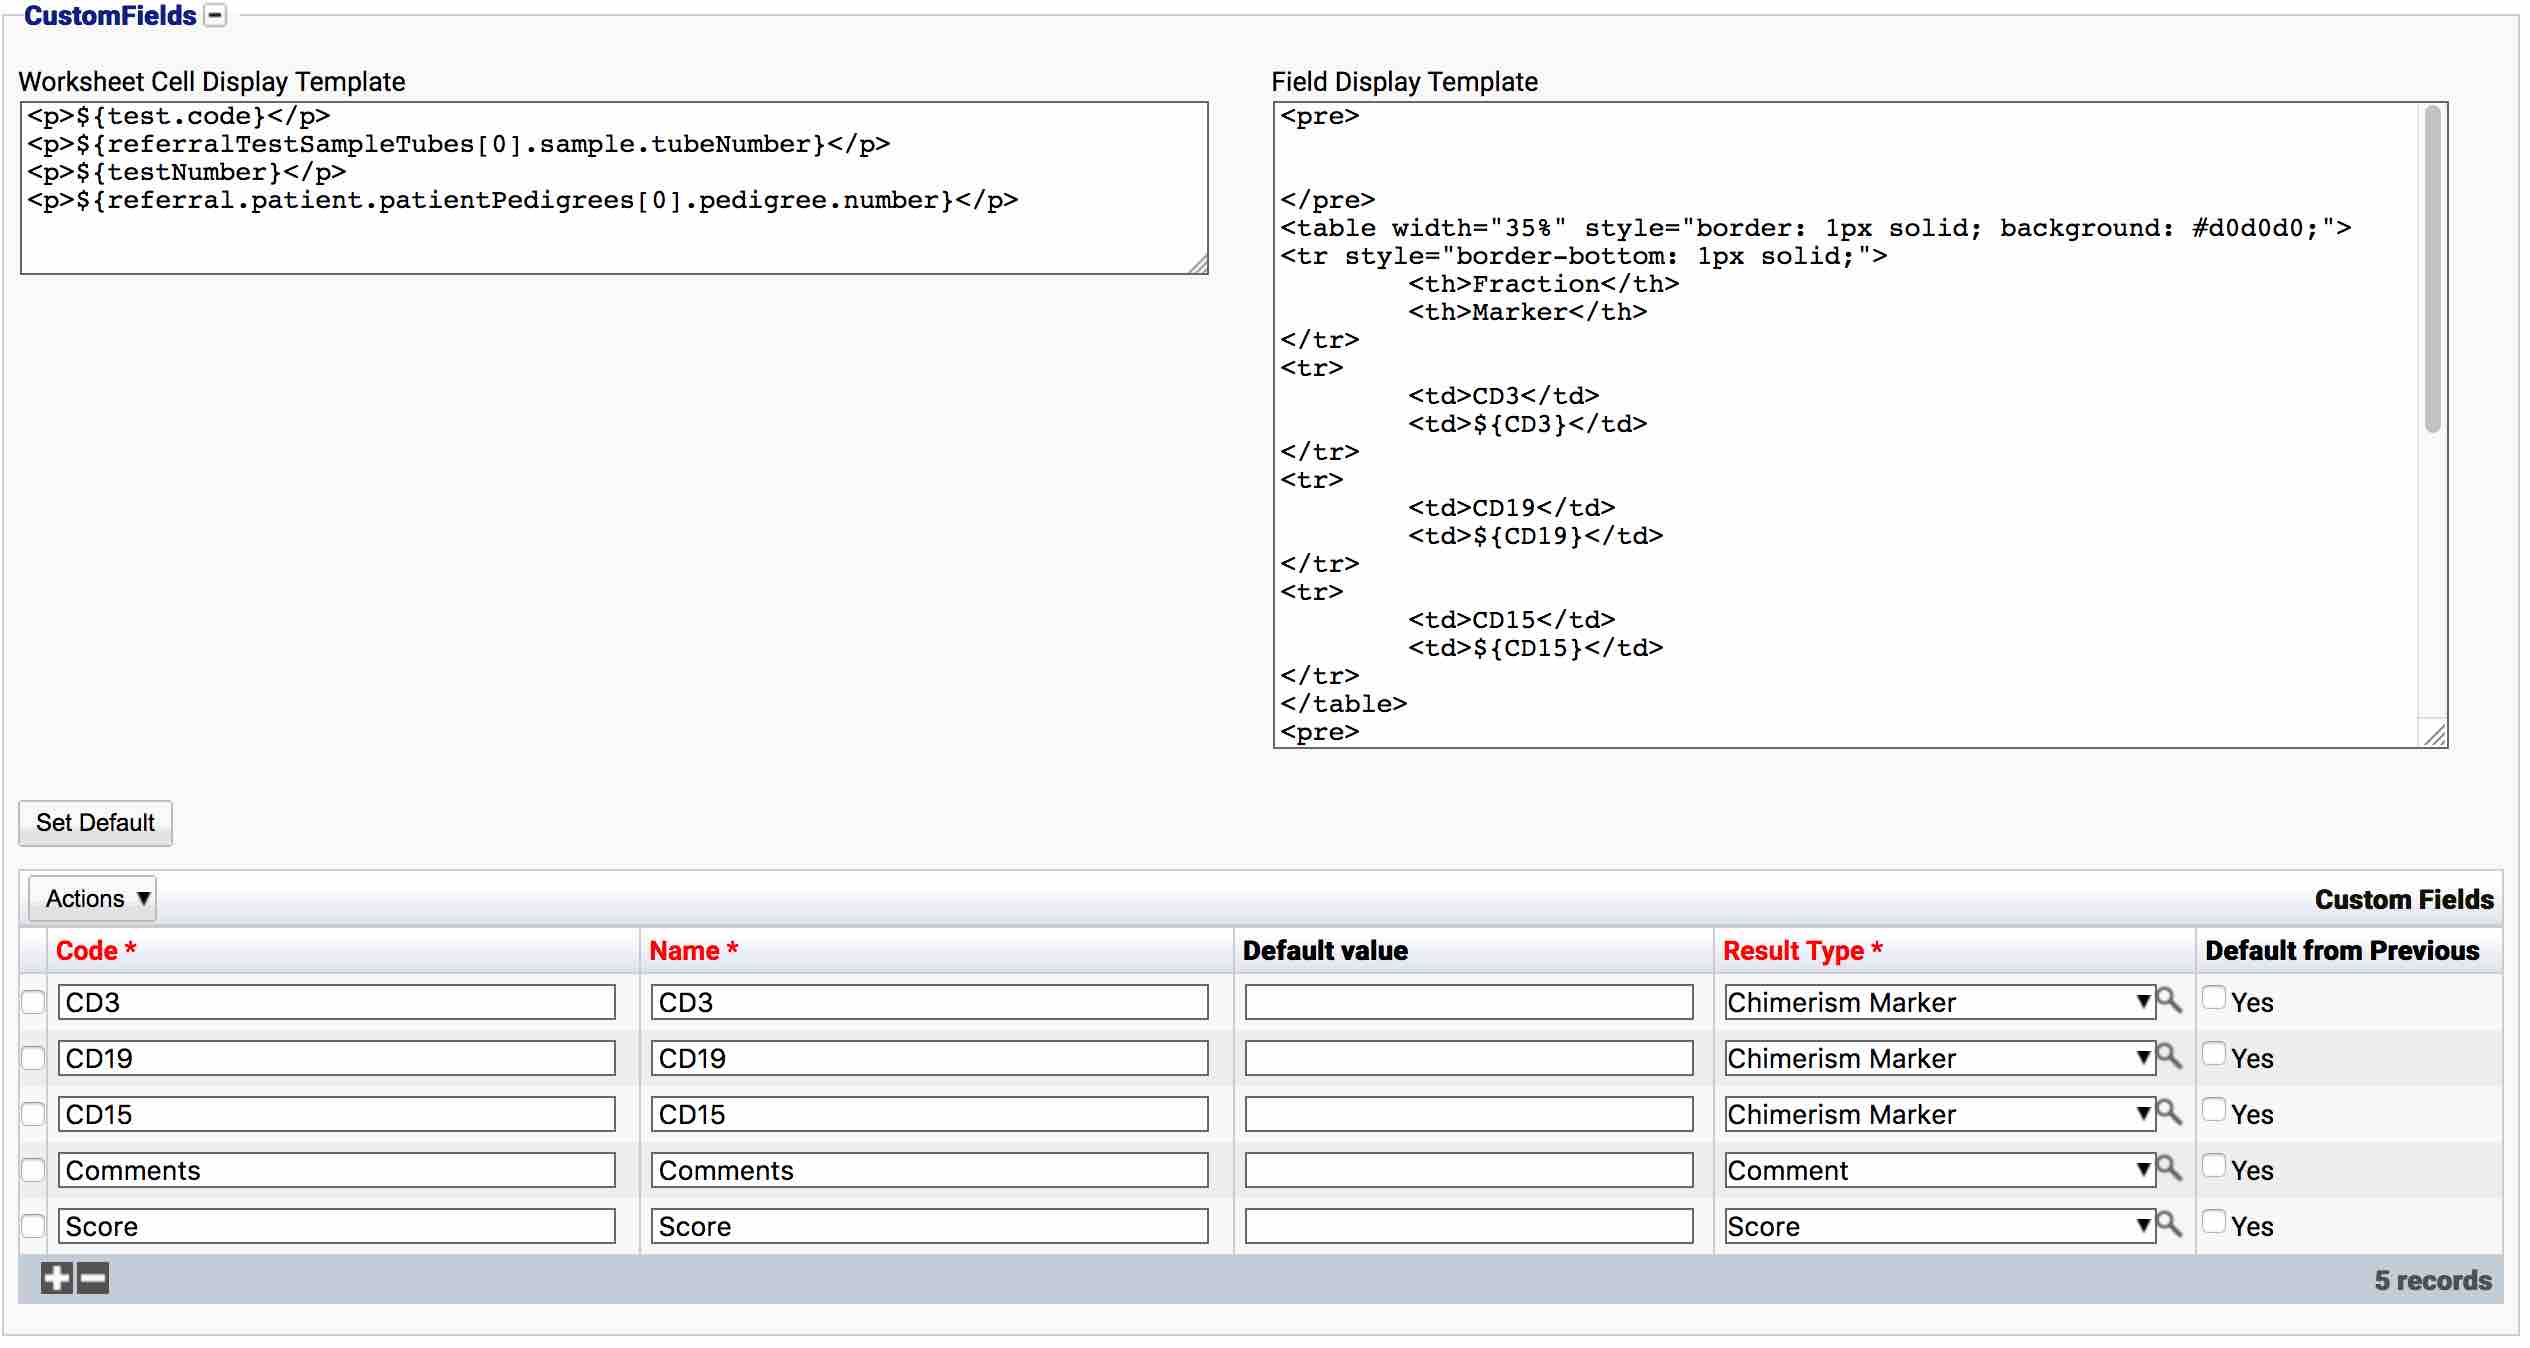
This displays the information as required by the laboratory staff. The final CustomFields field set is shown below, and the test is now ready to use: