Sample Storage
iGene is able to assign sample storage locations and track the movements of samples and storage containers within the application. The storage area is very configurable and this document should assist in setting up a basic sample storage process to expand on.
Key items in the sample storage process are:
- Containers - A container can be anything, it can be a fridge, a rack or a box. The idea is that it is something that takes either samples or other containers.
- Storage Policies - The storage policies are applied to containers to govern what items can be placed within them. Items such as the sample type and the sub sample type are typical values.
- Container Nomenclature - The numbering of containers is governed by the container nomenclature. This is set using the nomenclature preference screen.
Scripting
One of the key features of the sample storage area is the ability to run groovy scripts at certain stages of the storage process. These stages are:
- Container creation
- Sample Storage Allocation
- Sample Stored
- Sample Removed
At each of these points, the custom scripts allow endless possibilities. The groovy scripts in this document are examples only, most things are possible with a little imagination.
Concept
The main idea behind the changes to the sample storage area is to allow multiple dimensions of storage and facilitate the simple moving of samples en masse. A typical scenario is to move a container of samples from one fridge to another. Previously, iGene was limited to a single storage location with minimal history. The enhancements include allowing multiple dimensions of storage, whats inside a container as well of a history of where a sample is and was.
To explore the sample storage area in more detail, it is useful to consider a few scenario which might occur in a lab environment.
Setup
Container Templates
Container templates as the name implies are used to create new containers. For example, DNA storage containers are very much differently from your liquid nitrogen tanks. The container templates allow you to define such things as what should happen to a sample when it’s added. In the example of a liquid nitrogen tank, it would probably set the sample status to “Frozen in liquid nitrogen.”
Another example might be a -80 freezer used to migrate sample into the liquid nitrogen freezer. On adding as a sample, it might start a timer, via a workflow, to ensure the sample is moved in time avoiding sample deterioration.
Locate the Container Template Preference preference by:
In order to access the preferences area, a user must be a member of a role that has the Administration: Preferences and Administration menu permissions assigned.
- Navigate to Administration > Preferences.
- Find Container Template Preference in the table and click View by either:
- Navigating through the Preferences table until the Container Template Preference is found.
- Performing a search using an existing saved search for Name = Container Template Preference.
- Performing a search using a newly created search. See the searching guide for information on how to create searches.

To add a new container template preference, click the + button on the table. The user will then see the following screen:
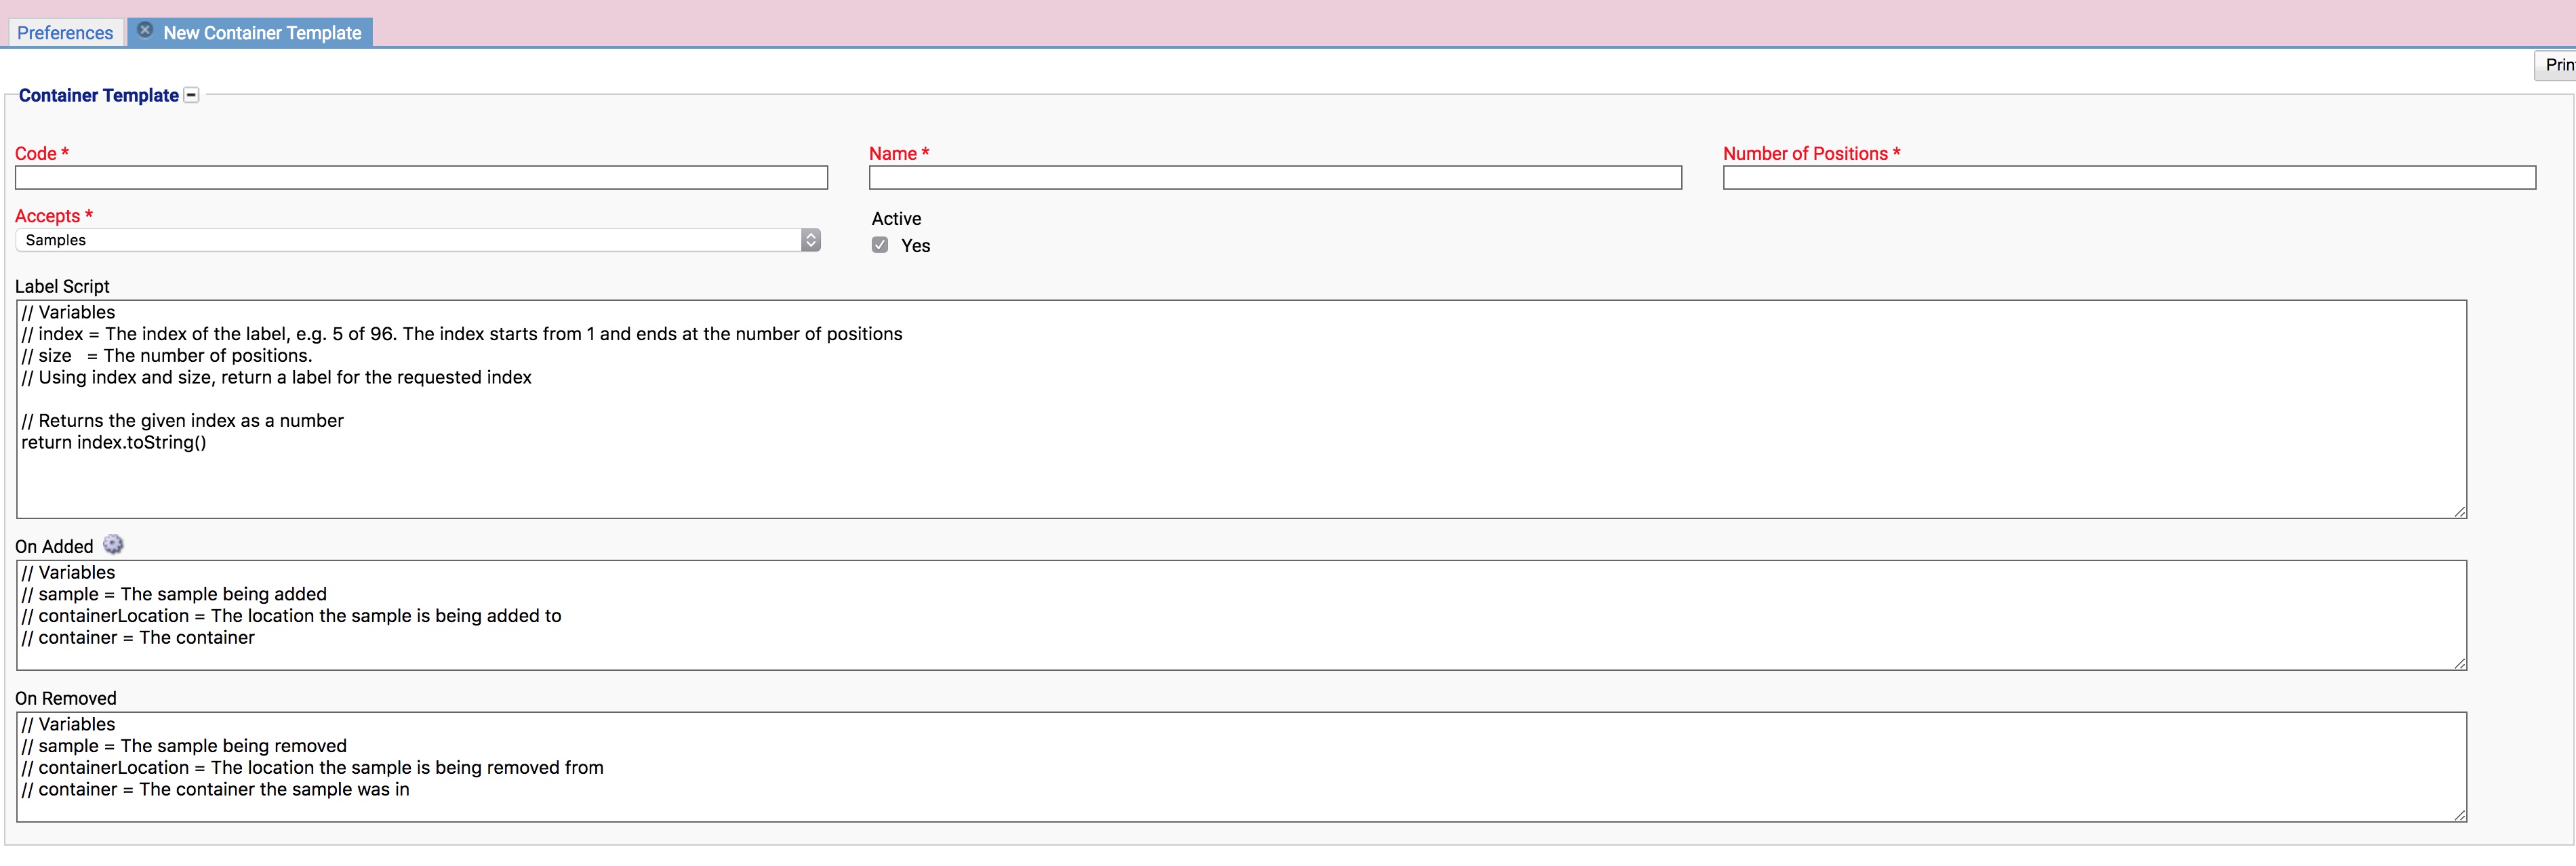
The following is a description of the fields:
- Code (Required) - A unique code for the container template.
- Name (Required) - A name for the container template.
- Number of Positions (Required) - The number of positions in the container. This could be 4 for a fridge with 4 shelves or 96 for a box for DNA samples.
- Accepts (Required) - A drop down list of either:
- Samples - Can accept samples Only
- Containers - Can accept other containers. Such as a fridge can accept racks of samples.
- Active - Checkbox to say if the container template is active or not.
- Label Script - Used to name each position in the container, for example “Shelf 1” or “A7”. Example scripts are listed below.
- On Add - A script to run each time something is added to the container. This could be to set the sample status as ‘In Fridge X’. Example scripts are listed below.
- On Remove - A script to run each time an item is removed from the container. This could be to set the sample status to be ‘Removed From Container X’. Example scripts are listed below.
Sample Storage Policies
Samples are assigned to locations automatically if the option is selected under the sample type preferences. If this is selected then iGene will search through the available sample storage policies until it finds one that matches. The application will used the first one found, the user must be careful not to overlap sample storage policies. e.g. Don’t have 2 policies with DNA only as the sample type, as the application will pick the first one. Ordering of these policies is performed using the weight option in the preferences, where the lower the weight, the earlier it is checked. This allows the ordering of policies.
It is a good rule to order policies from specific (with a lower weight so run first), to more generic (higher weight so run last), to avoid issues of items in the wrong location.
Locate the Sample Storage Policies preference by:
In order to access the preferences area, a user must be a member of a role that has the Administration: Preferences and Administration menu permissions assigned.
- Navigate to Administration > Preferences.
- Find Container Template Preference in the table and click View by either:
- Navigating through the Preferences table until the Sample Storage Policies preference is found.
- Performing a search using an existing saved search for Name = Sample Storage Policies.
- Performing a search using a newly created search. See the searching guide for information on how to create searches.

To add a new sample storage policy, click the ‘+’ button on the table. The user will then see the following screen:
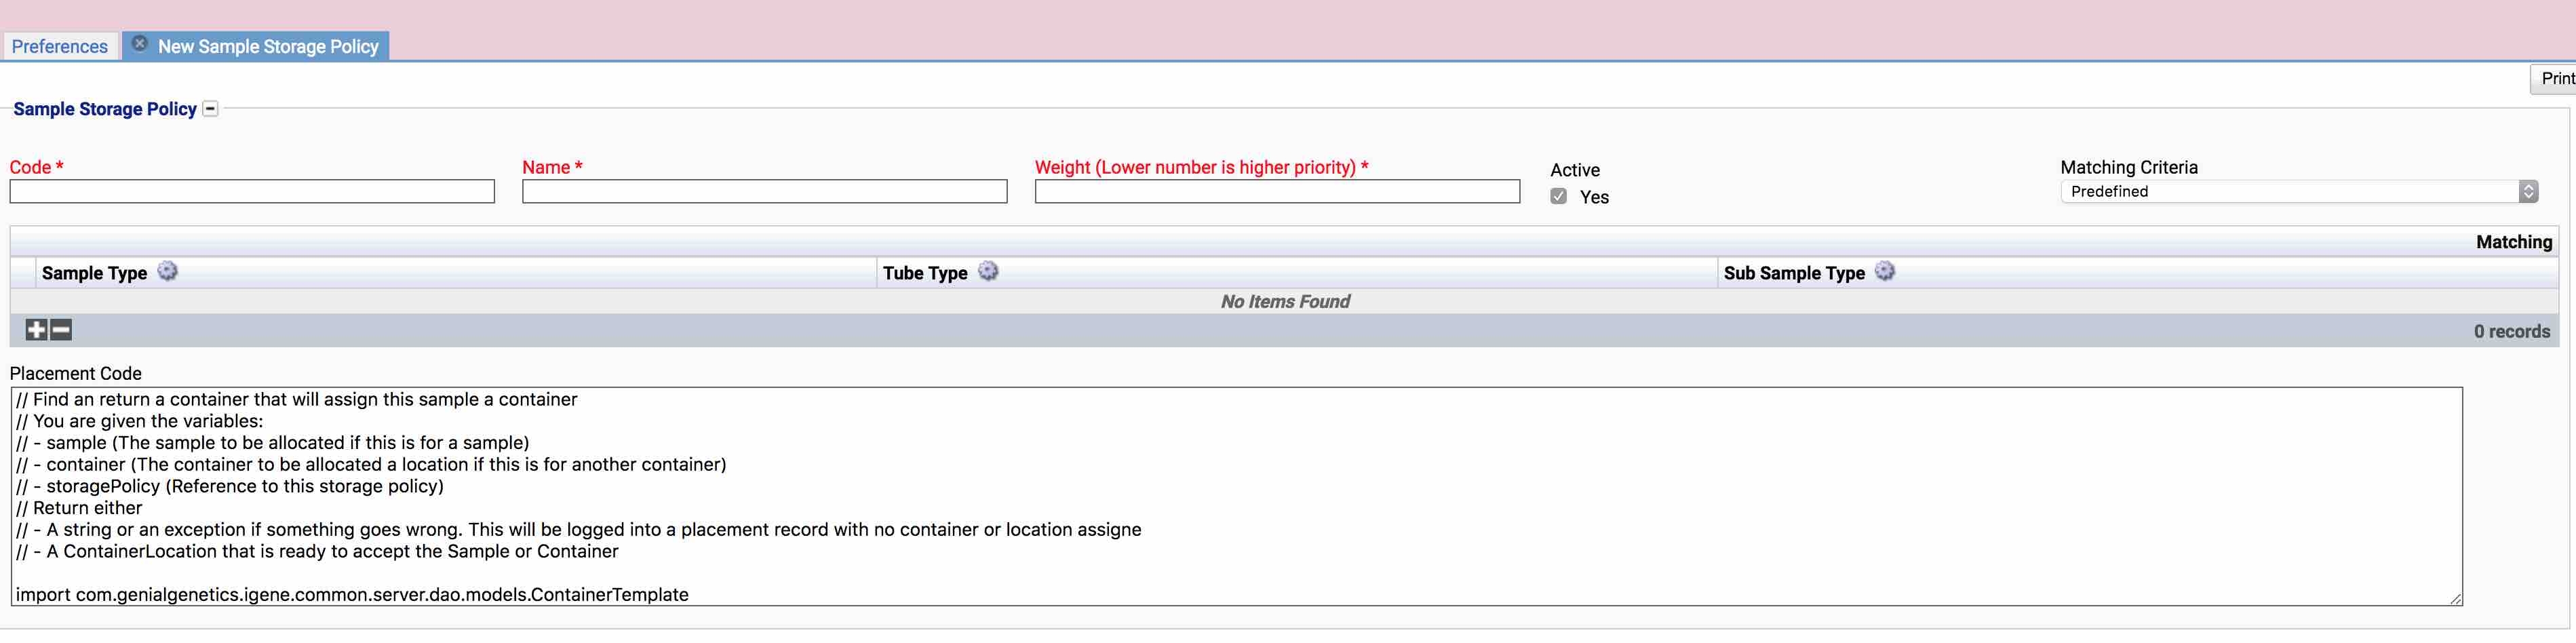
The following is a description of the fields:
- Code (Required) - A unique code for the sample storage policy
- Name (Required) - A name for the sample storage policy.
- Weight (Required) - The weight of a storage policy governs when it is ran in relation to other policies. The lower the number, the earlier it will be evaluated. It is a good rule to order the storage policies by the most specific at the start to the more generic at the lower end of the weighting.
- Active - Toggle if the sample storage policy is active or not.
- Matching Criteria - This is the criteria which is used to match the sample. Based on what is selected using this drop down will depend if the table for the criteria is displayed or the option to enter a ‘WHERE clause’ for an HSQL query is used. This can be either:
- Predefined - Specifying which sample can be placed using the storage policy by ‘Sample Type’, ‘Tube Type’ and/or ‘Sub Sample Type’. Clicking the ‘+’ to add a new row to the table and set the options there.
- HSQL - The aim of the HSQL option is to allow the user to set a ‘WHERE’ clause for the query to select which policy to use. Note that this is for advanced use and it is advisable to contact Genial support before using this option.
- Placement Code - The code executed when a sample which matches is search for a new storage location. This alows a large degree of flexibility. For example it may check there is avalible space in a container and if not, create a new container. Examples of scripts which can be ran are listed below.
Container Nomenclature
New containers can either be manually named, or auto generated based on what has been defined within the Container # Nomenclature. The Container # nomenclature is located under the Administration > Preferences area of iGene.
In order to access the preferences area, a user must be a member of a role that has the Administration: Preferences and Administration menu permissions assigned.
- Navigate to Administration > Preferences.
- Find Nomenclature in the table and click View by either:
- Navigating through the Preferences table until the Nomenclature preference is found.
- Performing a search using an existing saved search for Name = Nomenclature.
- Performing a search using a newly created search. See the searching guide for information on how to create searches.

Scroll to the Nomenclature preference of Container # and click View. The user will then see the following screen where the nomenclature can be defined by adding new Compositions. Either click the + button at the bottom of the table of select New Composition from the Actions menu.

The following is a description of the fields:
- Seq# (Auto Allocated) - the order in which the compositions run to build the new Container #
- Content (Required) - The following content can be applied to make up the Container # nomenclature:
- Autonumber - Padding Zeros - Returns a sequential number for each new container created, regardless of the proceeding content.
- Container Template Code - The value assigned to the Code field for a particular Container Template (within Container Template preferences)
- Base 34 Number (No I or O) - Returns the next sequential number based on the Base 34 numeral system
- Custom Date Generator - Generates a custom date
- Day of the Month (DD) - Returns the current day of the month in the format (dd)
- Autonumber (grouped by proceeding) - Returns a sequential number for each new container created, grouped by the proceeding content. The length of which is specified in the Length field
- Autoletter (grouped by proceeding) - Returns a sequential letter for each new container created, grouped by the proceeding content. The length of which is specified in the Length field
- Autonumber (grouped by proceeding excluding first character) - Returns a sequential letter for each new container created, grouped by the proceeding content excluding the first character. The length of which is specified in the Length field
- Month MM - Returns the current month in the number format (01 - 12)
- Month MMMM - Returns the current month in text format (January - December)
- Text - Return a static string of text as listed in the Value field
- Year YY - Returns the current year in short number format (eg 18)
- Year YYYY - Returns the current year in long number format (eg 2018)
- Reset Counter Annually - For autonumber content, if checked the the counter will be reset annually
As compositions are added, examples of the output can be seen. Click Save to apply the changes.

Container Creation
Once the storage policy and the container template have been setup, it is now possible to create a container to hold the samples or other containers. To create a container:
- Click on ‘Sample Management’
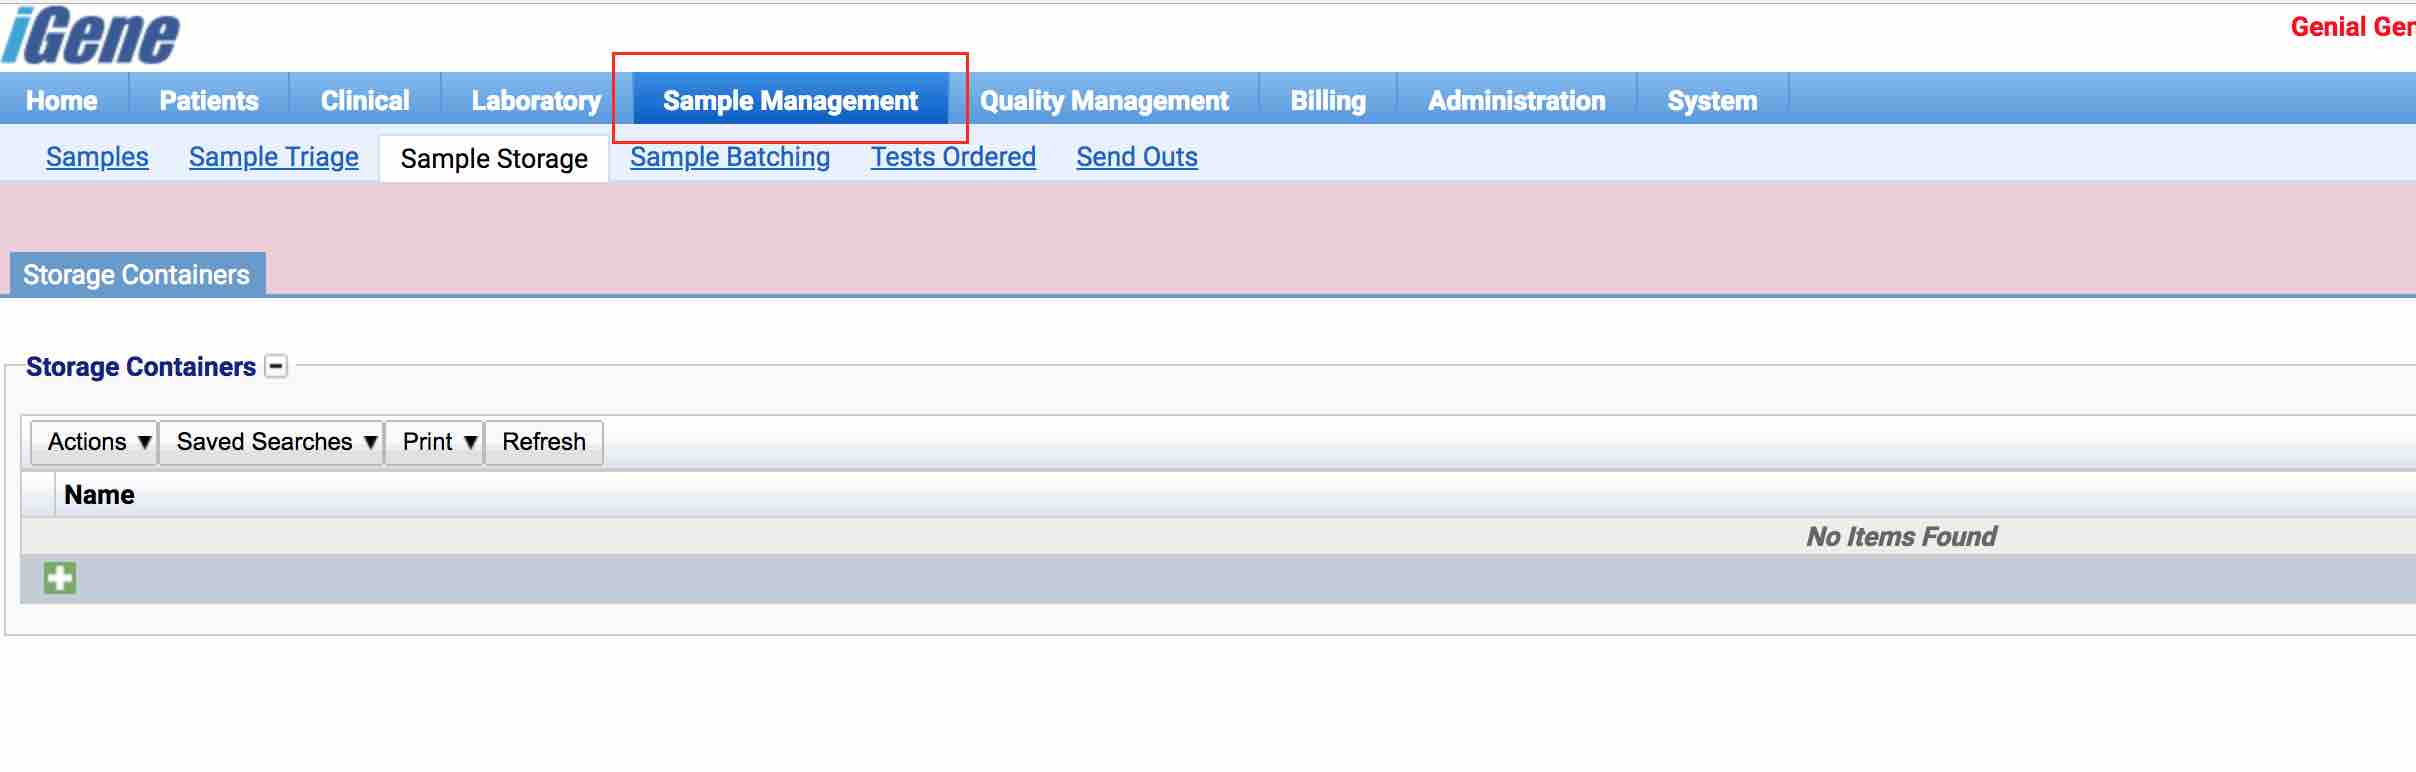
- Select ‘Sample Storage’
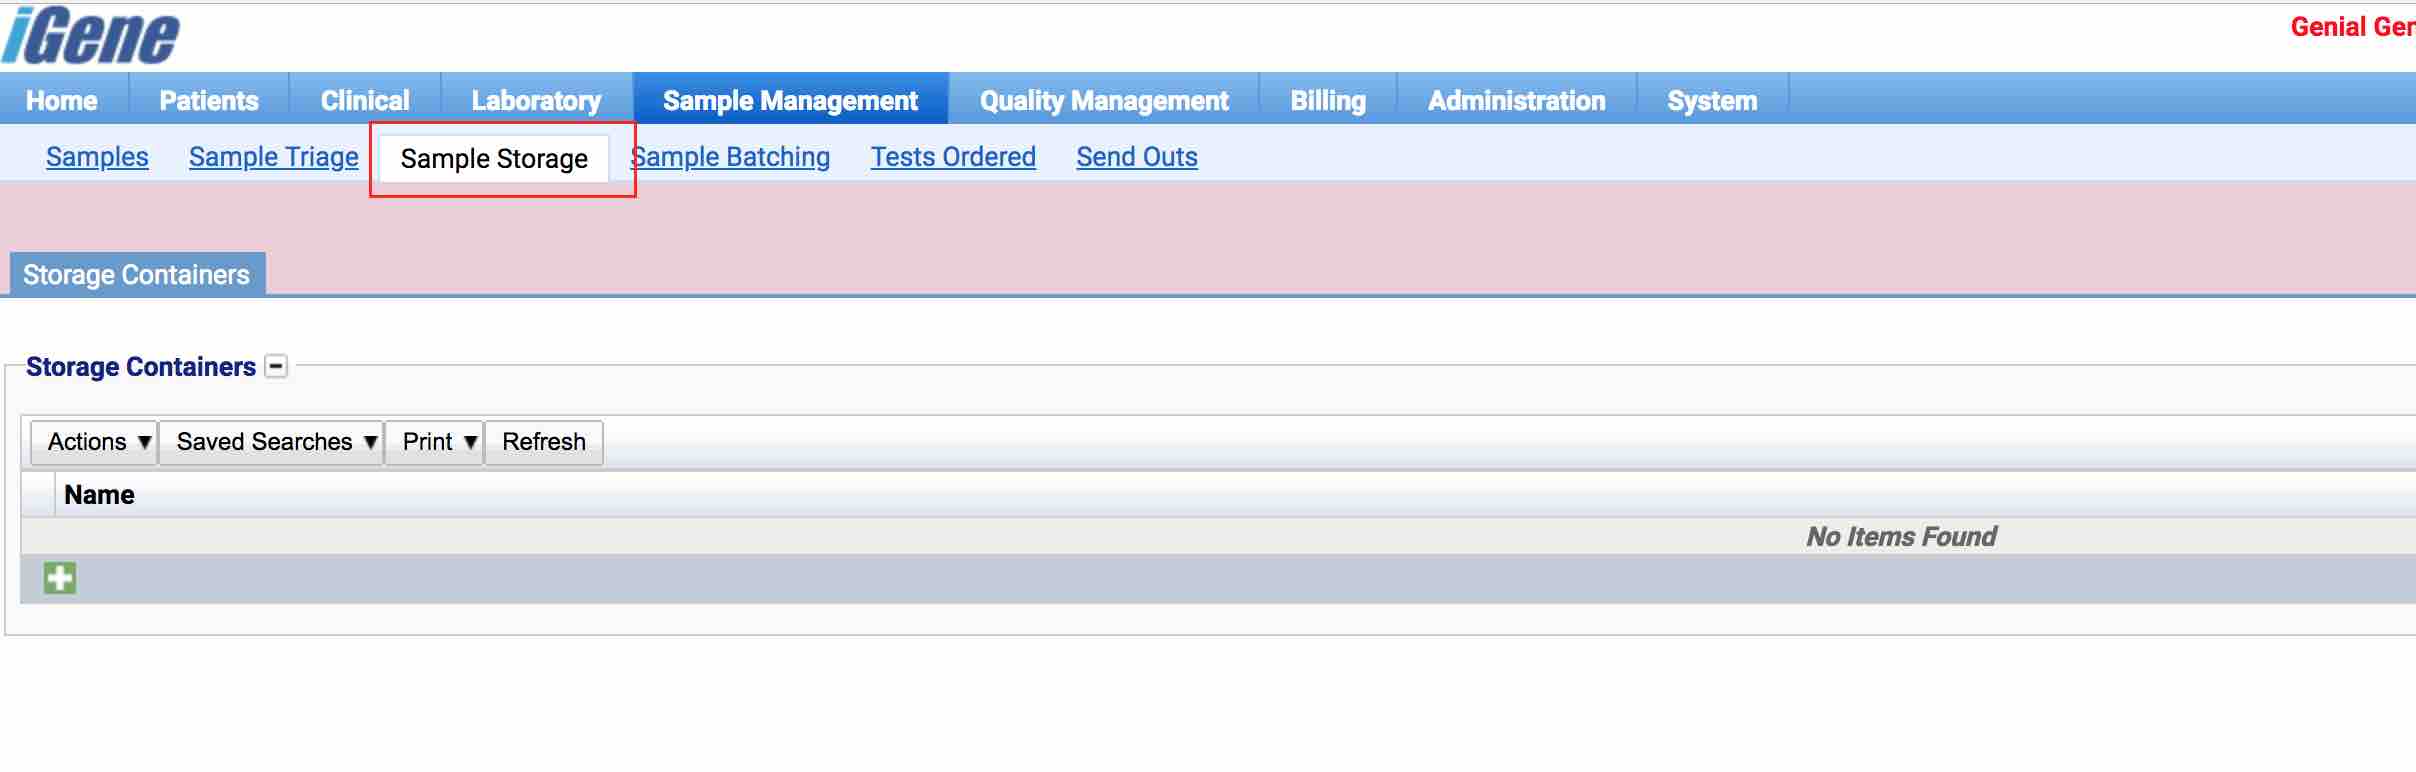
- Add a new item by clicking the ‘+’ or clicking ‘Actions’ and selecting ‘New Storage Container’
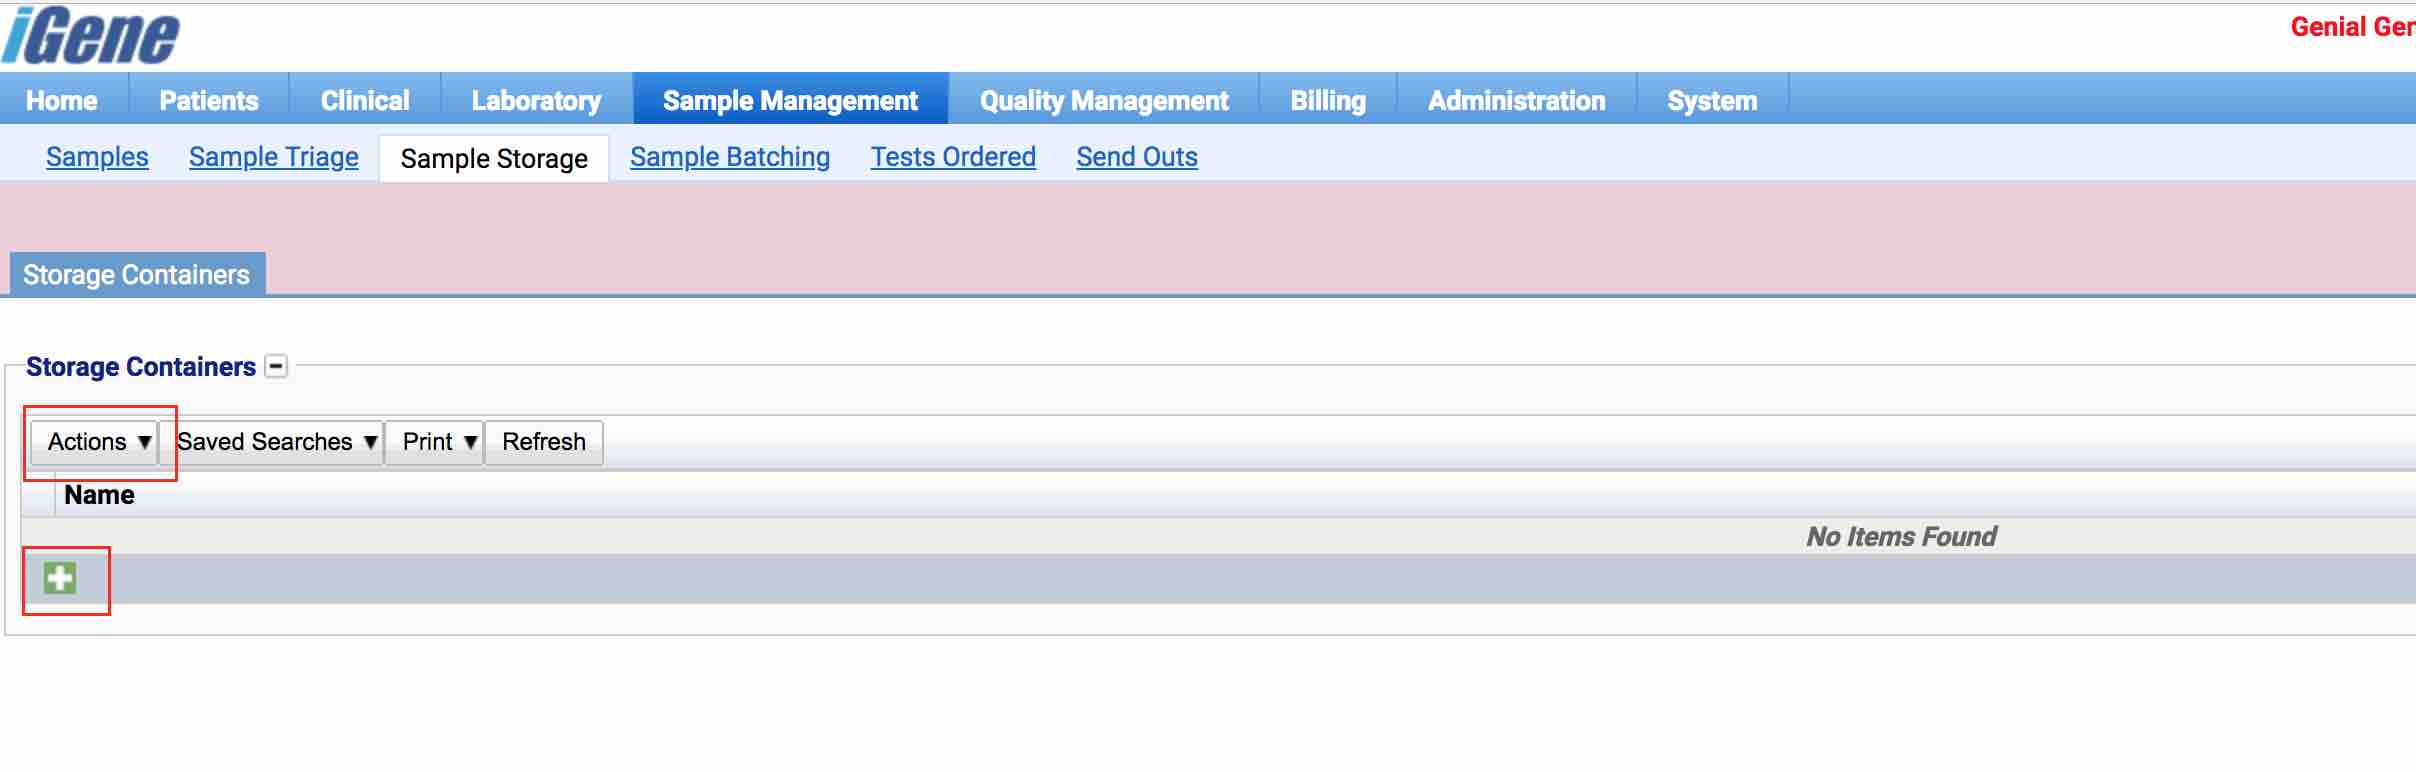
The user is presented with a popup window.

Enter:
- Name - The name for the container. Leave as “Auto Generated” for the name to be assigned via the Container # nomenclature
- Create Container In (Child Containers Only) - Select a container to create the existing container in. Leave blank for a top level container.
- Create In Location - Once the create in container is selected, the options of where to create in location are available. The options listed here will only show ones which are available.
- Container Template - The container template which the user wishes to apply to the container.
Once the form has been completed, click the ‘Create’ button to see the details for the container. Below is an example of a fridge with 4 shelves.

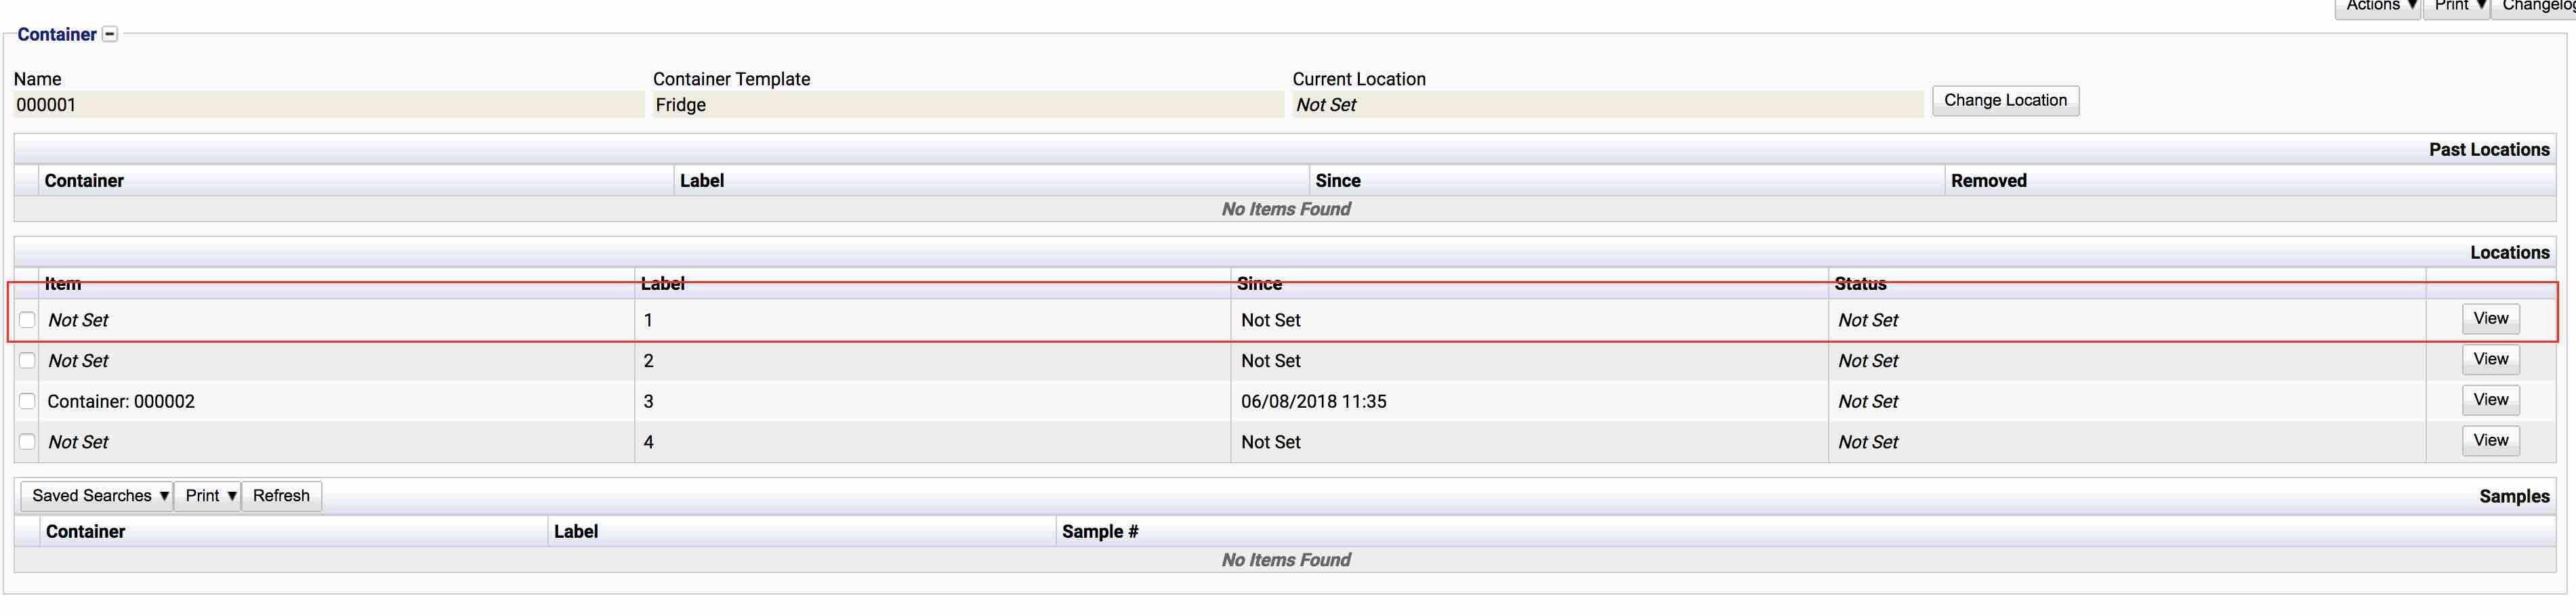
Once the user has created items to keep samples in within the sample container by following the above process, the locations are now listed with the details. Below is an example of a sample container with a box located in position 1 of the fridge.
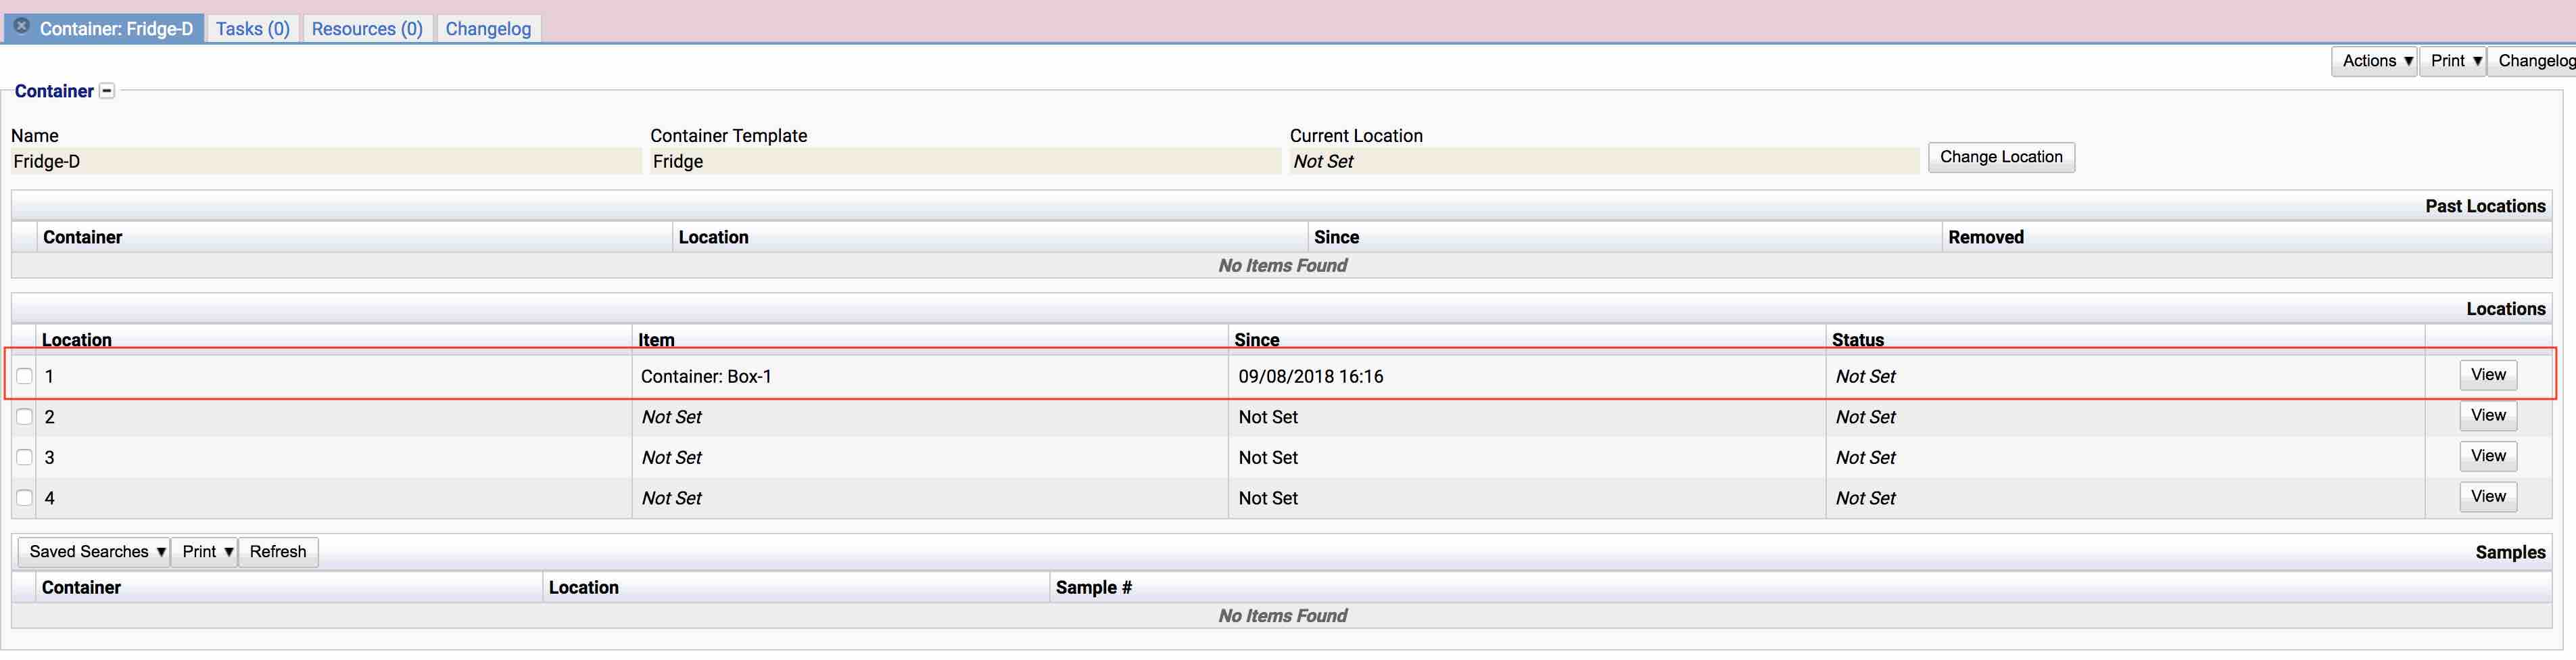
By clicking ‘View’ on each of the rows, it’s possible to see the details of the containers and it’s previous locations in a popup window.
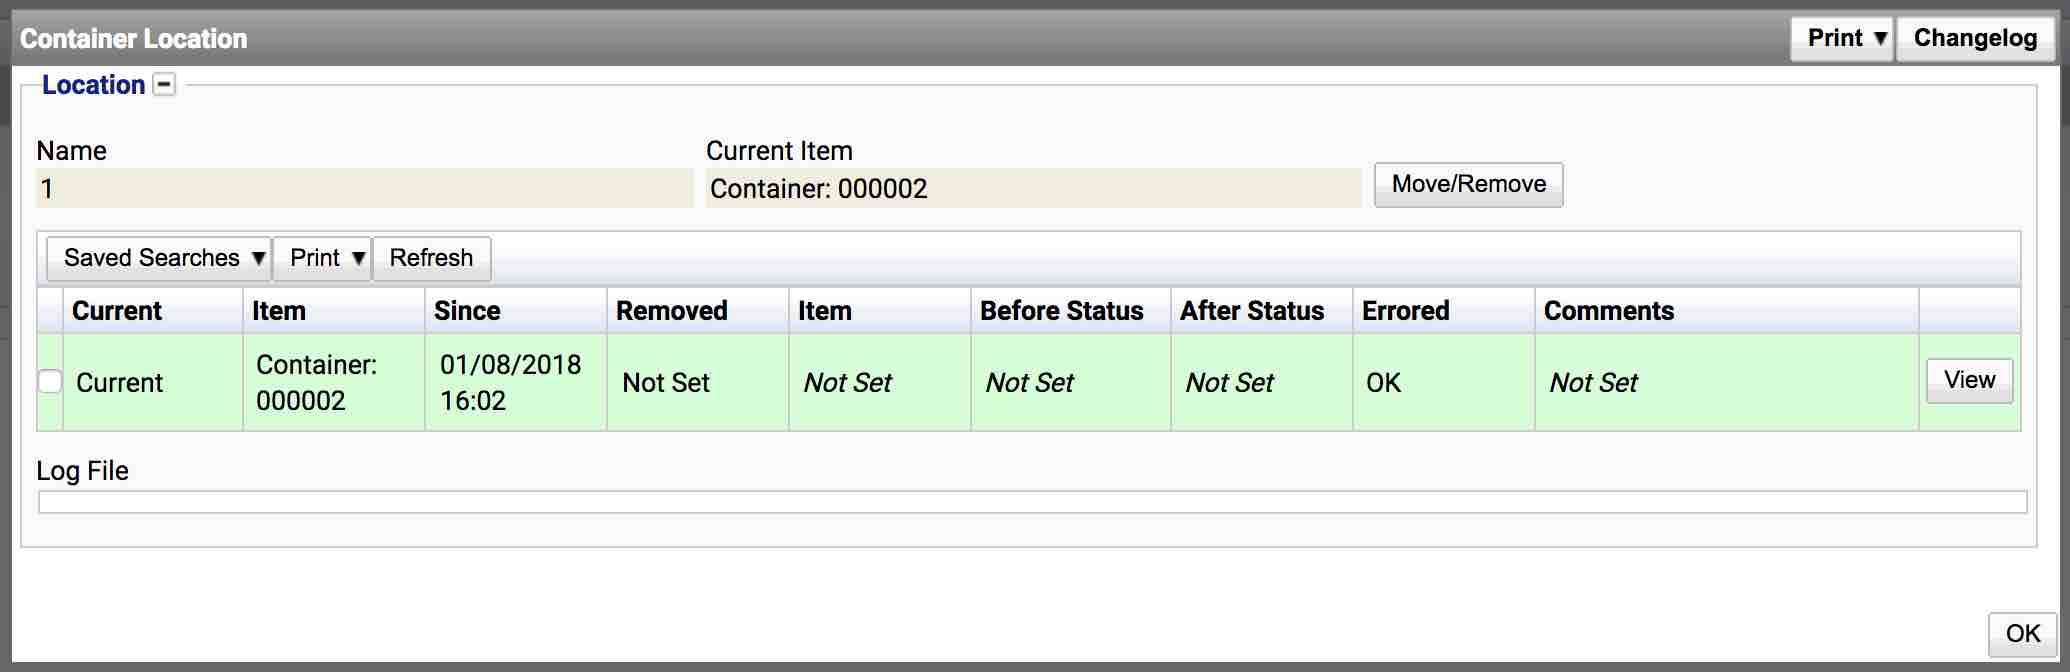
On each of the items, it is possible to click the ‘Log’ button. This will show any errors when items were moved or items were placed into that storage location.
Adding a Sample to a Container
Adding samples to a container is performed in 3 locations:
- Lab Referral Screen When the user is in the laboratory referral screen and selects a sample by pressing the view button (Note, screens may vary between customers).

Sample Management > Samples
Laboratory > Cultures
Moving a Sample from a Container
Moving a sample from a container to another container, or even completely out of storage is performed in 2 main areas:
Sample Details Screen
The sample details screen can be accessed from either the lab referral screen (Laboratory > Lab Referral), the setup screen (Laboratory > Setup) or from the Sample screen (Sample Management > Samples). Once in either of these locations, the process is the same to move a sample.
- Locate the Sample that requires moving.
- Click the ‘Details’ button for the sample.
- Click the ‘Move/Change’ button
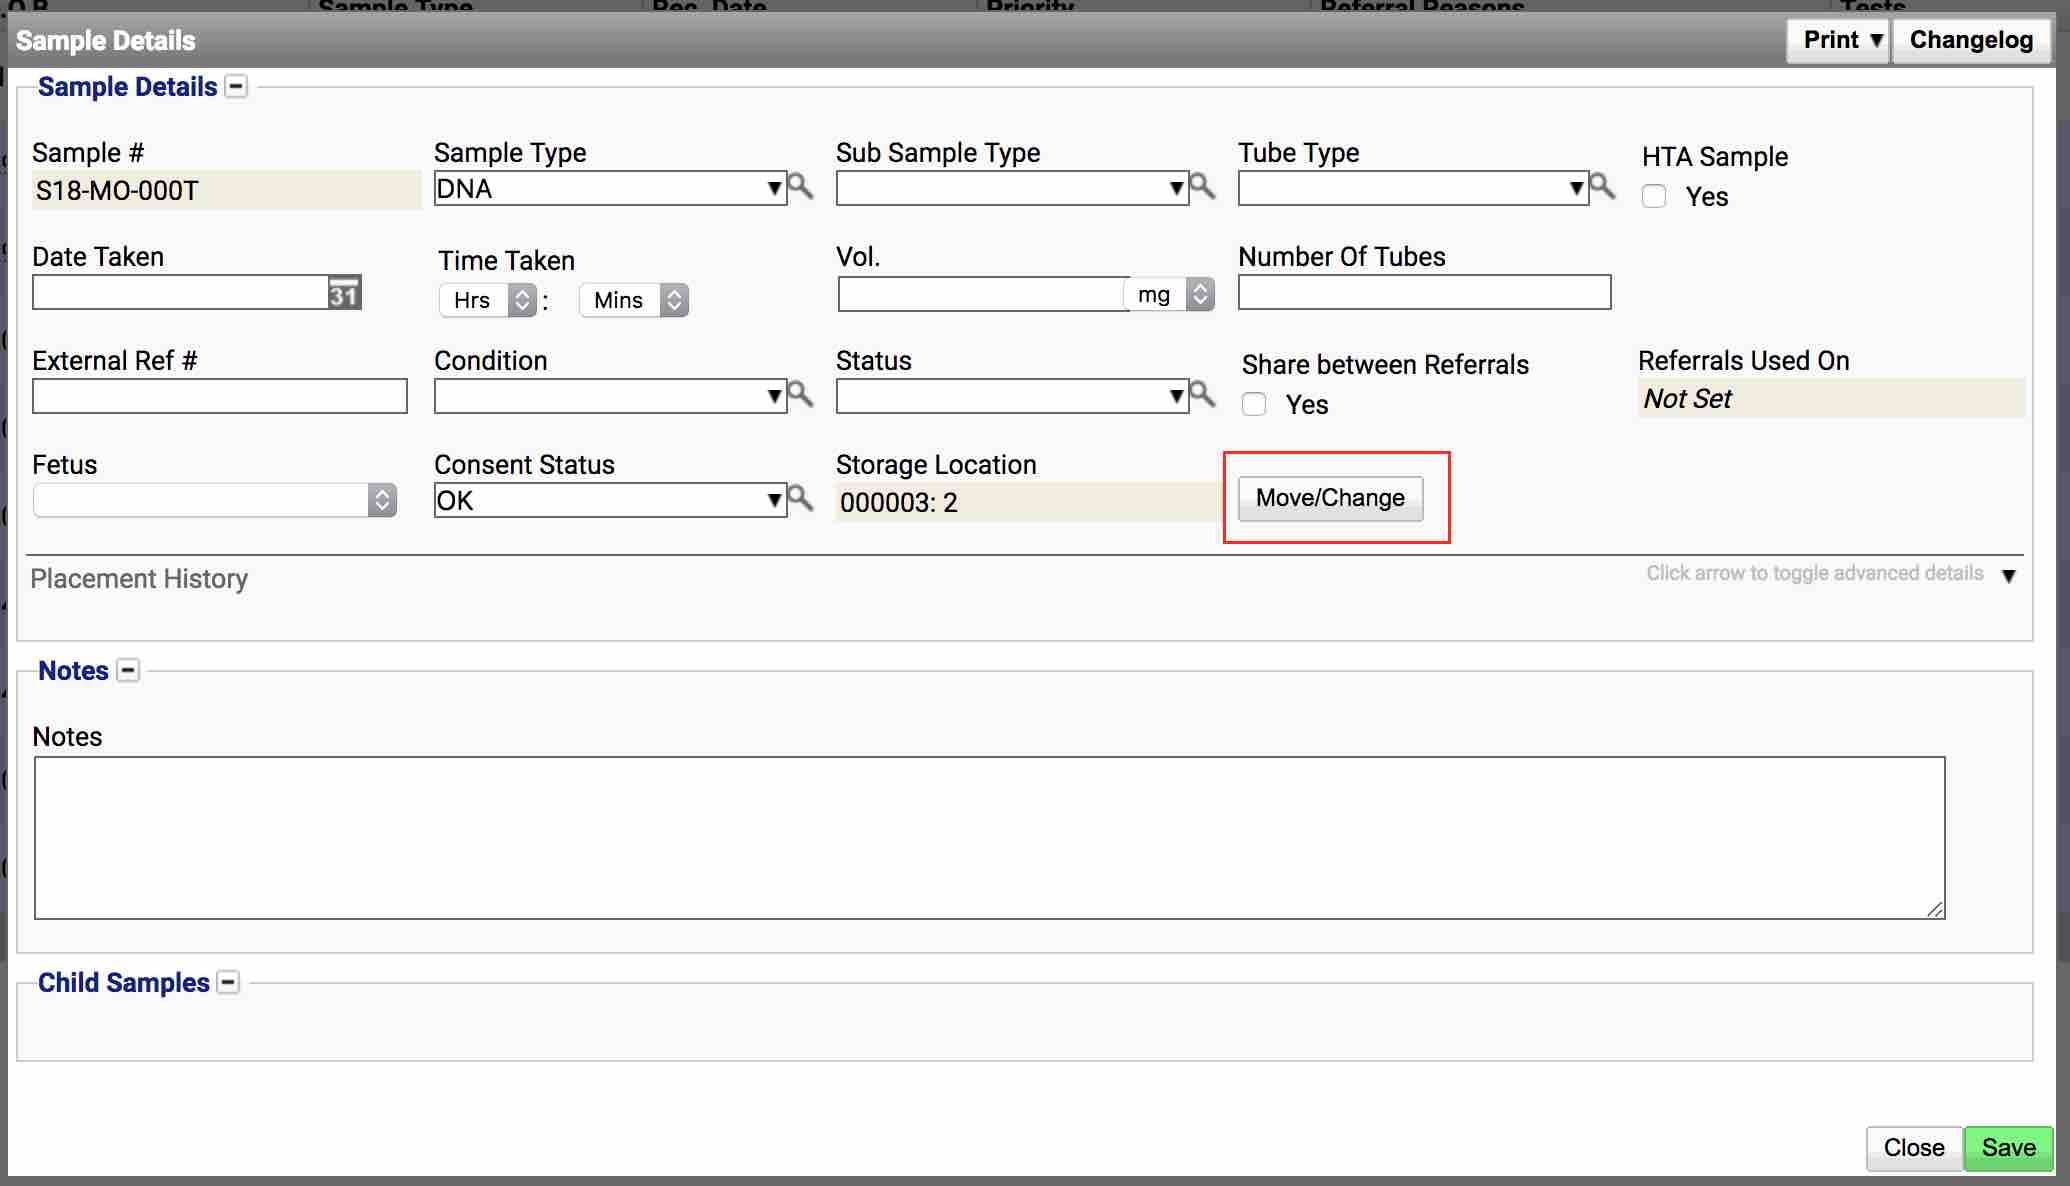
- In the popup that appears complete the information:
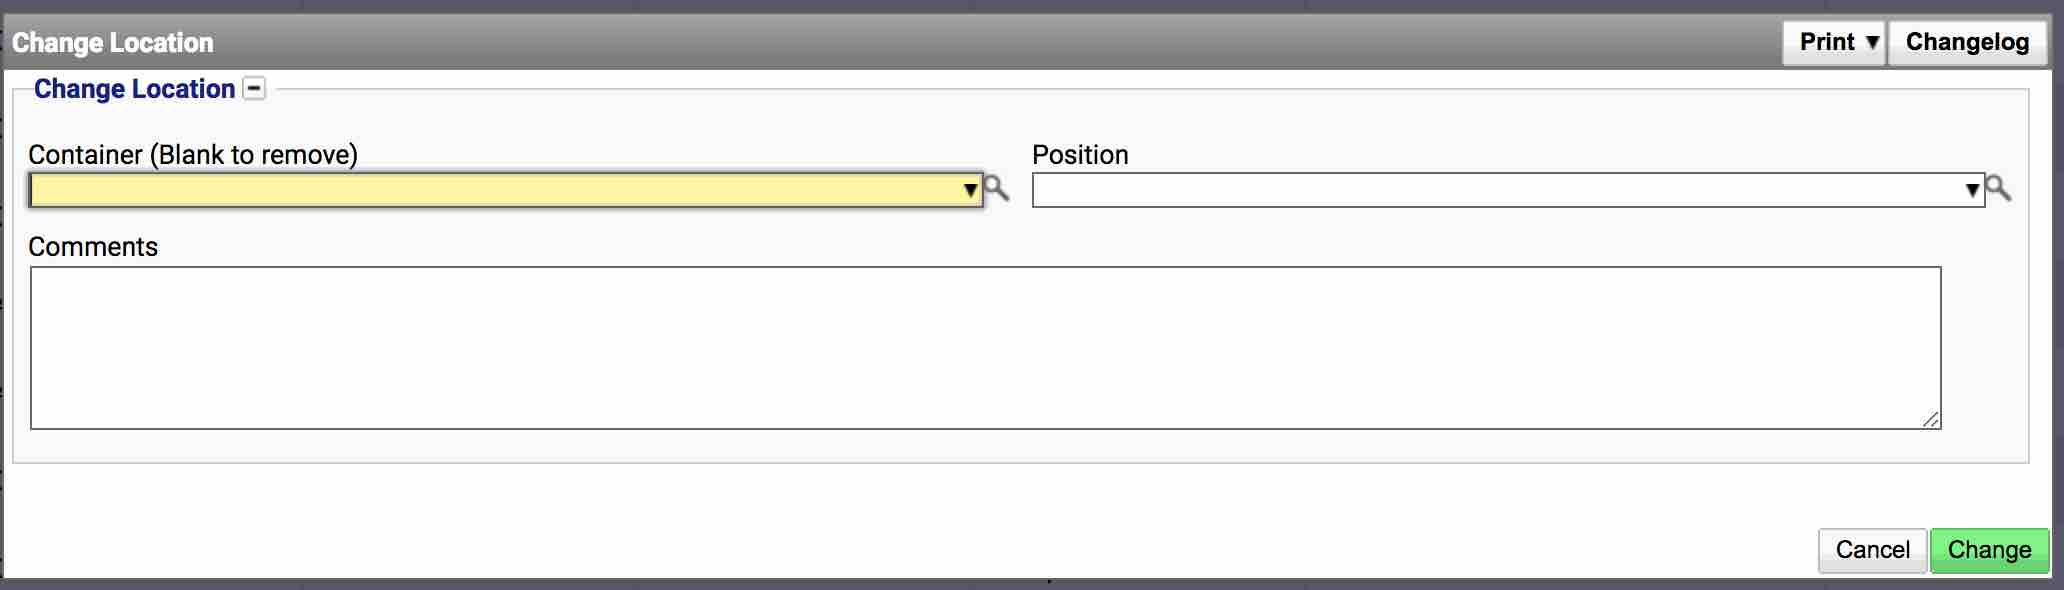
- Container - The new container to move it to. To remove from storage, leave this blank.
- Position - The position within the container
- Comments - Any comments about the movement
- Click the ‘Change’ button.
The sample has now been moved to a new location.
Sample Storage Screen
When viewing a container within the sample storage screen, the storage location can be changed.
- Open the ‘Sample Storage’ screen (Sample Management > Sample Storage)
- Locate the container the user wishes to move items from.
- Click the ‘View’ button.
- Locate the line for the sample/item the user wishes to move
- Click the ‘View’ button
- In the popup window, click the ‘Move/Remove’ button.
- In the popup that appears complete the information:
- Container - The new container to move it to. To remove from storage, leave this blank.
- Position - The position within the container
- Comments - Any comments about the movement
- Click the ‘Change’ button.
The sample is now moved to a different location.
Moving a Container
Moving a container follows the same method as moving a sample. Since a container is just a location within another container, the process to move them are the same. However, final screen where the container is moved differs from the sample movement screen.
- Open the ‘Sample Storage’ screen (Sample Management > Sample Storage)
- Locate the container the user wishes to move items from.
- Click the ‘View’ button.
- Locate the line for the sample/item the user wishes to move
- Click the ‘View’ button
- In the popup window, click the ‘Move/Remove’ button.
- In the popup that appears complete the information:

- Create In Container - The container to move the current container to
- Create in Location - The location to create the container in.
- Click the ‘Change’ button.
The container and all it’s contents are now moved. This has also updated all the samples to reflect the movement.
Manually Assign to Location
Samples and containers can also be assigned to locations manually rather than automatically. This is particularly useful when the user is ‘back filling’ storage locations. There are 2 main ways to manually assign samples and only a single way to manually assign a container to a location.
- Sample Management From the Sample Management screen (Sample Management > Sample Storage) the user can select a container that requires samples adding or a container placing into it.
- Locate the container the user wishes to place the item within.
- Click the ‘View’ button
- Under the locations, click the ‘View’ button
- In the popup window, select either of the options:
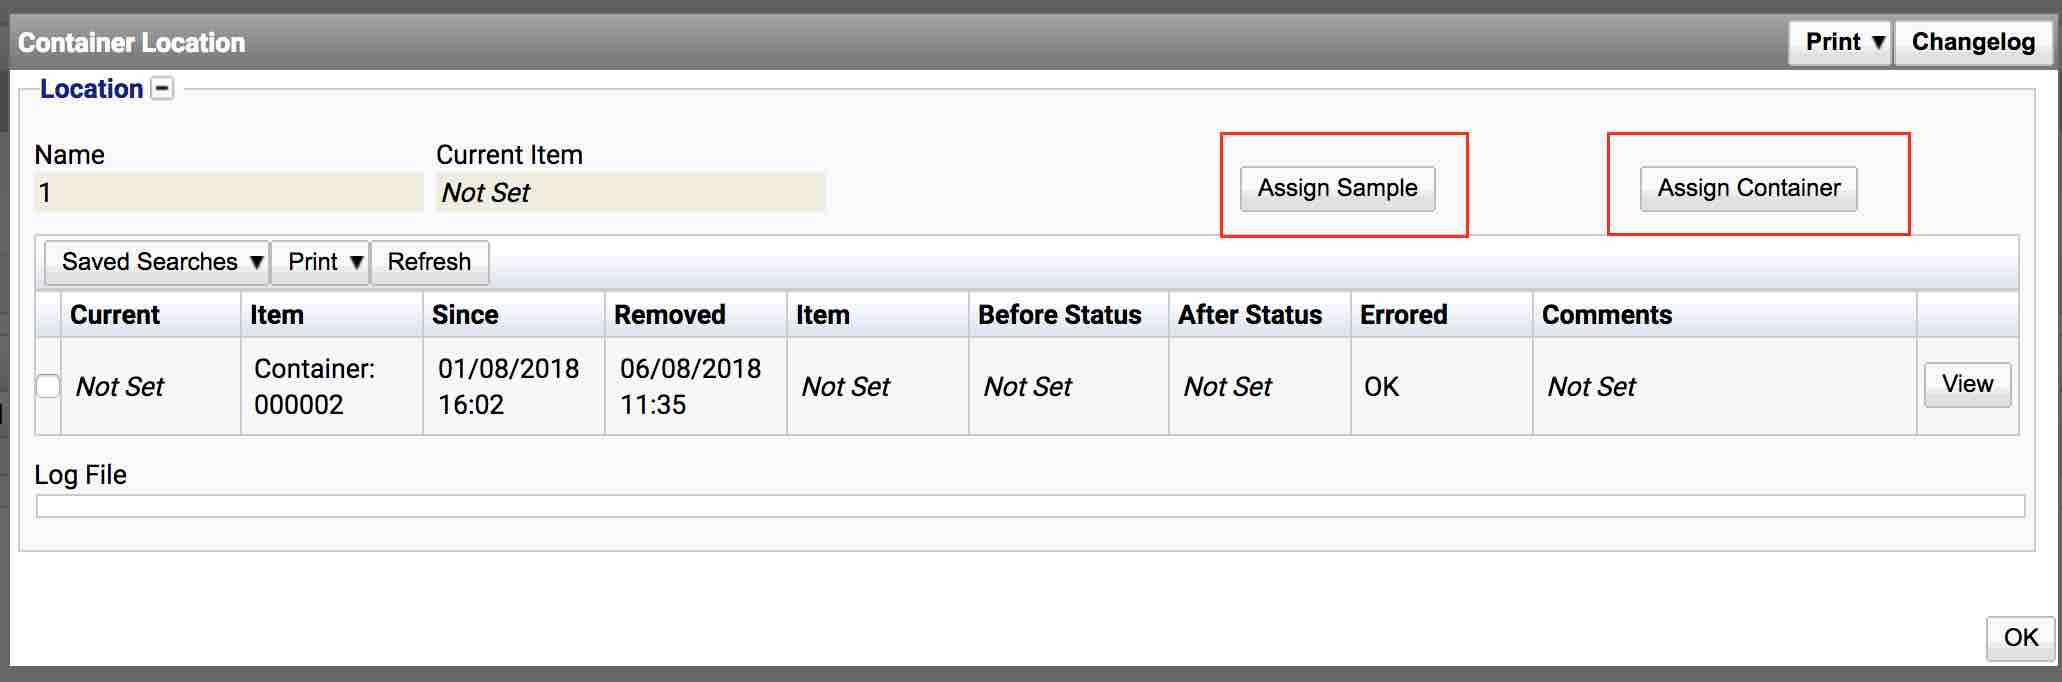
- Assign Sample - Clicking this button will display a list of samples
- Assign Container - Clicking this button will display as list of containers
- Locate the item to assign using the search filters.
- Press the ‘Assign’ button next to the item.
The item is now located in the location specified.
Sample Details Screen From a sample details screen the user can set a location for a sample. The sample details screen can be accessed from:
Lab Referral - Laboratory > Lab Referral > View Referral > View on Sample
Setup - Laboratory > Setup > View Referral > View on Sample
Samples - Sample Management > Samples > Click Details
To manually assign a sample to a location:
- Locate the sample details screen on either the Lab Referral, Setup or Samples screen.
- Click the ‘Manually Assign Location’ button
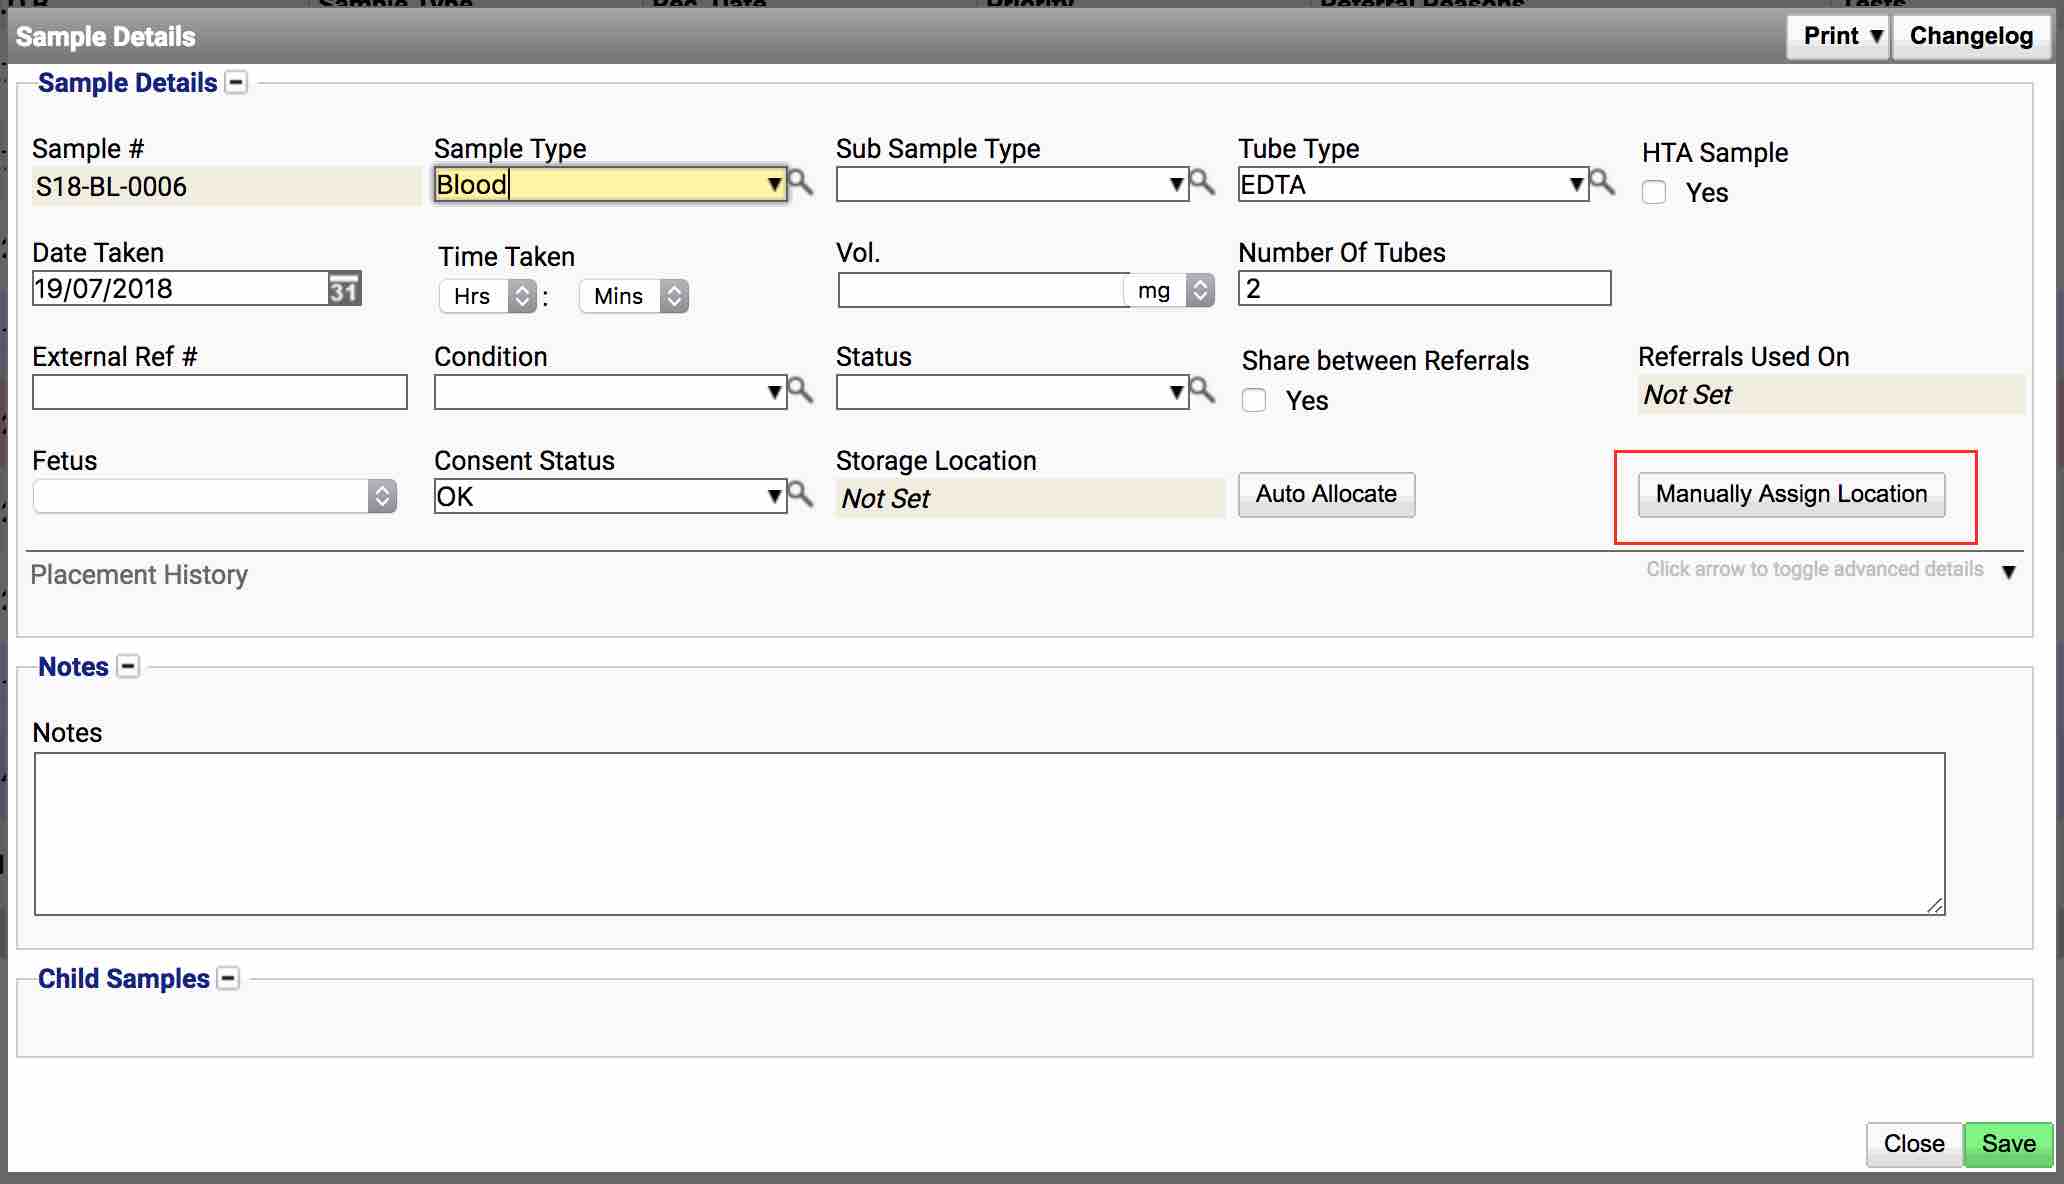
If the ‘Manually Assign Location’ button is not available, the sample must already have a location assigned. To manually assign it, move the sample to a new location from the Storage Location screens.
- In the popup that appears complete the information:
- Container - The new container to move it to. To remove from storage, leave this blank.
- Position - The position within the container
- Comments - Any comments about the movement
- Click the ‘Change’ button.
The sample has now been moved to a new location.
Deleting a Container
It is possible to delete a container provided that it does not have any samples or other containers stored within it. If the container does, it is a manual task to remove the containers contents. To delete a container:
- Navigate to Sample Management > Sample Storage
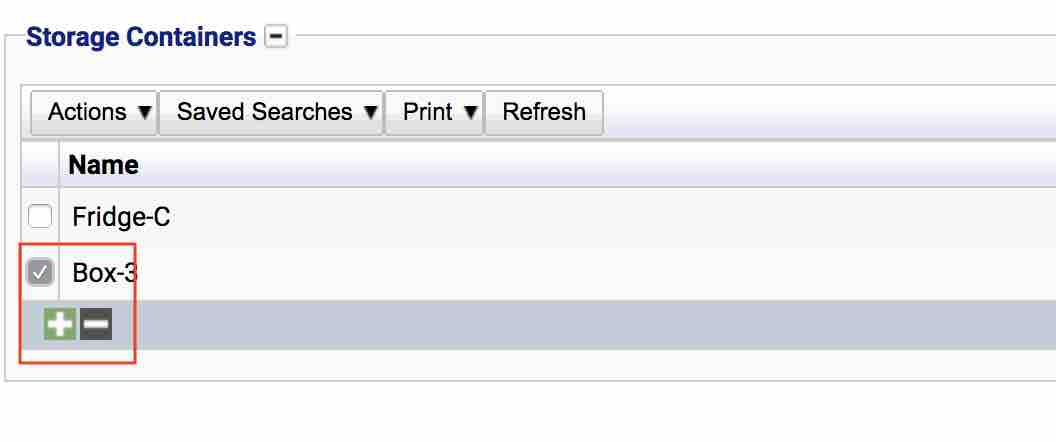
- Check the box next to the container the user wishes to remove.
- Click the ‘-’ button at the bottom of the table
- The user is presented with a confirmation box.
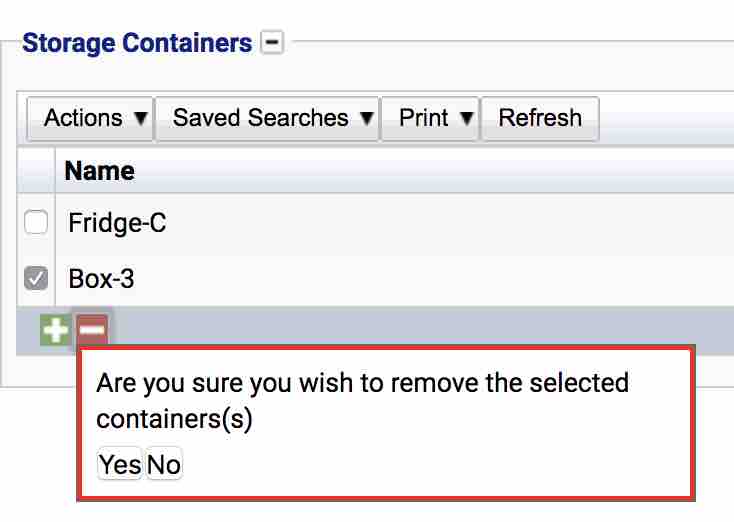
- Clicking ‘Yes’ will delete the container. ‘No’ will keep the container.
- If the container has no other samples, or has no other containers within it, the user is presented with a completed message and the container is deleted.
Renaming a Container
It is possible to rename a container. To do this:
- Navigate to Sample Management > Sample Storage
- Find the container the user wishes to rename.
- Click the ‘View’ button next to the container
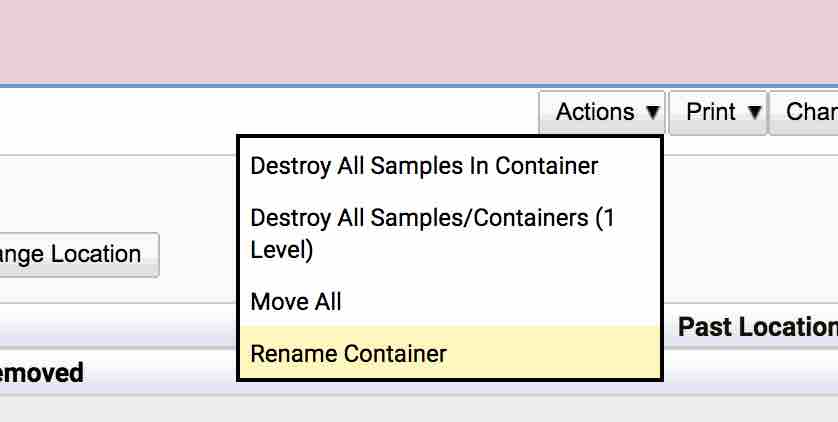
- Click the ‘Actions’ button in the top right
- Select ‘Rename Container’
- In the popup window, change the name of the container

- Click the ‘Rename’ button
- The container is now renamed.
Destroy All Samples (In Container)
This option has a permission assigned to it. Do not use it unless the user knows the consequences.
- Navigate to Sample Management > Sample Storage
- Find the container the user wishes to rename.
- Click the ‘View’ button next to the container
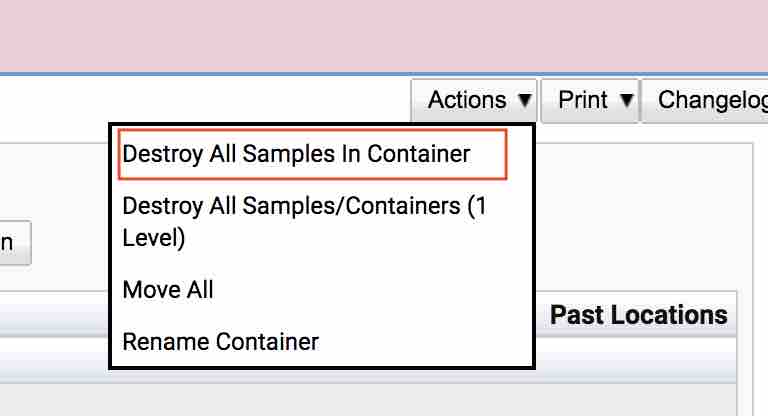
- Click the ‘Actions’ button in the top right
- Click ‘Destroy All Samples in Container’
- A confirmation box will appear.
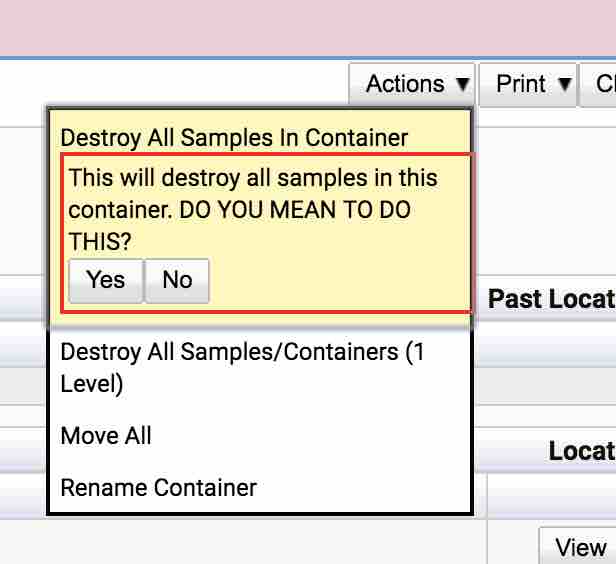
- Clicking ‘Yes’ will reveal the reason popup window
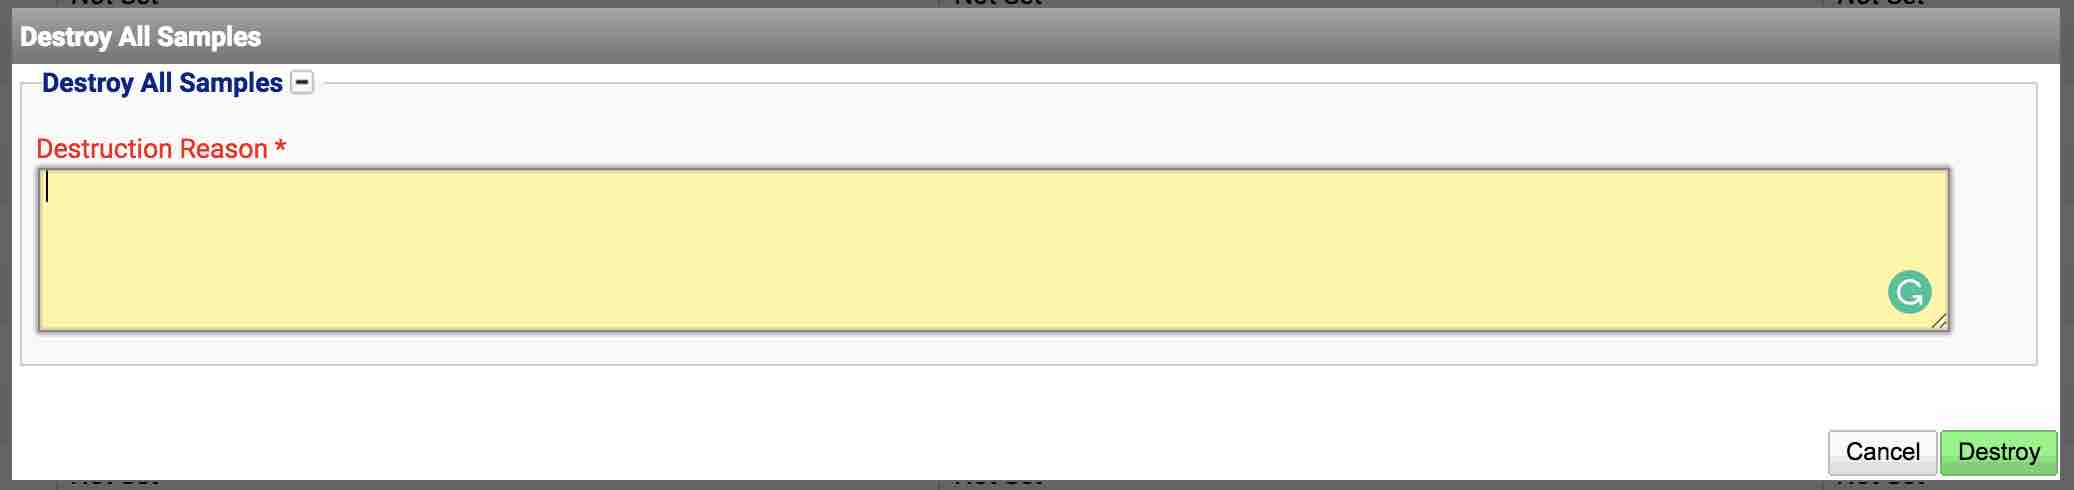
- Click ‘Destroy’. This will mark all samples in that container as destroyed.
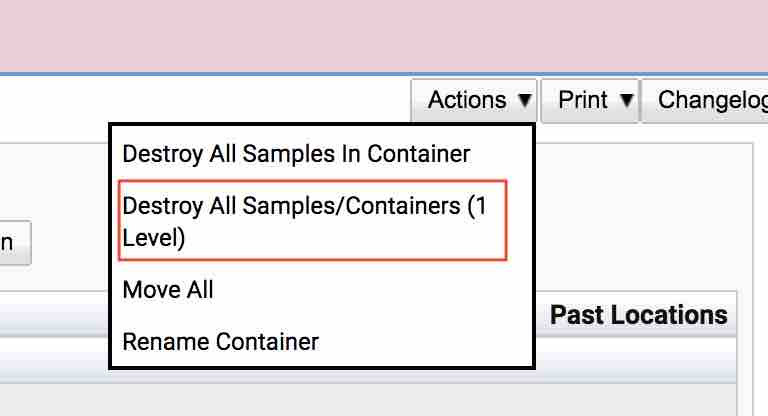
Destroy All Samples/Containers (1 Level Deep) (In Container)
This option has a permission assigned to it. Do not use it unless the user knows the consequences.
It is possible to mark a container and all the boxes in it as destroyed. This will also mark the samples within those boxes as destroyed as well. A scenario for this might be if a fridge breaks and the user wishes to mark all items destroyed in one go.
- Navigate to Sample Management > Sample Storage
- Find the container the user wishes to rename.
- Click the ‘View’ button next to the container
- Click the ‘Actions’ button in the top right
- Click ‘Destroy All Samples in Container’
- A confirmation box will appear.
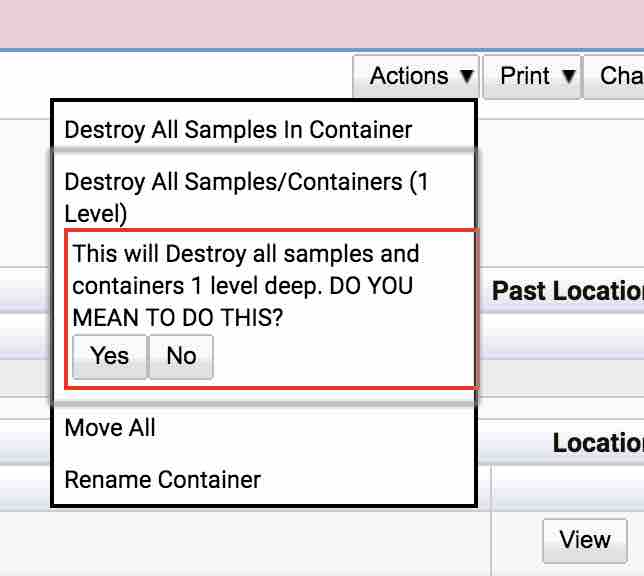
- Clicking ‘Yes’ will reveal the reason popup window
- Click ‘Destroy’. This will mark all samples and containers and any samples in those containers as destroyed.
Scenario 1
All scripts used in this scenario are the standard ones placed when items are first created.
A laboratory has the requirement to take samples which have been extracted and store those in boxes within a fridge. Once the box is full, the entire box needs to be moved from a fridge to a freezer and all the samples within that need to be updated to let the users know where they are located.
Storage Policies
Create a new Sample Storage Policy. The example below has been set to only apply to DNA samples.

Ensure the Weight is lower than any generic policy that may already be set up, so that this more specific policy is run first when samples are auto-assigned a location.
Container Templates
Create container templates for a box, a fridge and a freezer. Ensure the box is setup to accept samples, and the fridge and freezer accept containers.

Container Creation
Navigate to Sample Management > Sample Storage and create 3 new storage containers by clicking the ‘+’ or selecting ‘New Storage Container’ from the ‘Actions’ tab:
Container Template: Fridge. ‘Name’ can either be entered or left as “Auto Generated”. Leave the fields ‘Create in Container’ and ‘Create in Location’ blank as this is a top level container.
Container Template: Freezer. ‘Name’ can either be entered or left as “Auto Generated”. Leave the fields ‘Create in Container’ and ‘Create in Location’ blank as this is a top level container.
Container Template: Box. Select the Fridge that has just been created in the “Create in Container” field as this Box is going to be stored within the Fridge. Choose a location and leave the Name to Auto-Generate .

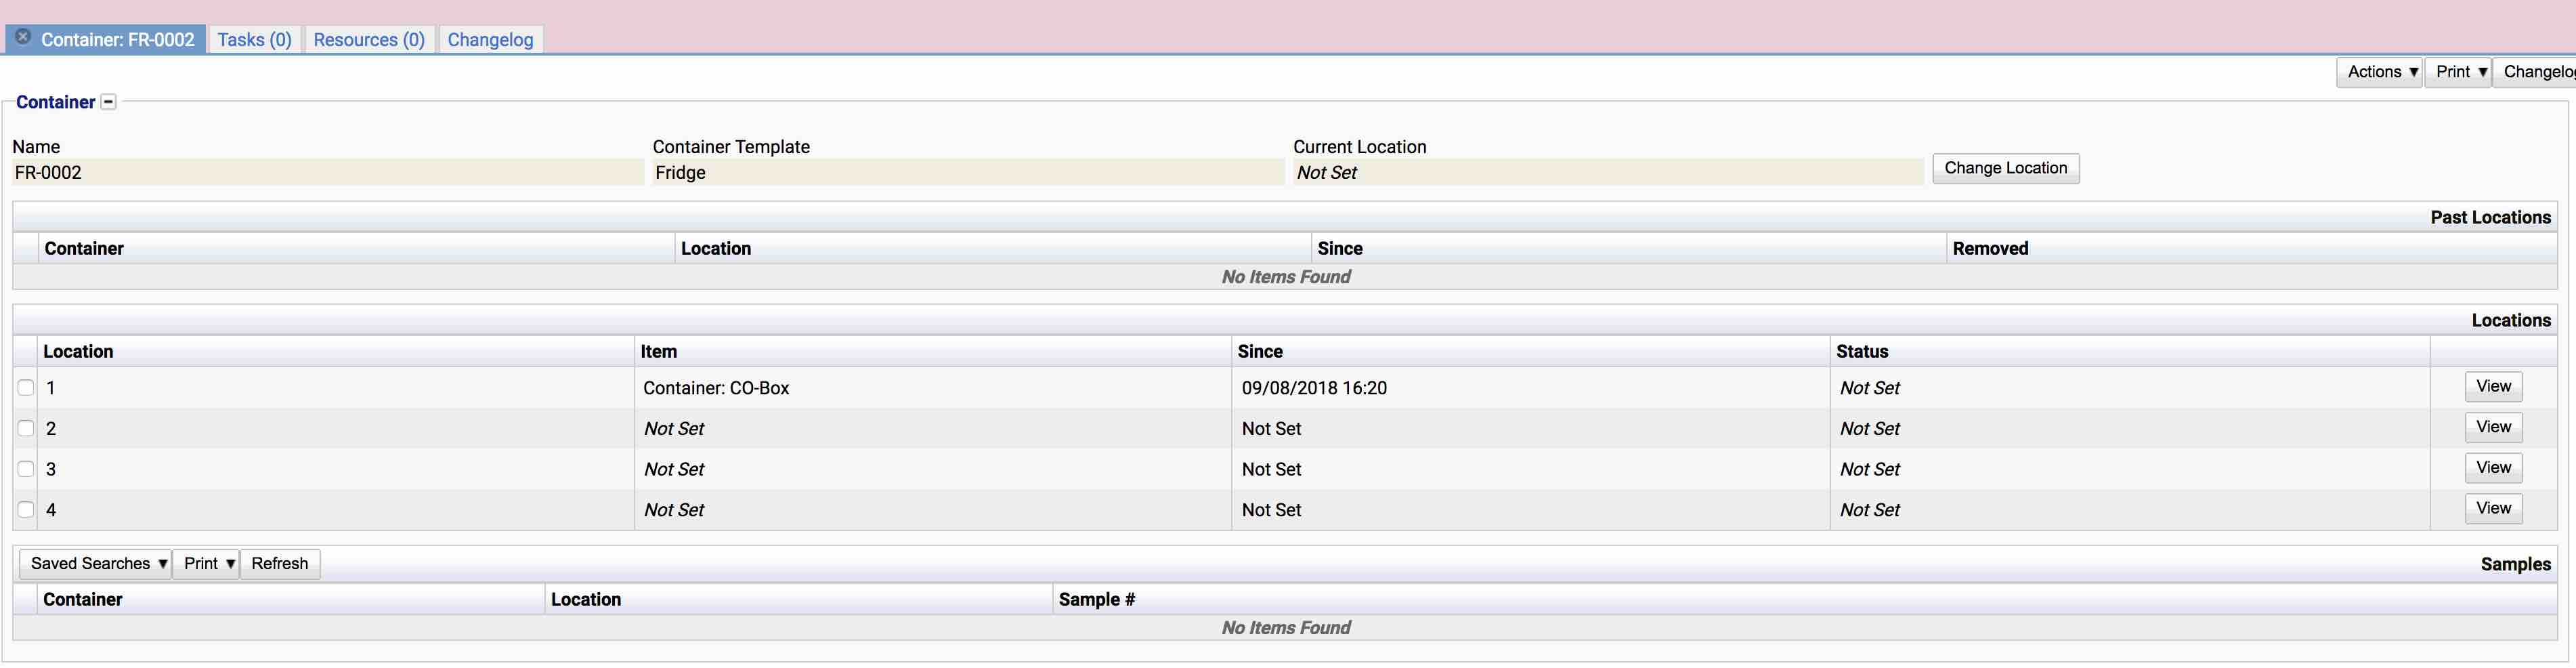
Return to the Sample Storage screen and click ‘View’ next to the new Fridge container. Below, the name of the fridge was auto-generated as FR-0002 and the new Box, B-0001 has been assigned to Position 1 of the fridge. Positions 2 and 3 are currently free.
Add samples to the container
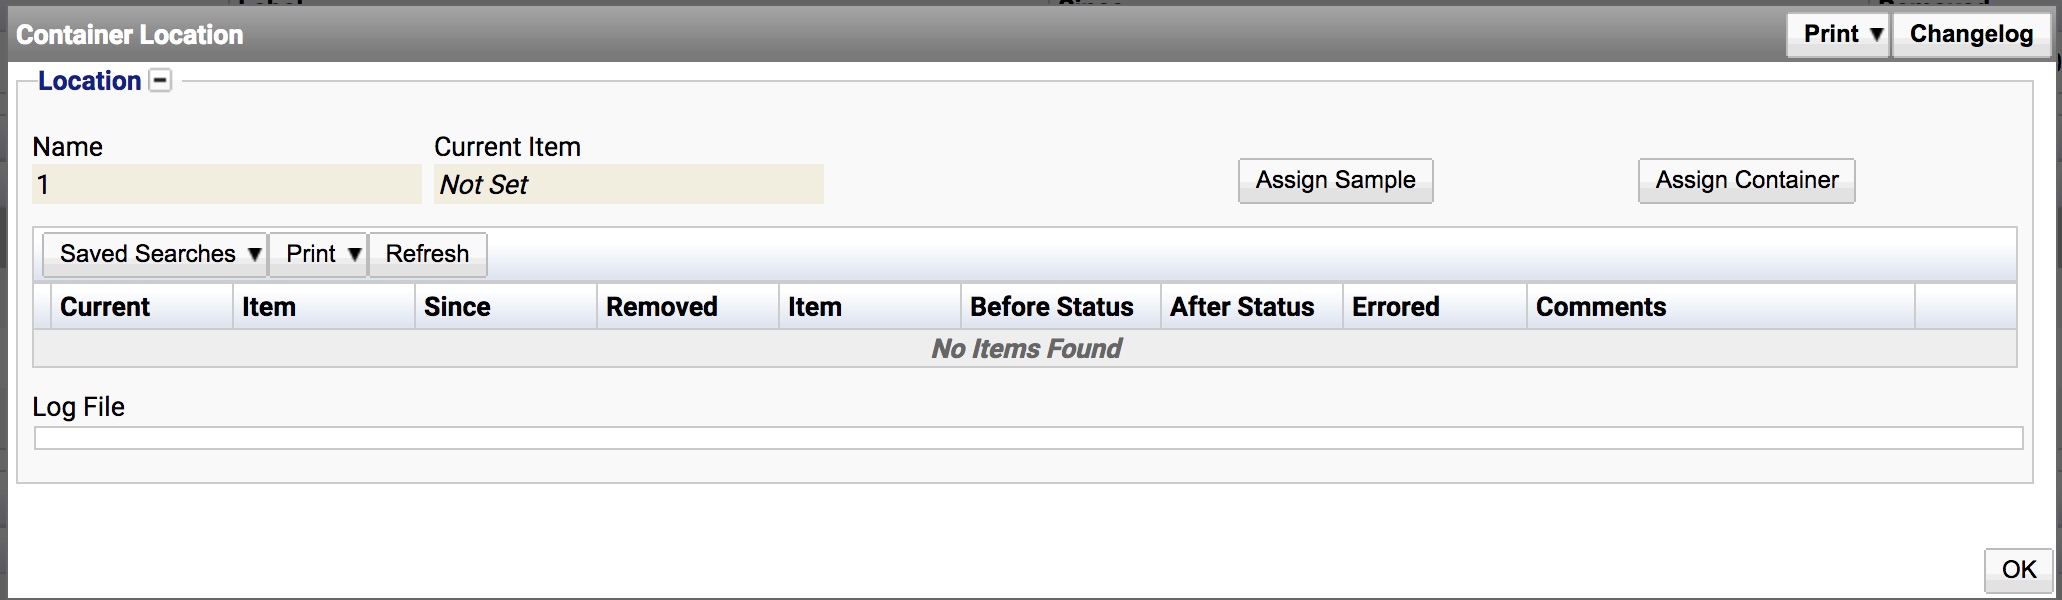
Return to the Sample Storage screen and click ‘View’ on the Box container. Under the ‘Locations’ section, all records will currently be displayed as “Not set”. To manually assign a sample to one of the free locations, click the ‘View’ icon. This will display details of that current location.
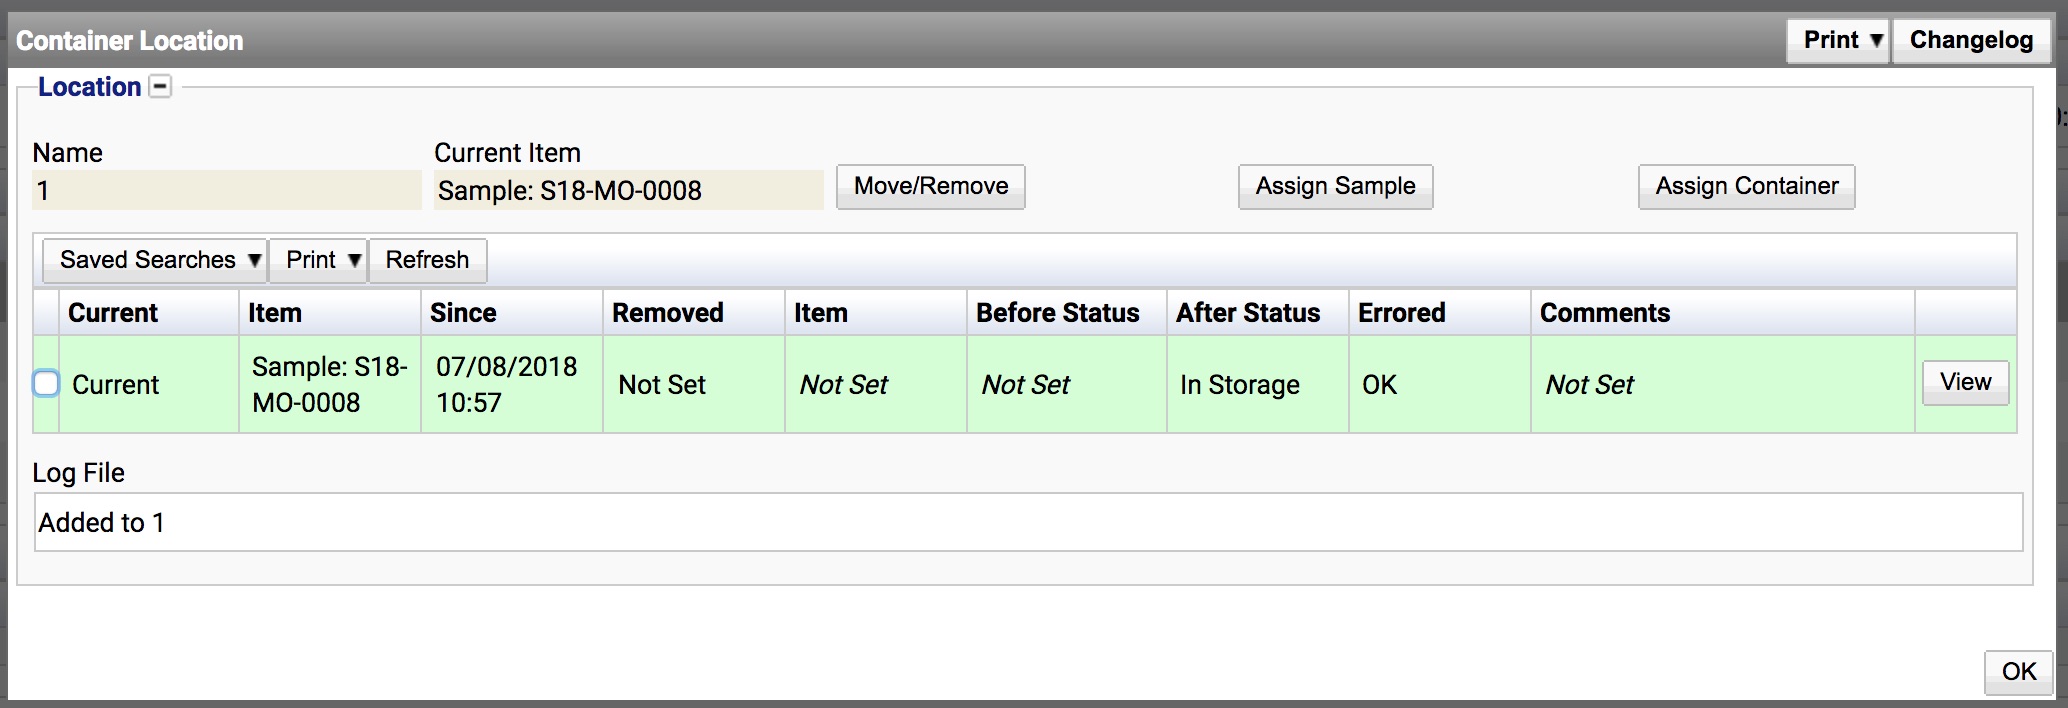
Click the ‘Assign’ icon to bring up the Assign Sample window where the specific sample which is to be assigned to that location can be searched for. Once located, click ‘Assign’ and a notification should display that the assignment was successful.
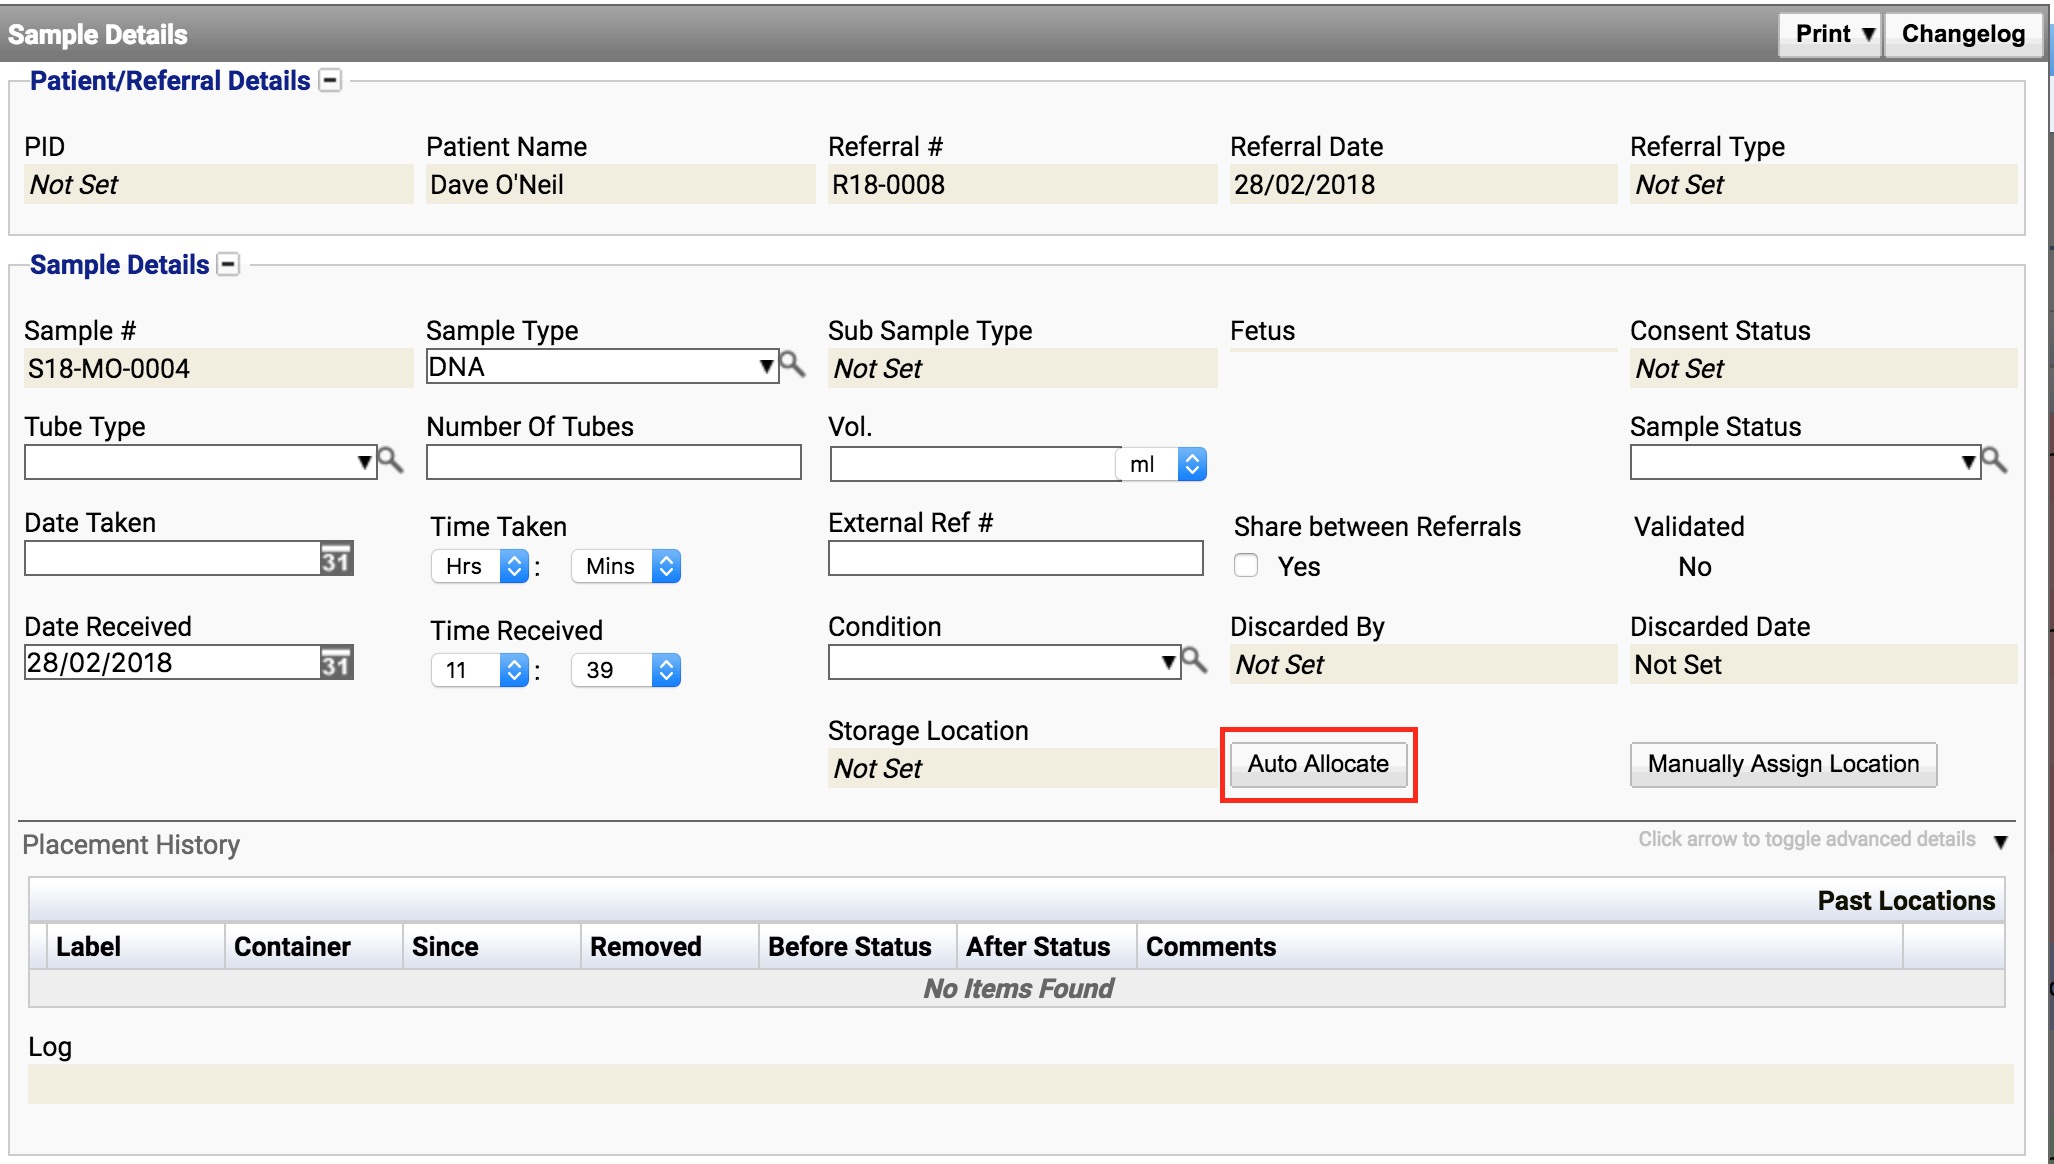
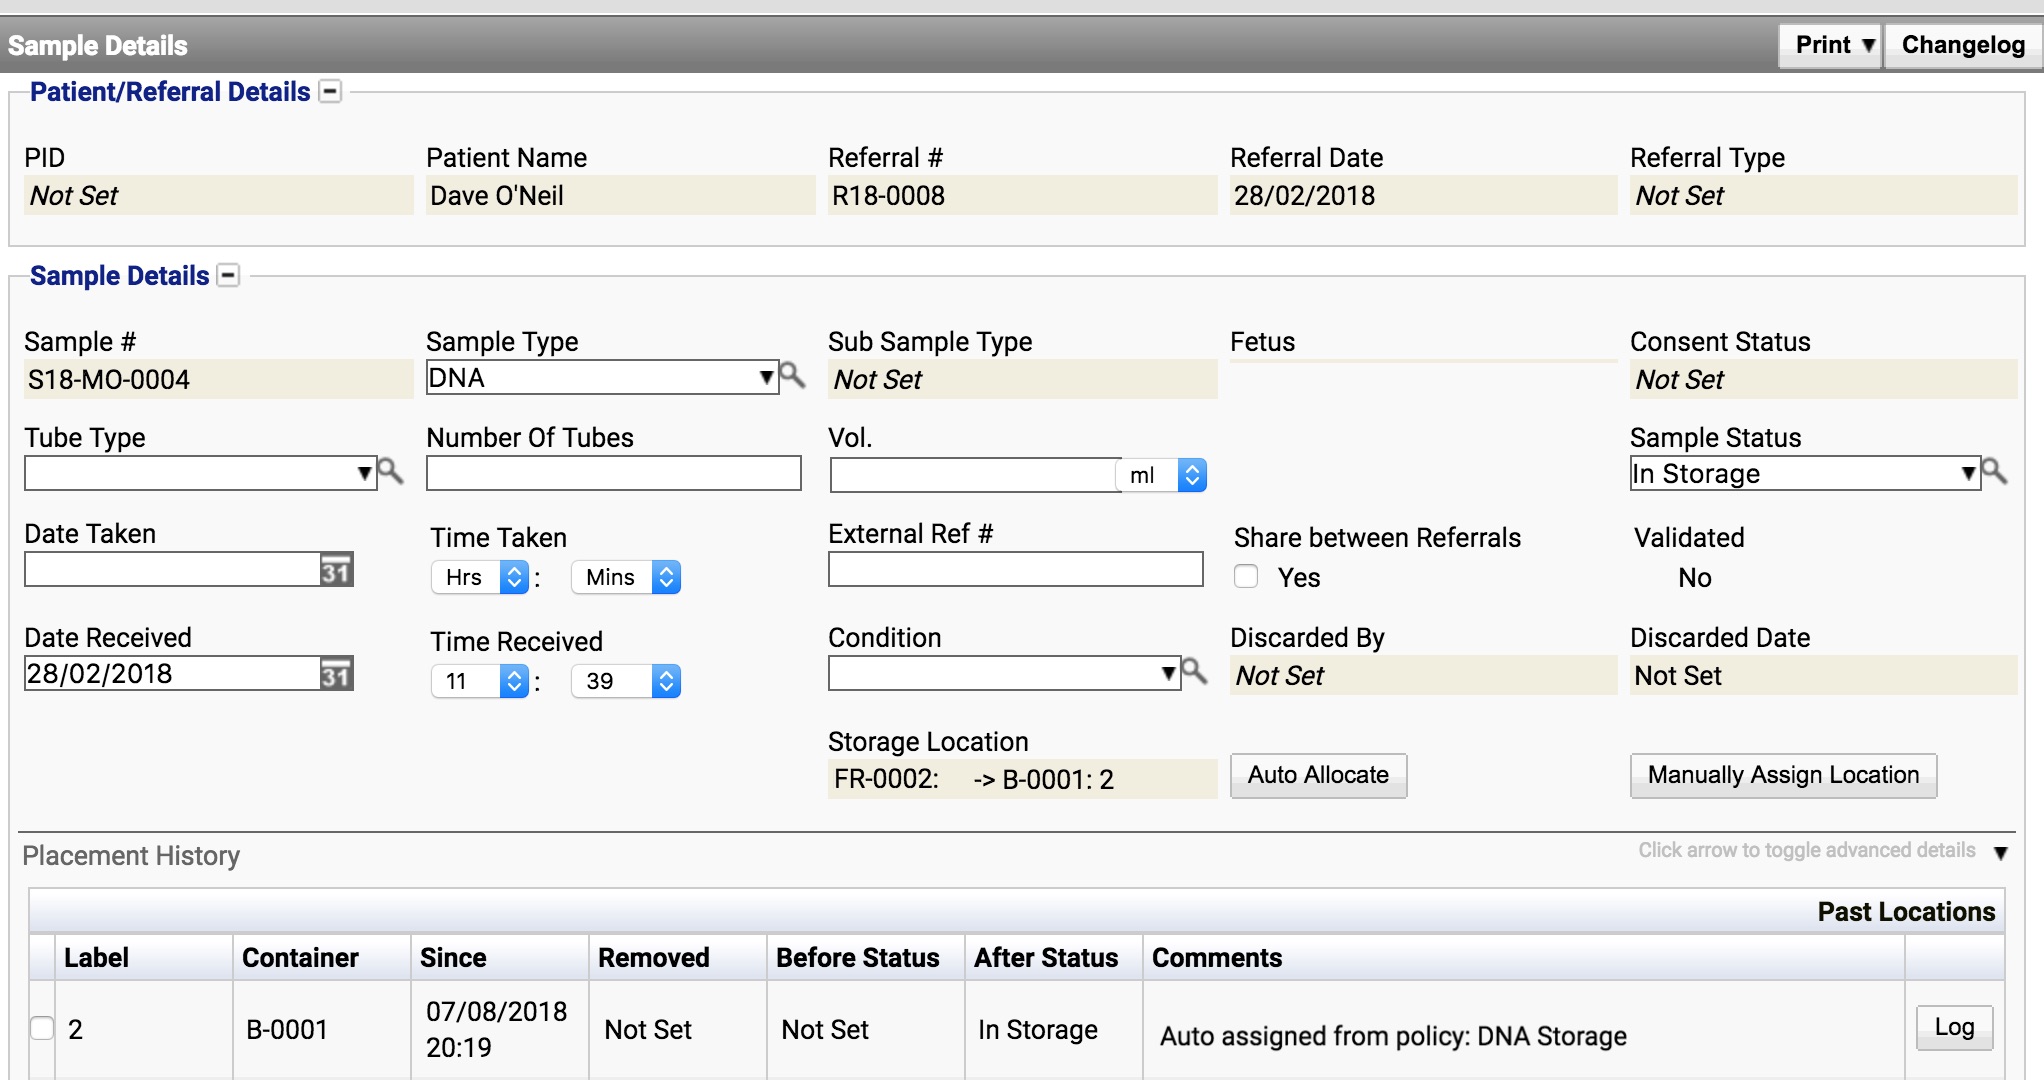
Alternatively, storage locations for B-001 can be automatically assigned via the Storage Policy. Navigate to the Sample Details window for another sample which is to be stored in a box within the fridge and click the ‘Auto-Allocate’ icon to allocate it to the next free location.
The storage policy set up in this example is for DNA samples only. If a sample other than a DNA is selected, the DNA storage policy will not be triggered and the next weighted storage policy will be checked.
The remaining container locations of B-001 can then be filled up with samples, and once there aren’t any free locations left, the status of the container changes from ‘Free’ to ‘Not Free’.

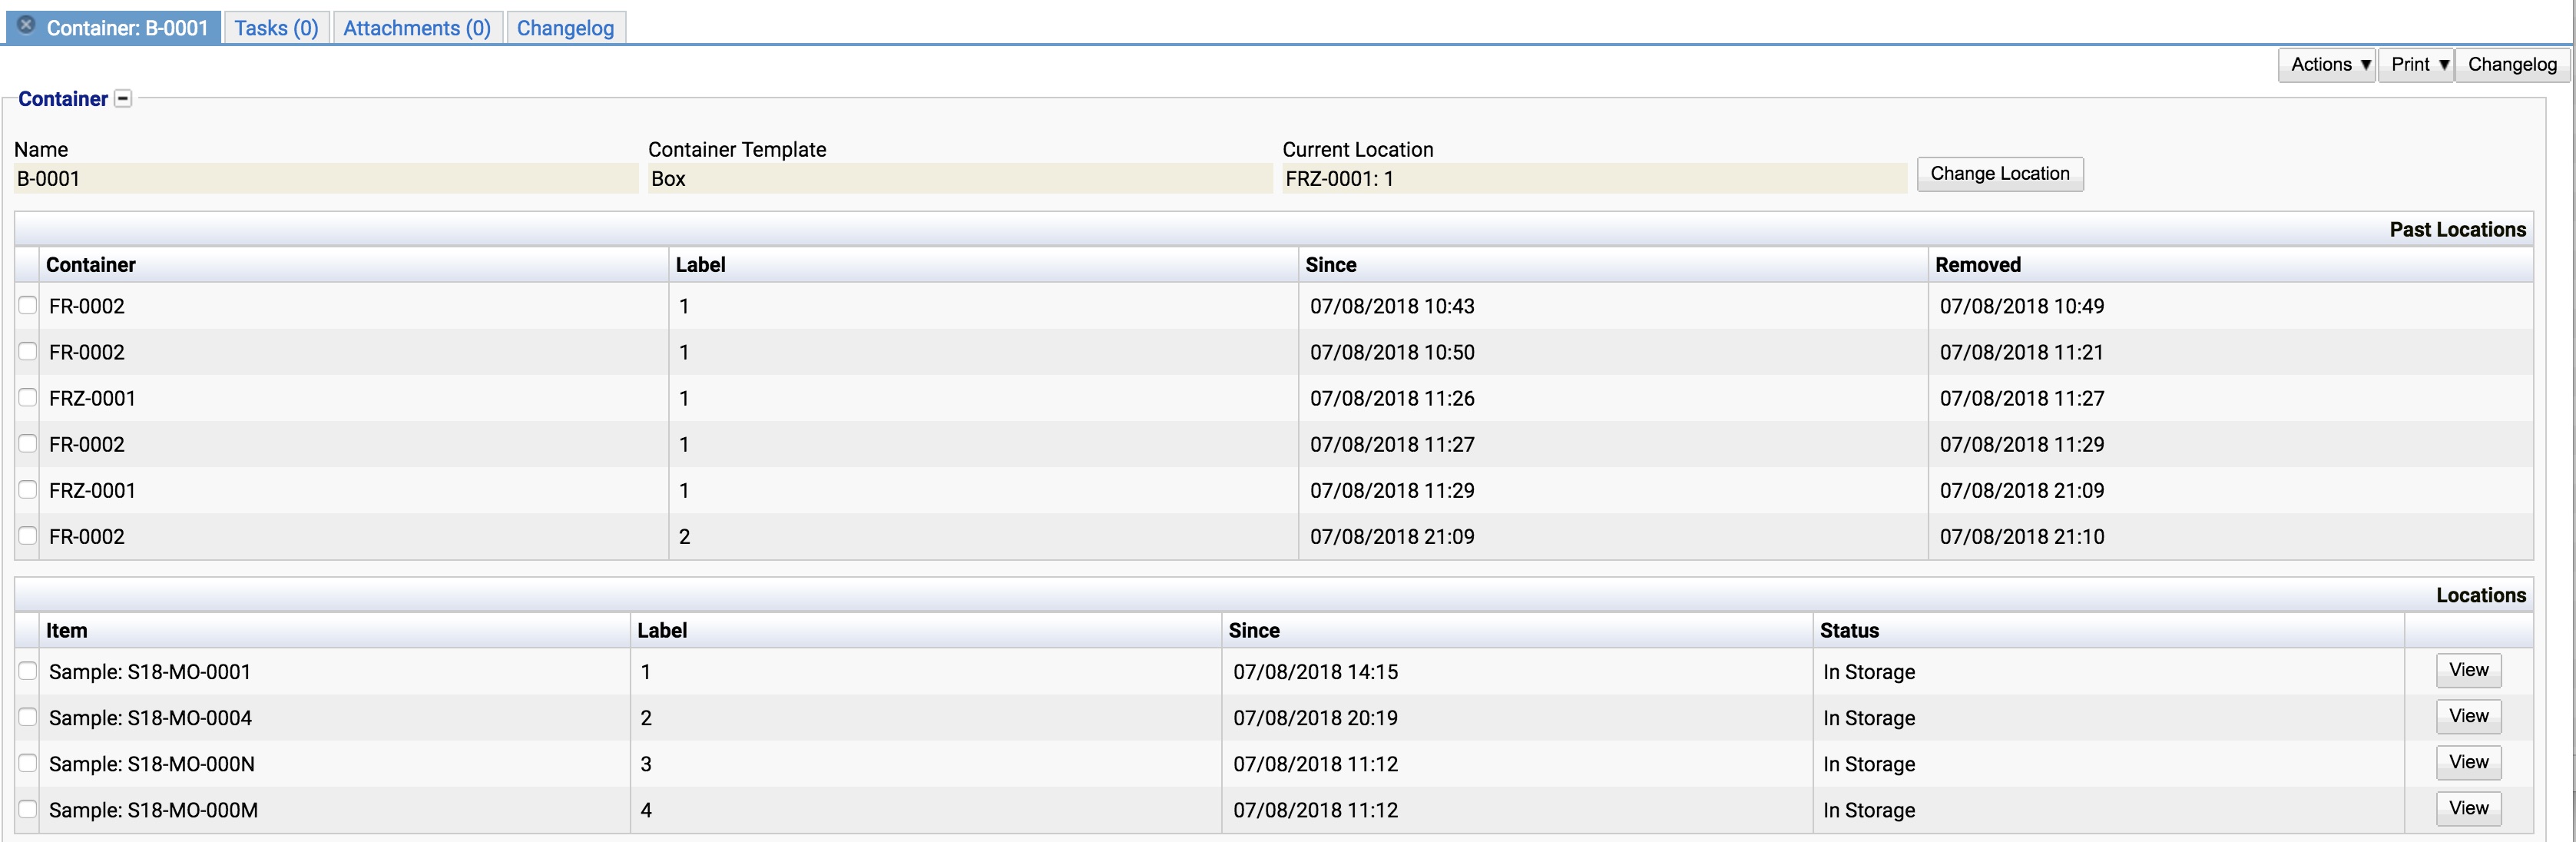
Now that the box is full, it needs to be moved to the freezer. Click ‘View’ against the highlighted container and in the subsequent Container details screen, click ‘Change Location’.

In the Change Location window, select the Freezer container created earlier in the “Create in Container” field, and an available location within that container in the “Create in Location” field. Click “Change” to complete the relocation

All previous locations of the container are tracked under the “Past Locations” section of the particular container.
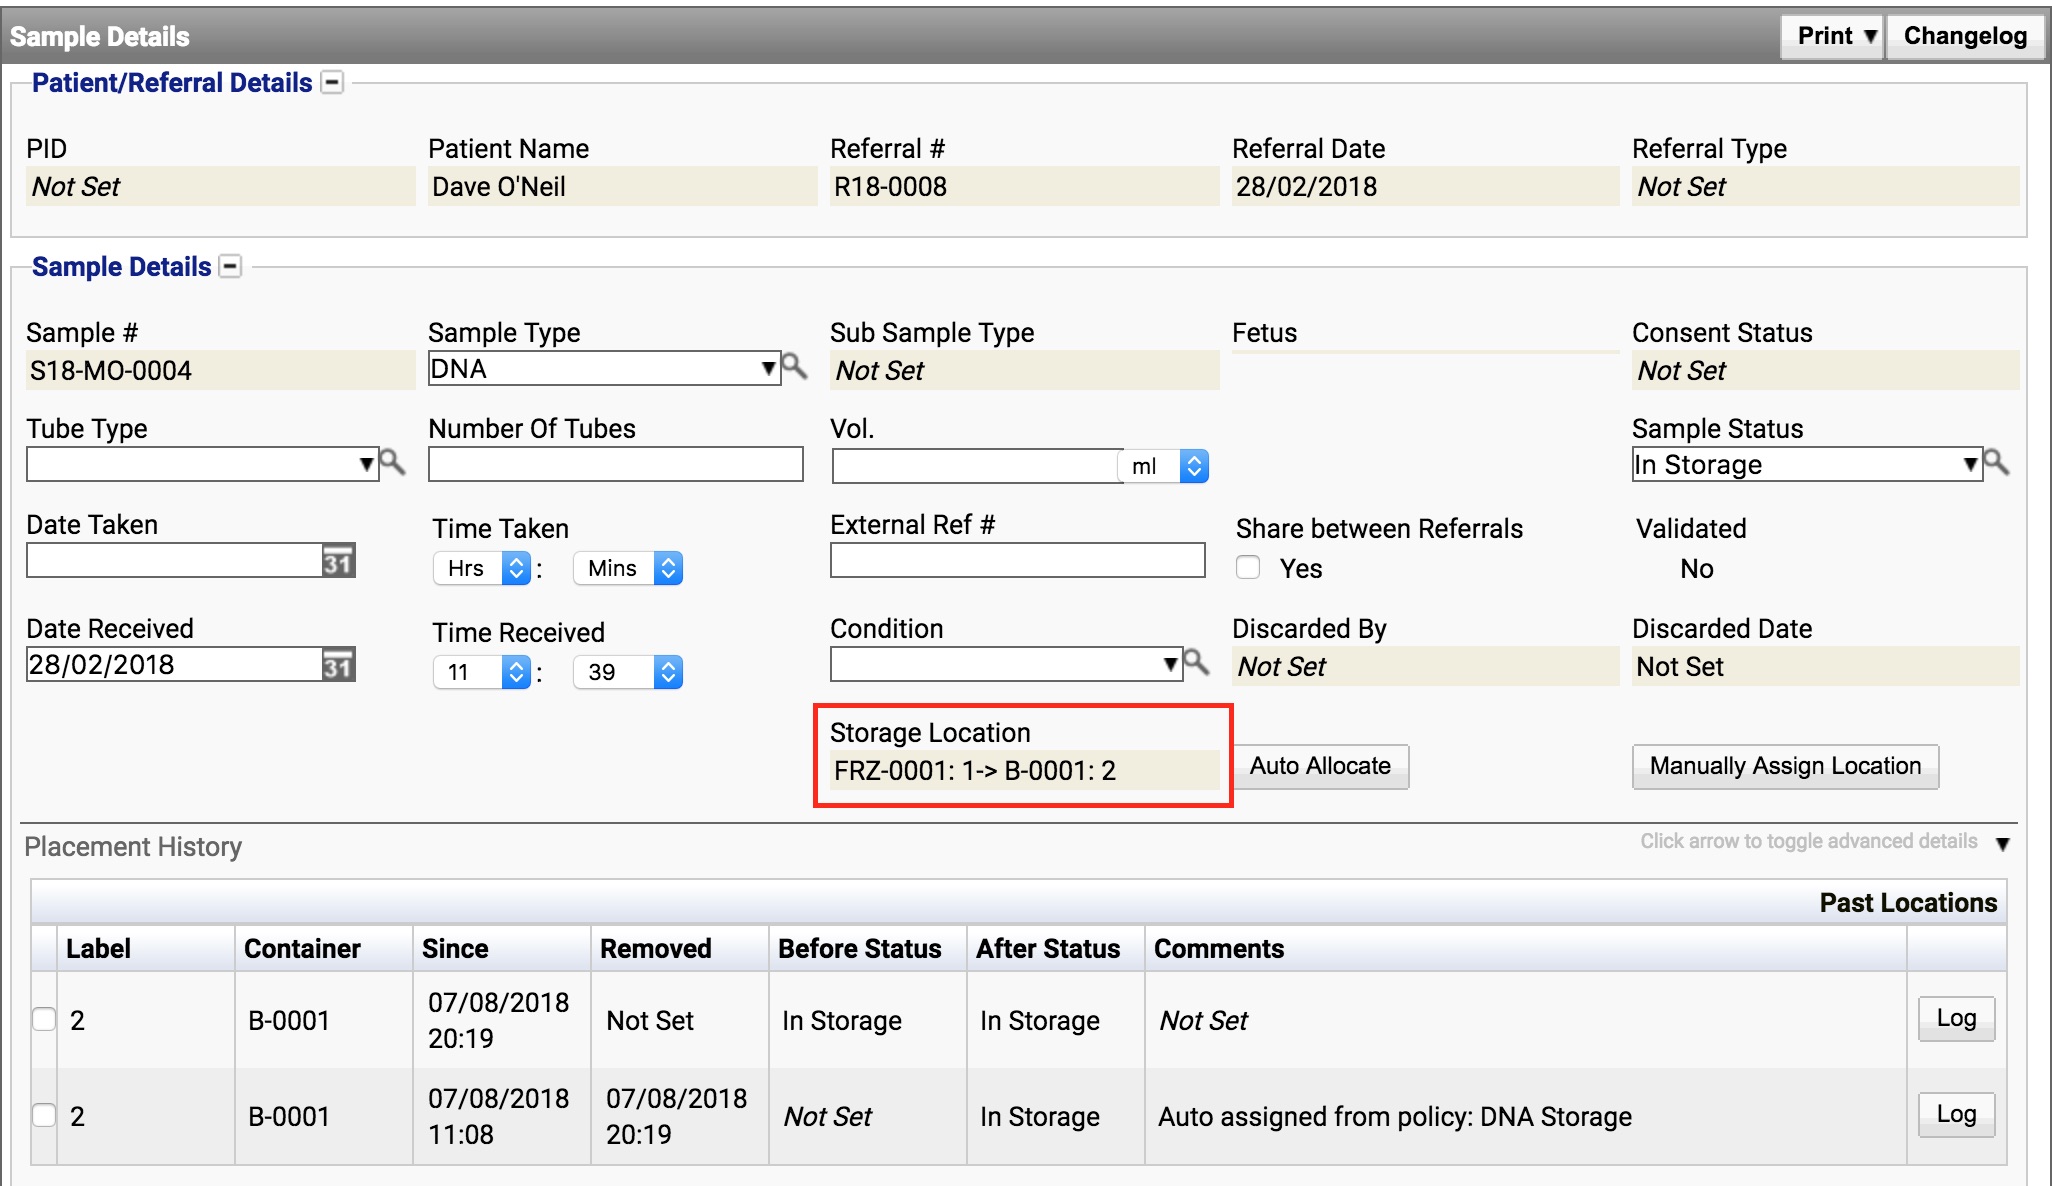
Within the Sample Details screen an up-to-date storage location is displayed, including any parent containers.
Example Scripts
Label Script (Sample Container)
// Variables
// index = The index of the label, e.g. 5 of 96. The index starts from 1 and ends at the number of positions
// size   = The number of positions.
// Using index and size, return a label for the requested index

// Returns the given index as a number
return index.toString()
Below is an example of a script which could be used to display items within a liquid nitrogen tank. This has the dimensions of Cane (colour), level and location. An example of this would be ‘Green:3A’
//Cane can hold 15 samples (5 x 3), assume 1 based!
//Total samples, 75 (15 * 5 canes)
def caneLevels = 5
def caneLocations = 3

//**** DON"T CHANGE ANYTHING BELOW HERE! ****//
caneSamples = caneLevels * caneLocations

//Which cane?
def caneColour = ""
caneToUse =  Integer.valueOf(String.format("%.0f", Math.ceil(index / caneSamples)))
switch (caneToUse) {
    case 1:
        caneColour = "Green"
        break;
    case 2:
        caneColour = "Red"
        break;
    case 3:
        caneColour = "Blue"
        break;
    case 4:
        caneColour = "Orange"
        break;
    case 5:
        caneColour = "Black"
        break;
    default:
        //Error, it's full!
        break;
}

//Which level?
def levelToUse = 0
levelToUse = String.format("%.0f",(Math.ceil(index / caneLocations)) - (caneLevels * caneToUse) + 5)

//Which location
def pos = ""
if ((index % caneLocations) == 0) {
    pos = "C"
} else if ((index % caneLocations) == 1) {
    pos = "A"
} else if ((index % caneLocations) == 2) {
    pos = "B"
}

return "${caneColour}:${levelToUse}${pos}"
Another example is the use of a box with X and Y where the top is A,B,C etc and the side is 1,2,3 etc. Items need to be placed in the the order of A1, B1, C1… A2, B2 etc. The below script will enable that to happen for a 100 well box.
//10 x 10 Grid
xAxis = 10 //A, B, C etc
yAxis = 10

//DO NOT CHANGE BELOW HERE

yValue = Math.floor(index / yAxis) +1
xValue = index % yAxis

if (xValue == 0) {
    xValue = 10
    yValue --
}

xDisplay = String.valueOf((char)(Integer.valueOf(xValue) + 64))
yDisplay = String.format("%.0f", yValue)

return "${xDisplay}${yDisplay}"
On Add (Sample Container)
// Variables
// sample = The sample being added
// containerLocation = The location the sample is being added to
// container = The container

import com.genialgenetics.igene.common.server.dao.models.SampleStatus

if (sample) {
   def status = SampleStatus.findByCode("inStorage")
   if (status) {
      sample.setSampleStatus(status)
   }
}
On Remove (Sample Container)
// Variables
// sample = The sample being removed
// containerLocation = The location the sample is being removed from
// container = The container the sample was in

import com.genialgenetics.igene.common.server.dao.models.SampleStatus

if (sample){
   def status = SampleStatus.findByCode("outStorage")
   if (status) {
      sample.setSampleStatus(status)
   }
}
Placement Code (Sample Storage Policy)
// Find an return a container that will assign this sample a container
// You are given the variables:
// - sample (The sample to be allocated if this is for a sample)
// - container (The container to be allocated a location if this is for another container)
// - storagePolicy (Reference to this storage policy)
// Return either
// - A string or an exception if something goes wrong. This will be logged into a placement record with no container or location assigne
// - A ContainerLocation that is ready to accept the Sample or Container

import com.genialgenetics.igene.common.server.dao.models.ContainerTemplate

def containerTemplate = ContainerTemplate.findByCode("Rack")
if (!containerTemplate) {
    return "Error: Container Template Rack not found"
}

// Search for the first free container
def container = containerTemplate.findFirstFreeContainer()

if (!container) {
   // No free container, create a new container
   container = containerTemplate.createNewContainer()
   if (!container){
      return "Error: Failed to create a new container of type Rack"
   }
}

// Collect the next free location and return it
def location = container.getNextFreeLocationFor(sample)
if (!location) {
  // No free location.
  return "Error: no free location in container ${container.name}"
}

// All good, return this location. iGene will then allocate the sample to the location
return location
The below script will create a task for a group of users to complete when the container is 80% full. Once it is 100% full, a new task will be created to move the container to a new location.
// Find an return a container that will assign this sample a container
// You are given the variables:
// - sample (The sample to be allocated if this is for a sample)
// - container (The container to be allocated a location if this is for another container)
// - storagePolicy (Reference to this storage policy)
// Return either
// - A string or an exception if something goes wrong. This will be logged into a placement record with no container or location assigne
// - A ContainerLocation that is ready to accept the Sample or Container

import com.genialgenetics.igene.common.server.dao.models.*

def containerWarnThreshold = 80
def containerManagementGroupCode = 'container_managers'

DistributionList dl = modelHandler.findByCode(DistributionList.class, containerManagementGroupCode)
if (dl == null) {
 return "Error: Unable to find the distribution group with the code ${containerManagementGroupCode}"
}

def containerTemplate = ContainerTemplate.findByCode("Rack")
if (!containerTemplate) {
    return "Error: Container Template Rack not found"
}

// Search for the first free container
def container = containerTemplate.findFirstFreeContainer()

if (!container) {
   // No free container, create a new container
   container = containerTemplate.createNewContainer()
   if (!container){
      return "Error: Failed to create a new container of type Rack"
   }
}

// Collect the next free location and return it
def location = container.getNextFreeLocationFor(sample)
if (!location) {
  // No free location.
  Task createContainer = new Task();
  TaskAssignee assignee = new TaskAssignee()
  createContainer.getTaskAssignees.add(assignee)
  assignee.setTask(createContainer)
  assignee.setDistributionList(dl)
  createContainer.setName("Create a new container");
  createContainer.setDescription("Please create a new container. ${container?.name} is full")
  modelHandler.save(assignee)
  modelHandler.save(task)

  return "Error: no free location in container ${container.name}"
}

if ((location / container?.containerLocations?.size() * 100) > containerWarnThreshold) {
  //We are getting close to the max
  Task createContainer = new Task();
  TaskAssignee assignee = new TaskAssignee()
  createContainer.getTaskAssignees.add(assignee)
  assignee.setTask(createContainer)
  assignee.setDistributionList(dl)
  createContainer.setName("Container ${container.name} nearly full.");
  createContainer.setDescription("Container ${container.name} is ${containerWarnThreshold}% full. Please create a new container.")
  modelHandler.save(assignee)
  modelHandler.save(task)
}

// All good, return this location. iGene will then allocate the sample to the location
return location