Test Status Workflow
Test Status Workflow allow the user to customise the status of tests as required and the location. For example, setting a test to initially be ‘Ordered’ or changing the status to be ‘Results Entered’ when the results are completed. Every test/orderable in iGene has a Test Status that is used for the following purposes:
- To show the current state of a test in the lab workflow, e.g. Waiting, Results Entered, Reported.
- To control what users can and can not do when a test has a particular state, e.g. To prevent results from being edited when the test has a report.
- To define transitions between states and which users can perform these transitions, e.g. Marking a result as complete or a test as cancelled.
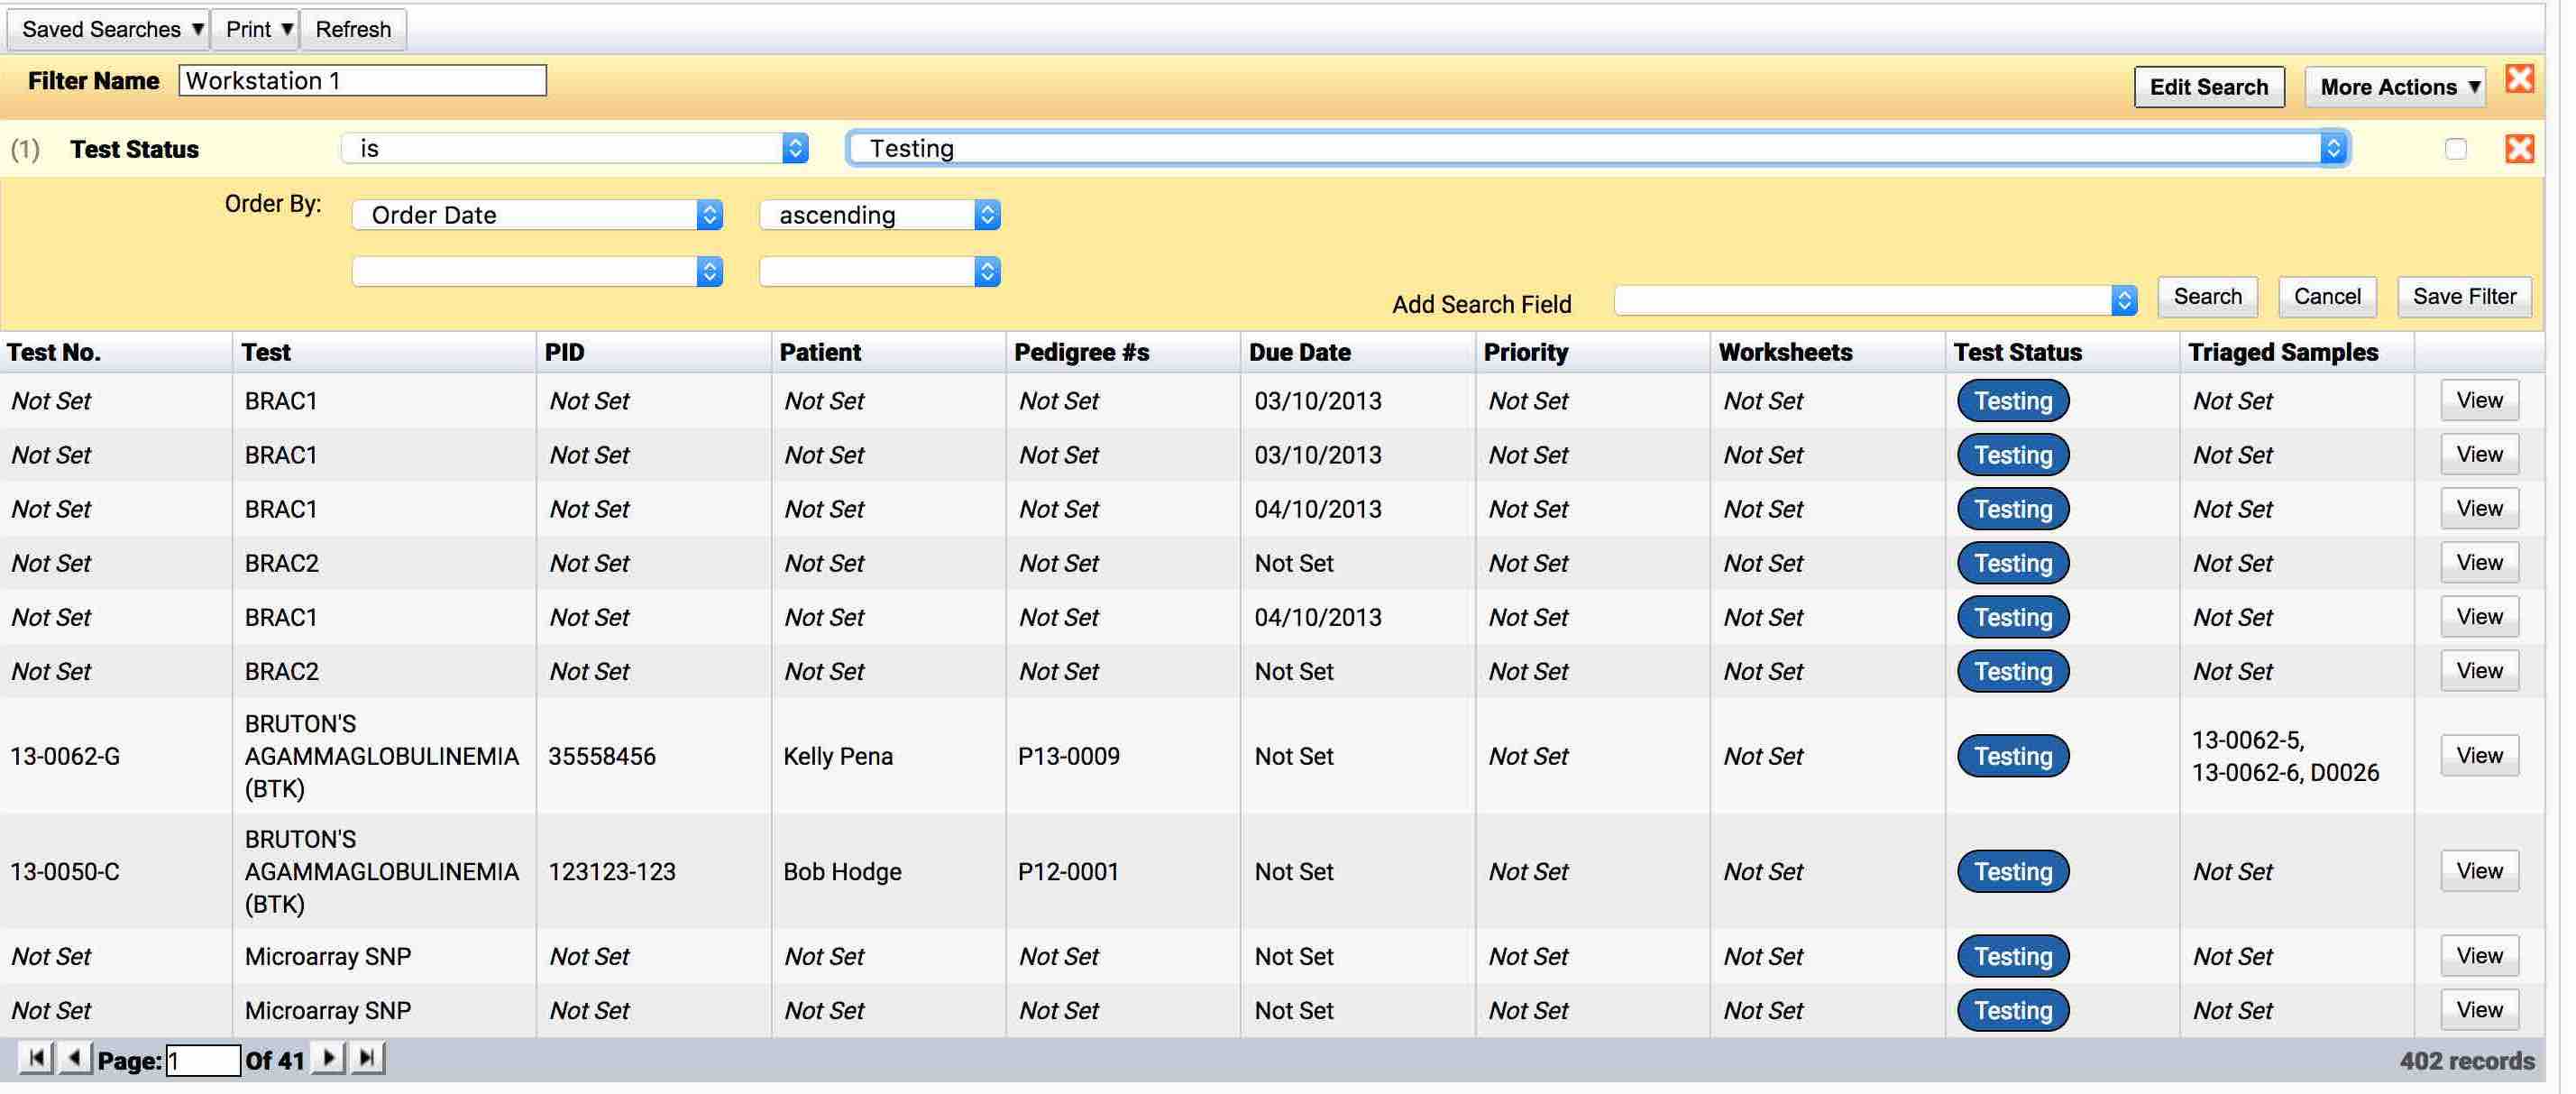
- To provide an easy way of searching or creating worklists of tests that are at a particular stage in the workflow, e.g. All tests waiting to be triaged.
For more information on setting up a search filter, see Searching
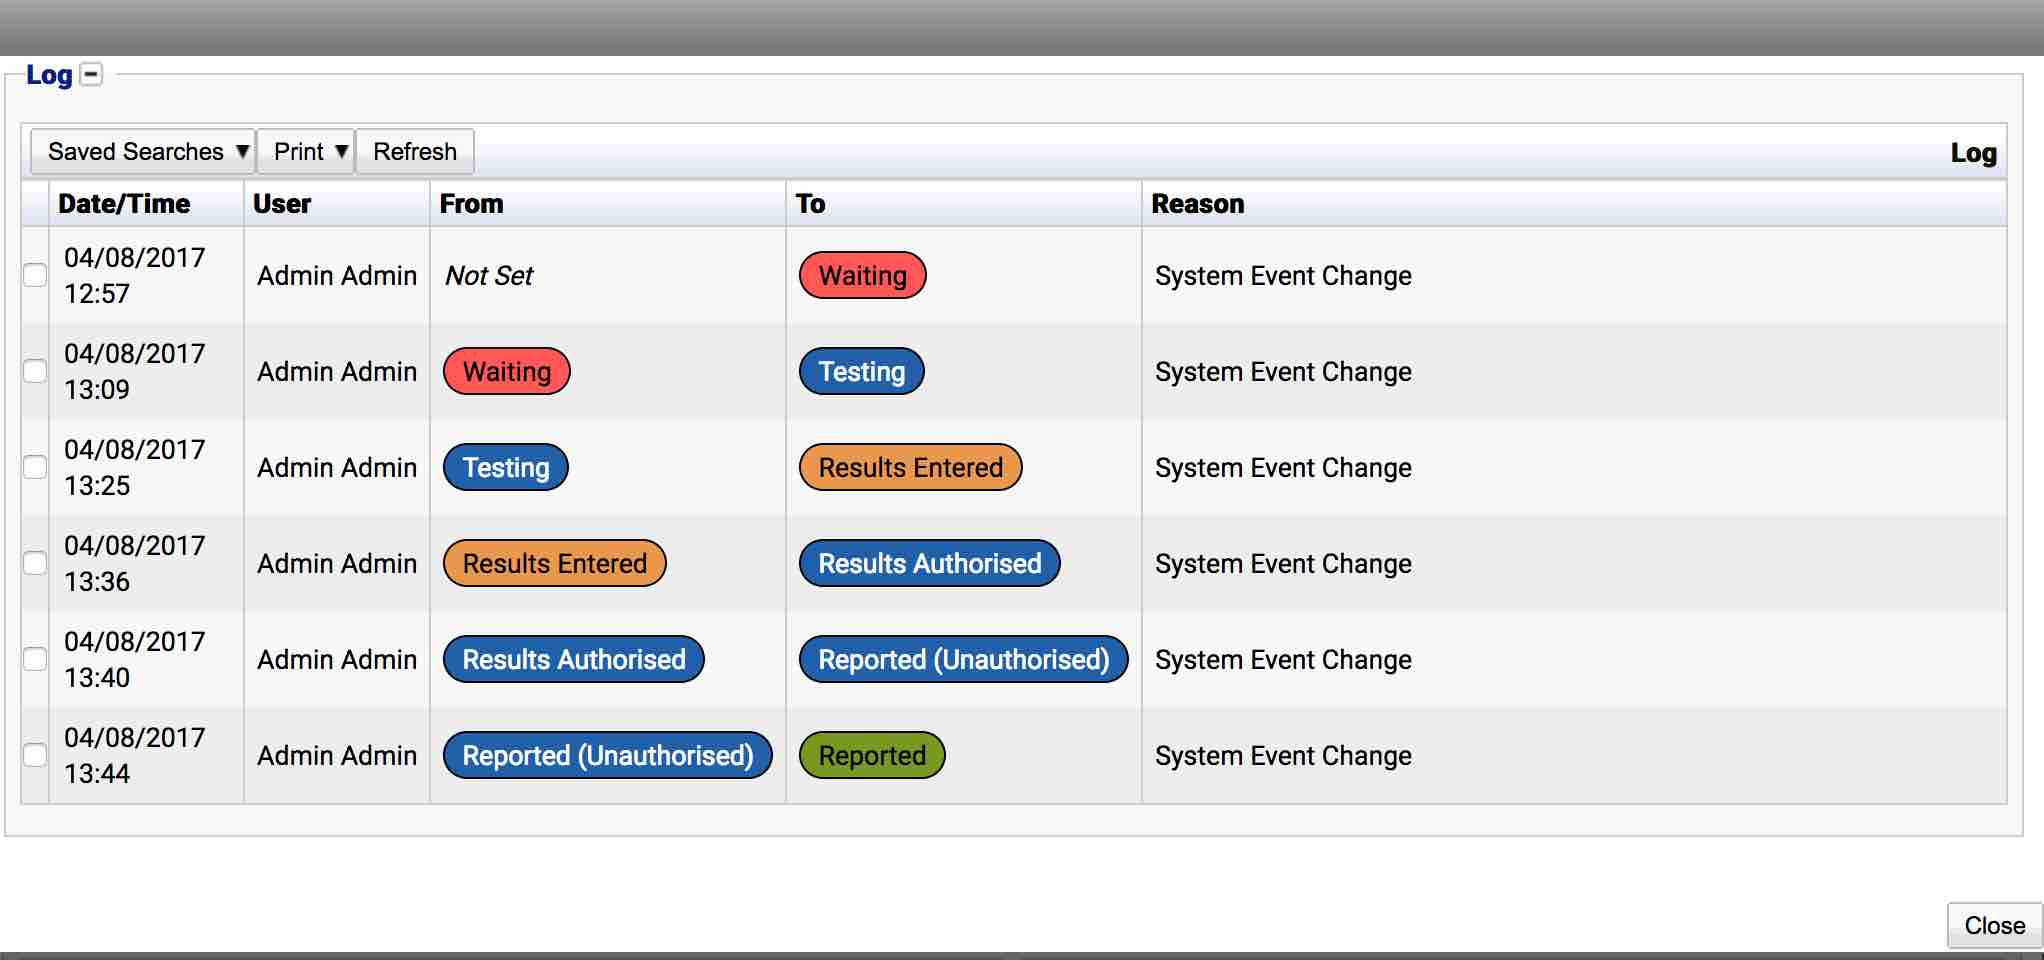
- To provide a full log of a test’s history, i.e. The date/time a test had each status and which user triggered the test to have that status.
- Colour coding. Each test status can have a unique colour code to provide visual cues when browsing lists of tests or worksheets on the test’s current status.
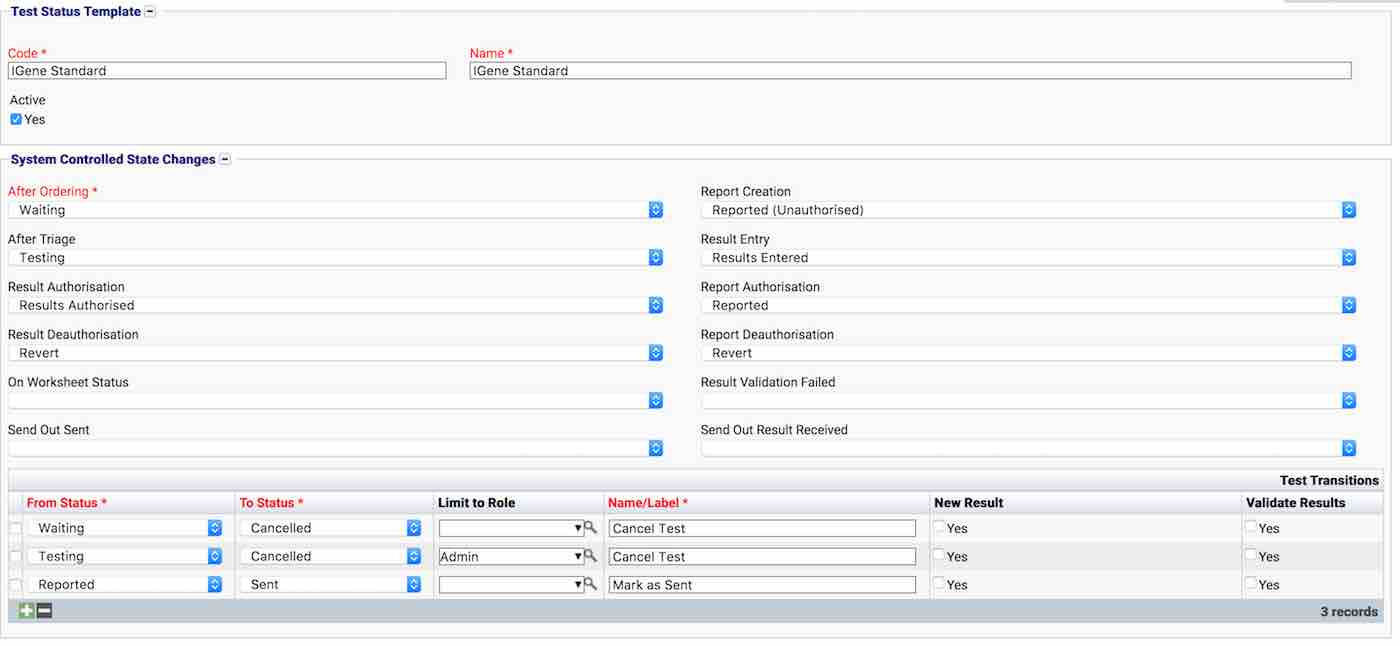
Each test/orderable is assigned a Test Status Template via Test Preferences which defines:
- Which test statuses the test can have.
- Automated state changes:
- After Ordering: The status to assign after the test has been initially ordered/created.
- After Triage: The status to assign after the test has been triaged.
- Result Authorisation: The status to assign after a test has been authorised.
- Result Deauthorisation: The status to assign when a test is deauthorised. The status can also be reverted to the previous status.
- On Worksheet Status: The status to assign when the test is placed onto a worksheet.
- Send Out Sent: The status to assign when an external send-out test has been sent.
- Report Creation: The status to set when the report has been created (but not yet authorised).
- Results Entered: The status to set when the result code on a result has been entered.
- Report Deauthorisation: The status to set when a report is deauthorised. The status can also be reverted to the previous status.
- Result Validation Failed: The status to set when a result is invalid. This status is used when two or more results are entered per test and the results don’t match.
- Send Out Results Received: The status to set when the results are added to an external send-out test.
- A list of test transitions, discussed below:
As well as the automated status changes provided by the system, a test status template can define a list of transitions that indicate user actions for changing from one status to the other. Transitions provide additional actions (via buttons and the actions menu) when viewing results to trigger a state change. A transition has the following values:
- From Status: The status the test must be at for this transition to apply.
- To Status: The status the test will have after a user triggers the transition.
- Limit To Role: A user role (TODO link to roles) to limit the transition to. If blank, anyone can perform this transition.
- Name/Label: The name of the transition. This name will appear in the button and action menu item for triggering the transition.
- New Result: When enabled, a new blank result will be created when the transition is triggered. This is useful for cases where double-entry is required on a result and the first user has finished entering their results.
- Validate Result: When enabled and there are multiple results, the transition will trigger a validation step that will check the current result against the previous result. If both results match (are valid) then the transition will proceed, otherwise the Result Validation Failed status change will be applied. This is useful for cases where double-entry is required for a result and provides a way to track results that may have an issue.
iGene provides an administrator option (enabled via permissions) that will allow a user to set a test to any status on the system. This is provided in case a test becomes stuck or the status change was accidental. N.B. All status changes are always logged and a reason must be provided when forcing a status change.
An Example Workflow
Below is an example workflow which mimicries the behaviour found in older versions of iGene and is a very common workflow:
The workflow is setup as follows:
See Test Status Template Preferences for more details about this preference. [TO DO]
The workflow defines the following:
- When the test is first ordered, it will be given the Waiting status. This defines the test is waiting to be triaged. At present, no results can be entered.
- When the test is triaged, it will be given the Testing status. This indicates that testing has now or can now begin and results can be entered.
For sites that don’t have a triaging stage, tests will automatically be triaged to the sample in the referral or skip triaging completely. If this happens, the status will initially be Waiting, but then immediately be changed to Testing after the referral has been saved.
- When results have been entered (i.e. A result code has been specified), the status will change to Results Entered.
- Another user will then authorise the result to say it has been checked. The status will change to Results Authorised.
- With the authorised result (which is now locked down), a draft report will be created. The status will change to Report (Unauthorised).
- The report will then be checked and authorised, and the status of the test will change to Report (Authorised). At this point, the test has been considered completed, and once billing has been approved, the referral can be closed.
- Some sites may send out their reports electronically or would like to record that the report has been posted. The transition Mark as Sent will allow the status to be changed to Sent, but only if the report is authorised.
- Two additional transitions are provided to allow cancelling the test. When the status is Waiting, the test can be immediately cancelled. However, once triaged, only members of the Admin role can cancel the test.
Each test status has certain allowed states that can control what the status can and can not do. It also defines a colour label to use to help quickly identify the current state:
See Test Status Preferences for more details about this preference. [TO DO]
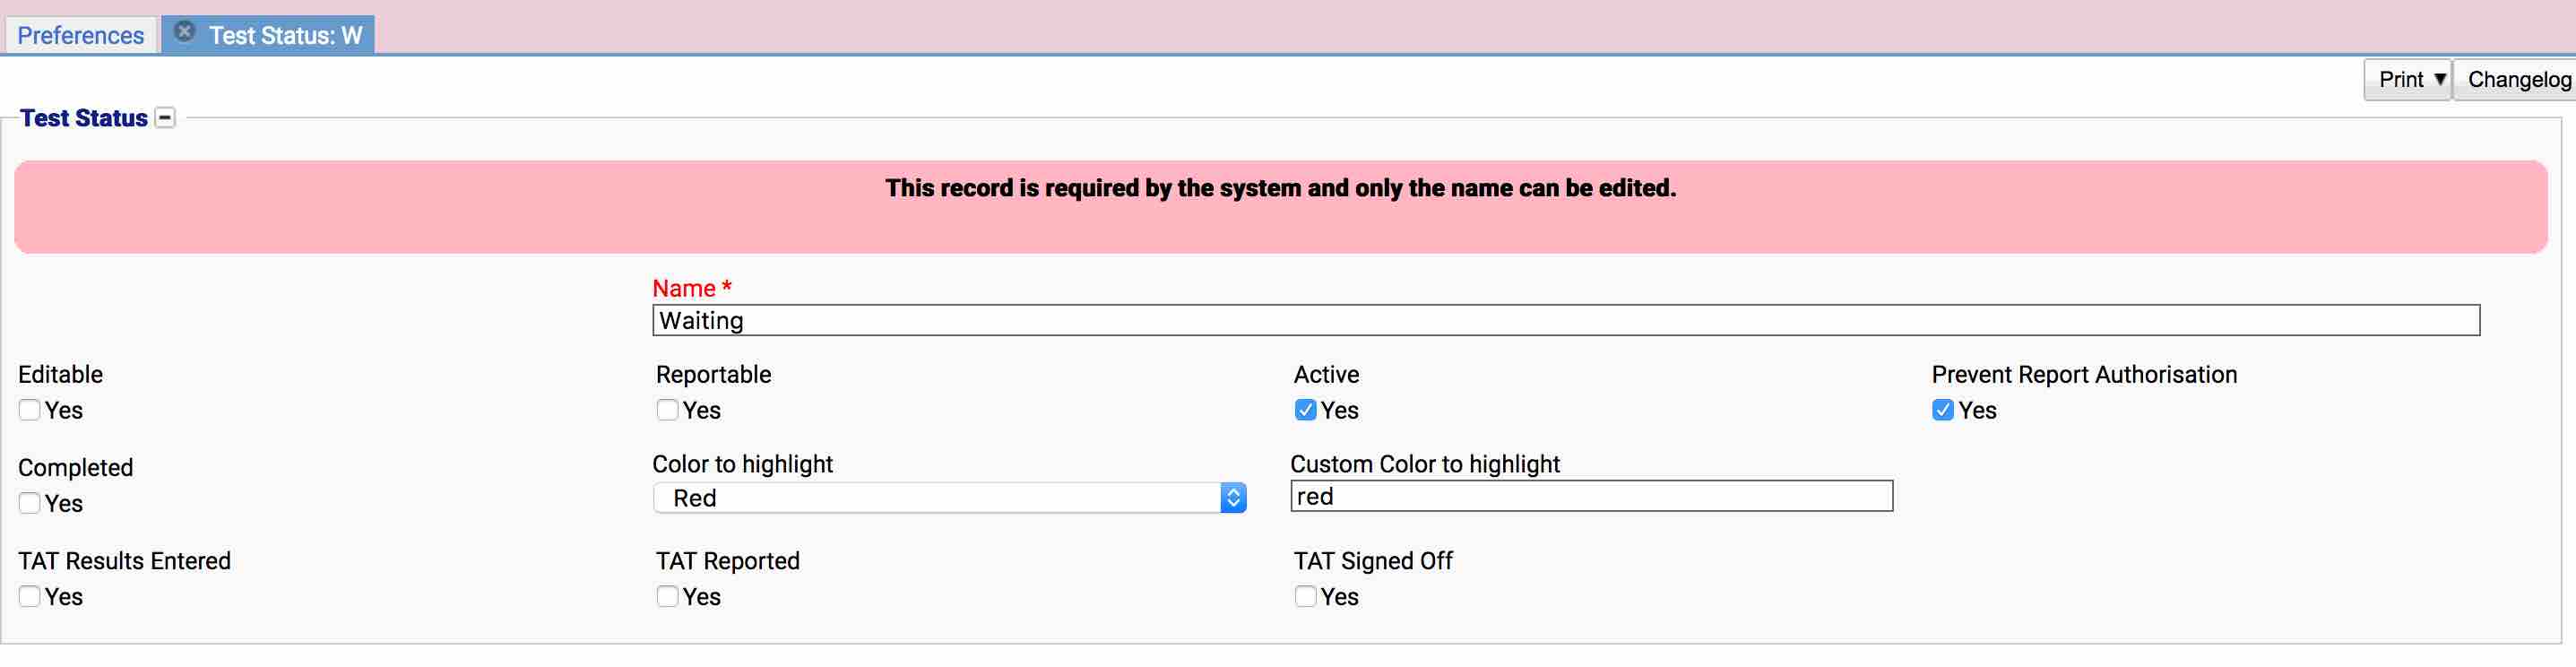
The above test status preference indicates more details about the initial Waiting status:
- Editable is unchecked. This option indicates that a result cannot be entered.
- Reportable is unchecked. This option indicates that a report cannot be entered.
- Prevent Report Authorisation is checked. This prevents any reports with this status being authorised.
- Completed is unchecked. Completed controls whether the test has finished and billing can be completed and the referral closed.
- Colour to Highlight is set to red.
Apart from the basic colours defined in the preferences, test statuses can be assigned CSS colours. There are various resources on the internet for these colours such as w3 schools. e.g. #cc33ff will show a purple colour.
For the Testing status:
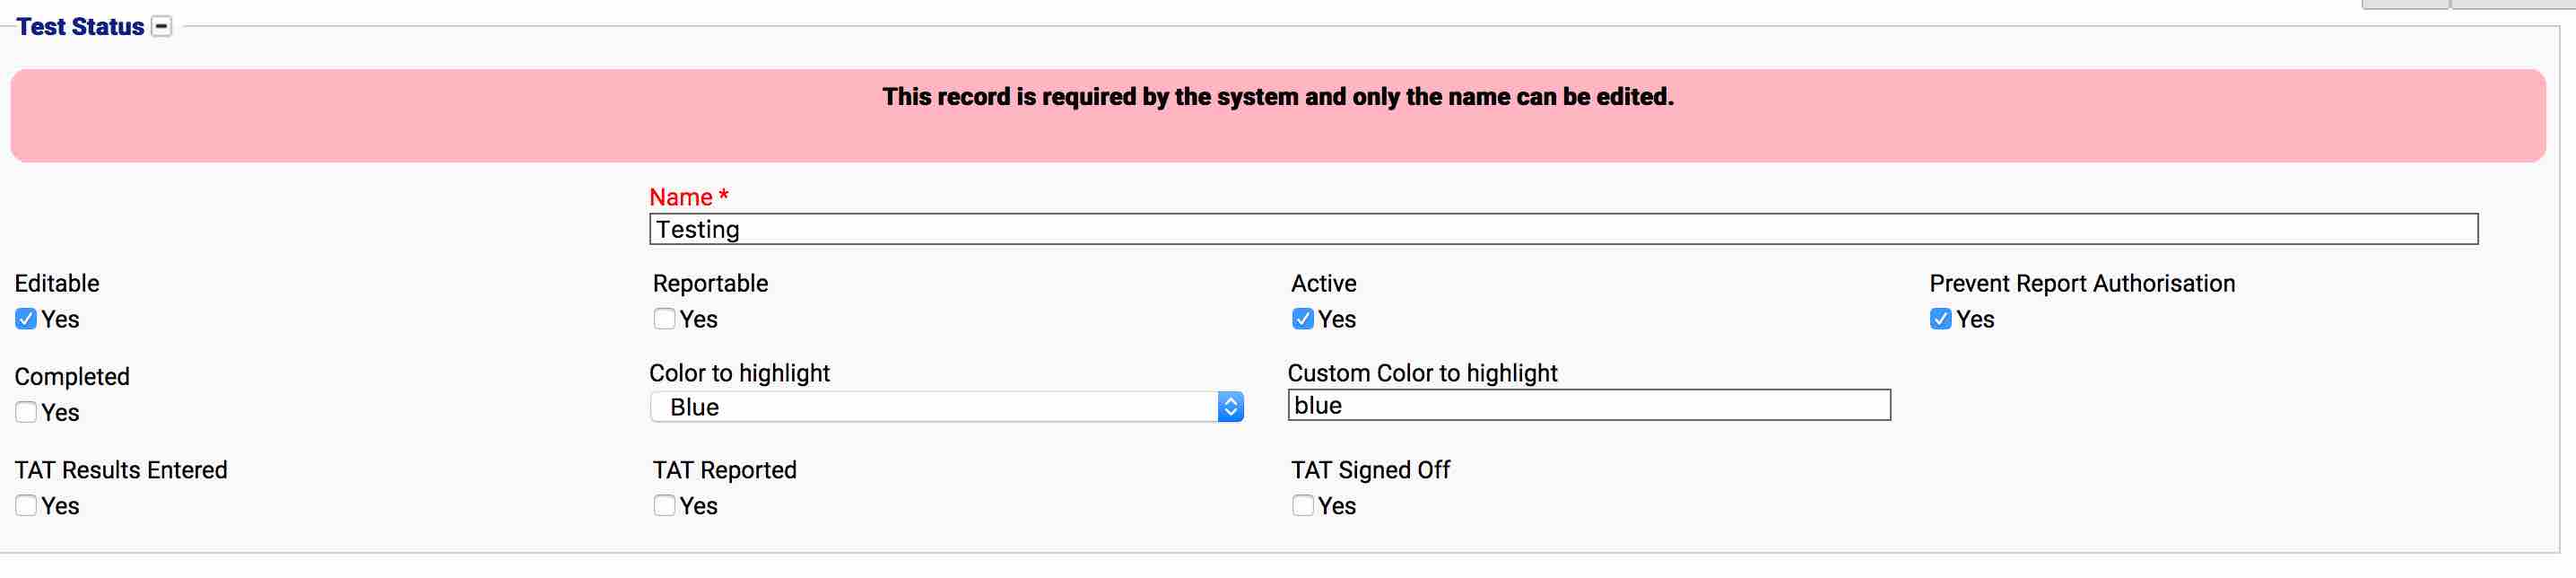
- Editable is checked. This option indicates that a result can now be entered.
- Reportable is unchecked. This option indicates that a report cannot be entered.
- Prevent Report Authorisation is checked. This prevents any reports with this status being authorised.
- Completed is unchecked. Completed controls whether the test has finished and billing can be completed and the referral closed.
- Colour to Highlight is set to blue.
For the Results Entered status:

- Editable is checked. This option indicates that the result can still be edited if required. (In this workflow, the test is not locked down until the result has been authorised)
- Reportable is unchecked. This option indicates that a report cannot be entered.
- Prevent Report Authorisation is checked. This prevents any reports with this status being authorised.
- Completed is unchecked. Completed controls whether the test has finished and billing can be completed and the referral closed.
- Colour to Highlight is set to orange.
For the Results Authorised status:
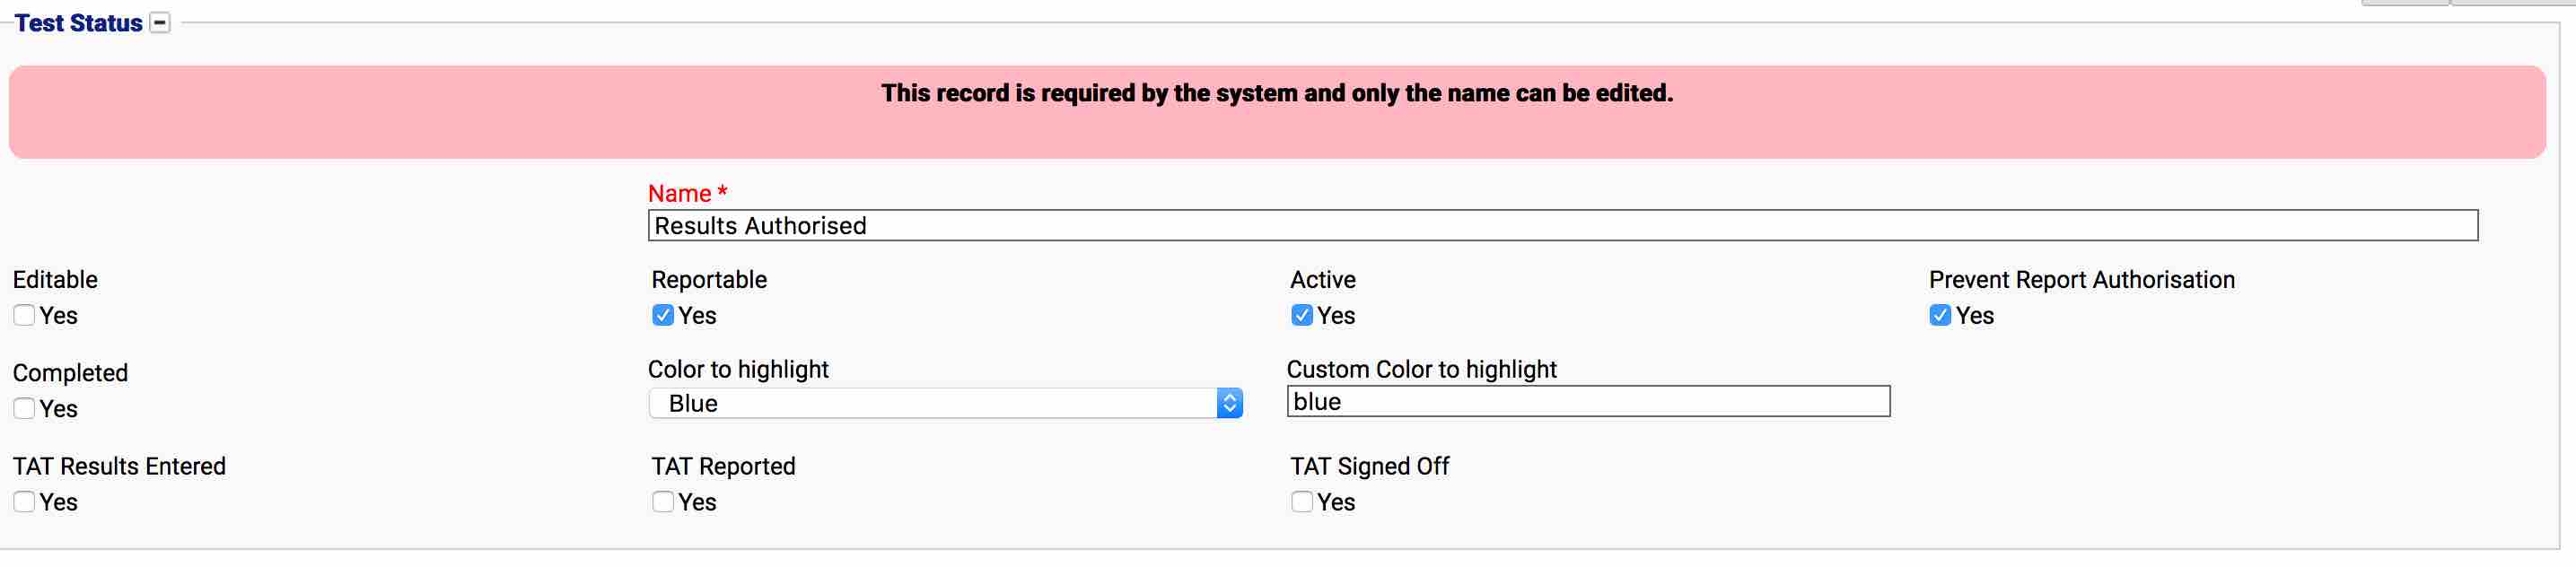
- Editable is unchecked. The result can no longer be edited. To enable editing again, a user must deauthorise the result which will Revert it to the previous status.
- Reportable is checked. A report can be created since the result has been entered and authorised.
- Prevent Report Authorisation is checked. Although reports can be entered, they cannot yet be authorised.
- Completed is unchecked. Completed controls whether the test has finished and billing can be completed and the referral closed.
- Colour to Highlight is set to blue.
For the Reported Unauthorised status:

- Editable is unchecked. The result can no longer be editable. To enable editing again, a user must deauthorise the result which will Revert it to the previous status.
- Reportable is checked. A report can be created and viewed since the result has been entered and authorised.
- Prevent Report Authorisation is unchecked. Since there is now a report, it should be possible to authorise it.
- Completed is unchecked. Completed controls whether the test has finished and billing can be completed and the referral closed.
- Colour to Highlight is set to blue.
For the Reported status:
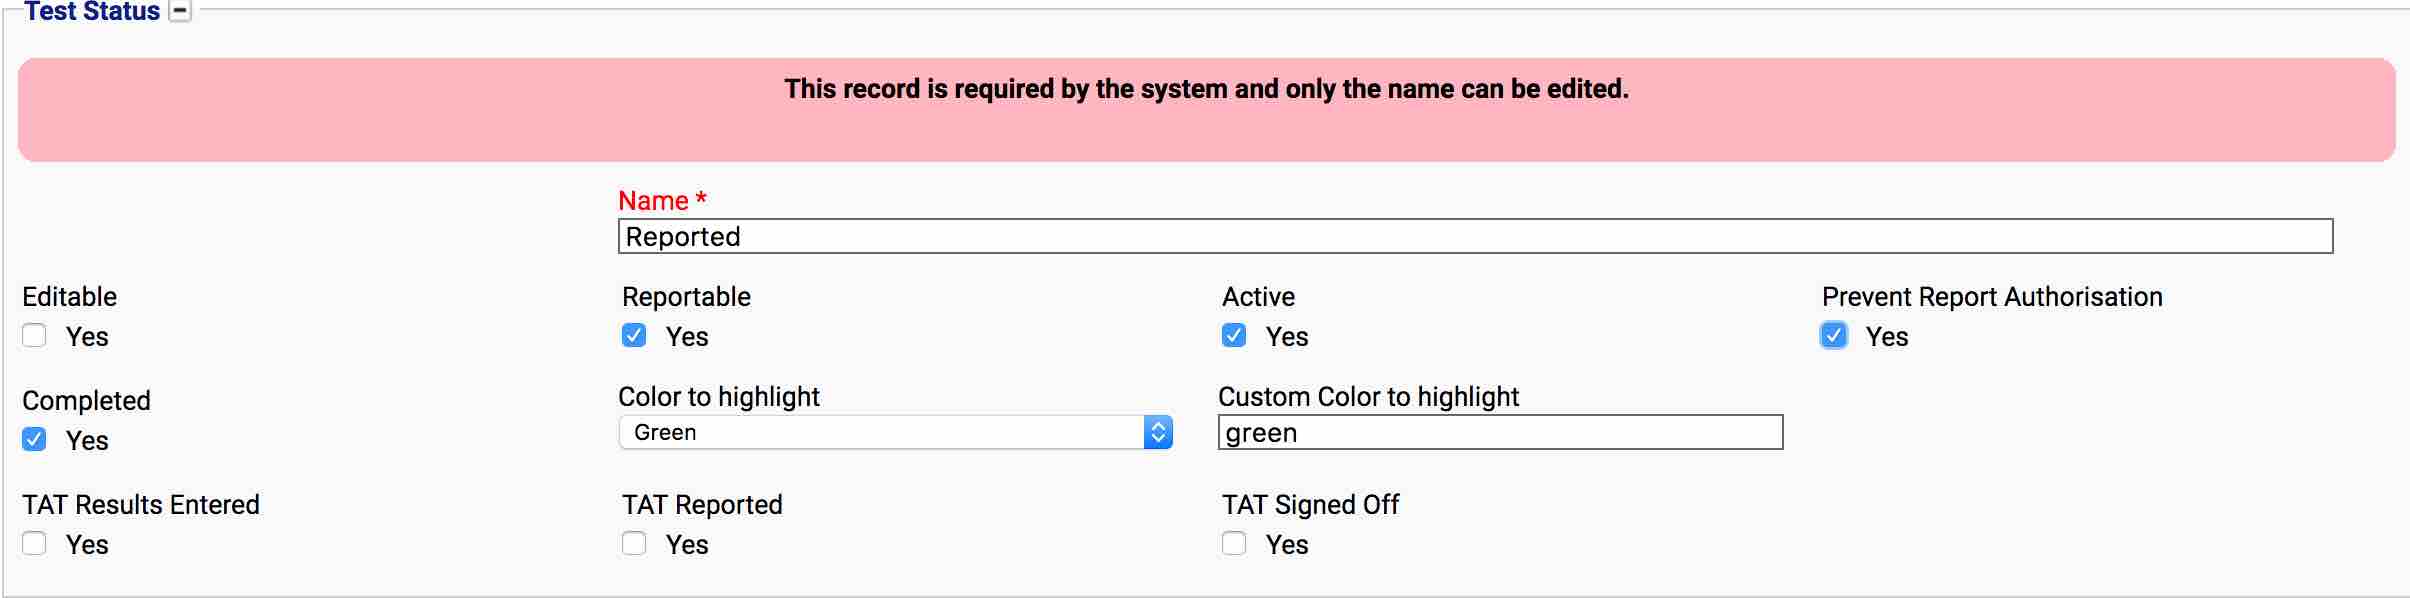
- Editable is unchecked. The result should not be editable because the report has been finalised.
- Reportable is checked. The report can still be viewed, but once authorised, the report screen will be readonly.
- Prevent Report Authorisation is checked. It shouldn’t be possible to authorise an already authorised report.
- Completed is checked. Tests with this status are considered completed. The referral can now been closed (as long as billing has been approved)
- Colour to Highlight is set to green.
As part of the workflow, an option was provided to allow a test to be cancelled if it was either in the Waiting or Testing states. The Cancelled status is shown below:
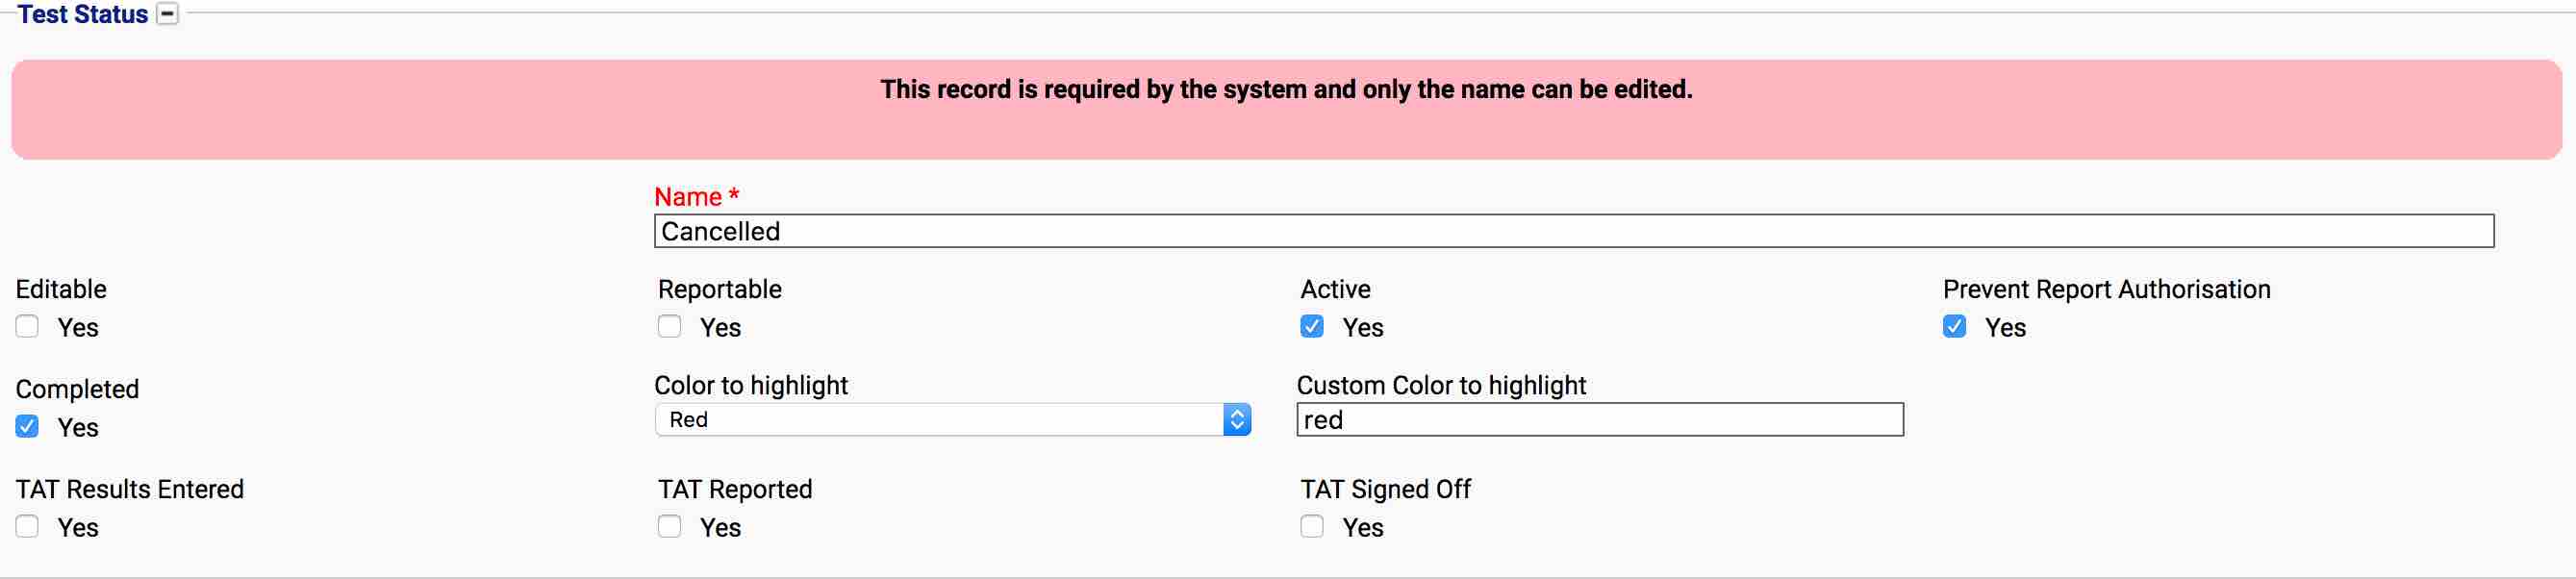
- Editable is unchecked. It should not be possible to enter a result for a cancelled test.
- Reportable is unchecked. It should not be possible to report on a cancelled test.
- Prevent Report Authorisation is checked. It shouldn’t be possible to authorise a cancelled test’s report.
- Completed is checked. Tests with this status are considered completed. Since there is no further action that can be taken, the test is considered completed.
- Colour to Highlight is set to red.
Many sites configure the workflow slightly different, e.g. Some may not have an authorisation stage for results, and will allow results which have the Results Entered stage to have reports. The test status template should provide enough flexibility to configure the workflow as required.
For this example walkthrough, a test has been created which uses the Test Status Workflow defined earlier:

See Test Preferences for more details about test preferences
The “Lab Test” is a simple custom test that uses the iGene Standard test status template defined earlier.
For Patient Maria Grek, the test is initially ordered from the Lab Referral screen (although it can be ordered from other places as well):
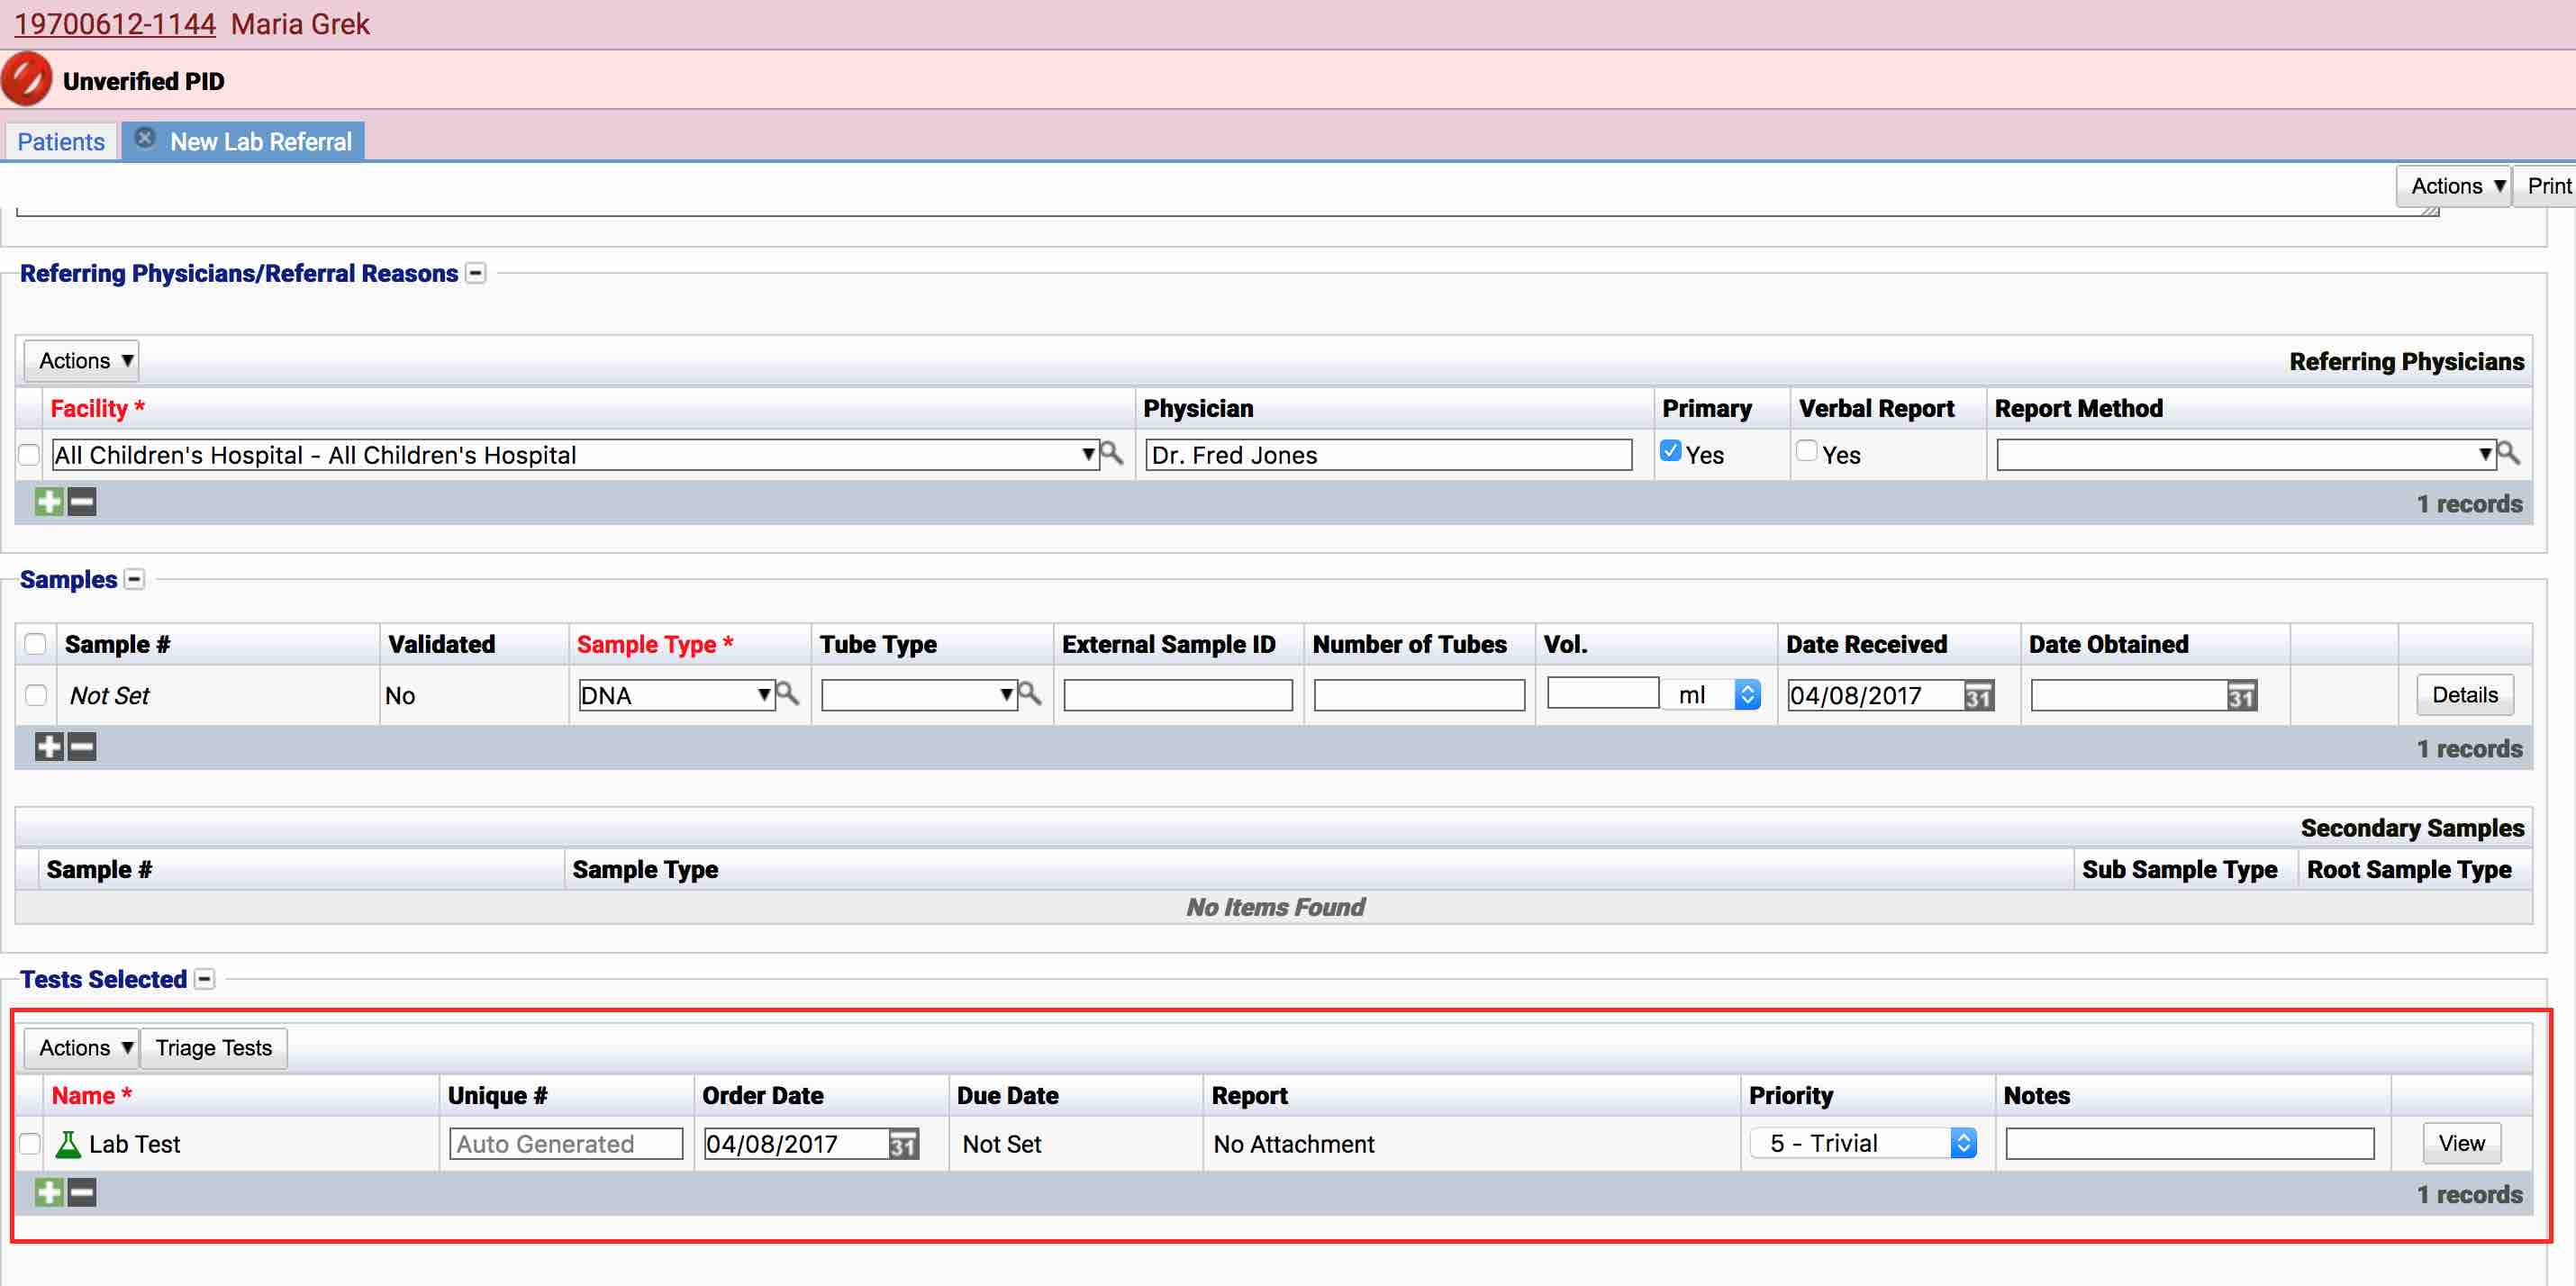
When the referral is saved, the test will have the initial status of Waiting which is coloured in red. This initial status was configured in the test status template earlier.

At this stage, no result can be entered for the test (any attempt to do so will show a readonly screen that can’t be saved).
The test for Maria Grek is then triaged to the sample:
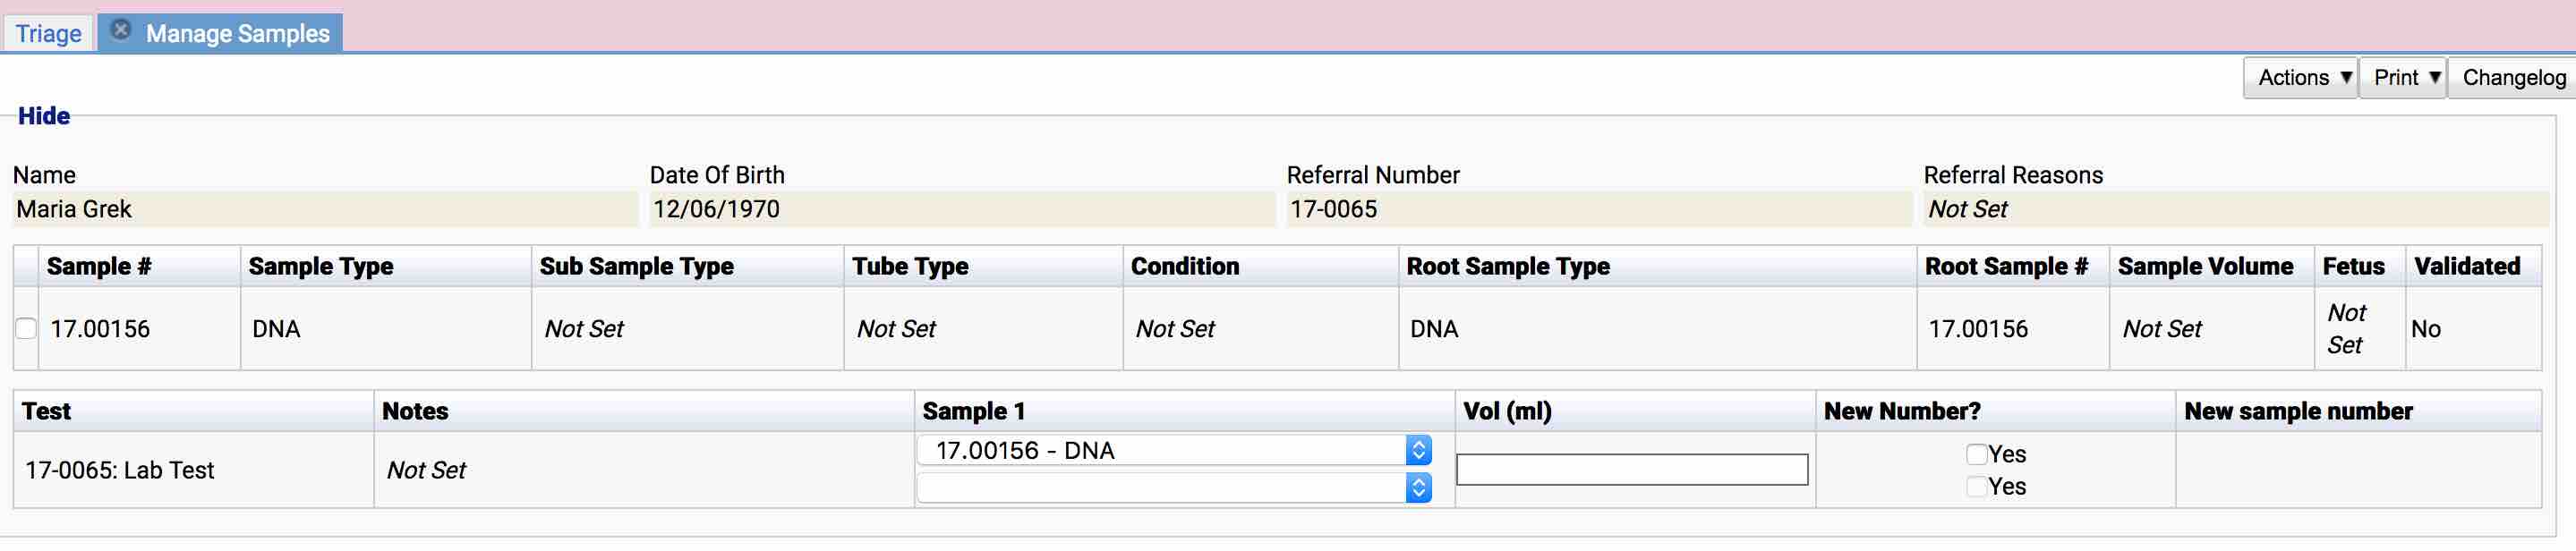
and the status automatically changes to Testing:

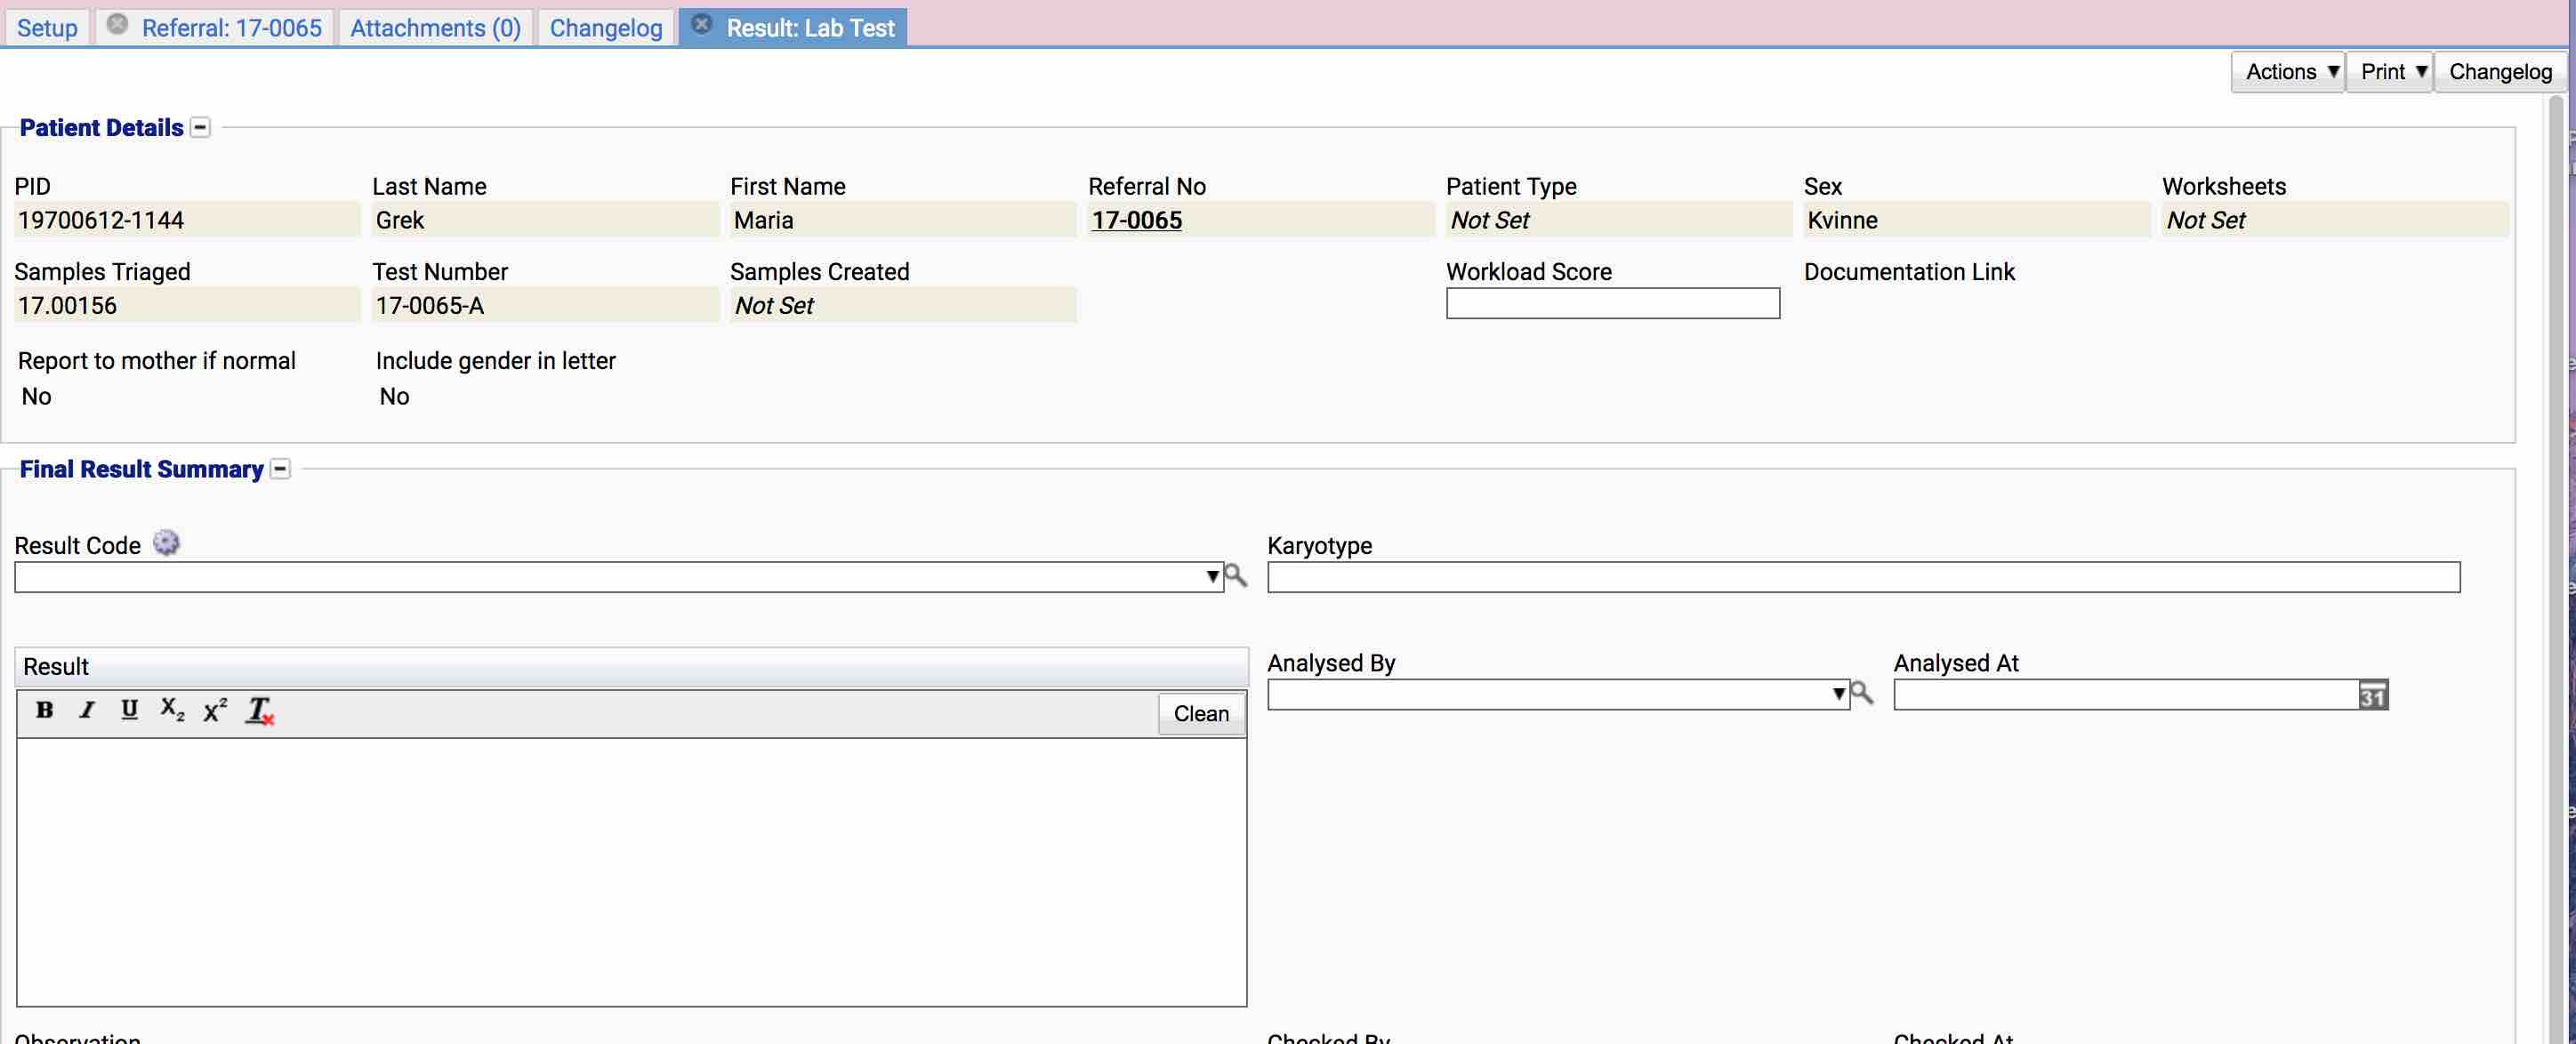
A result can now be entered (The result fields are editable):
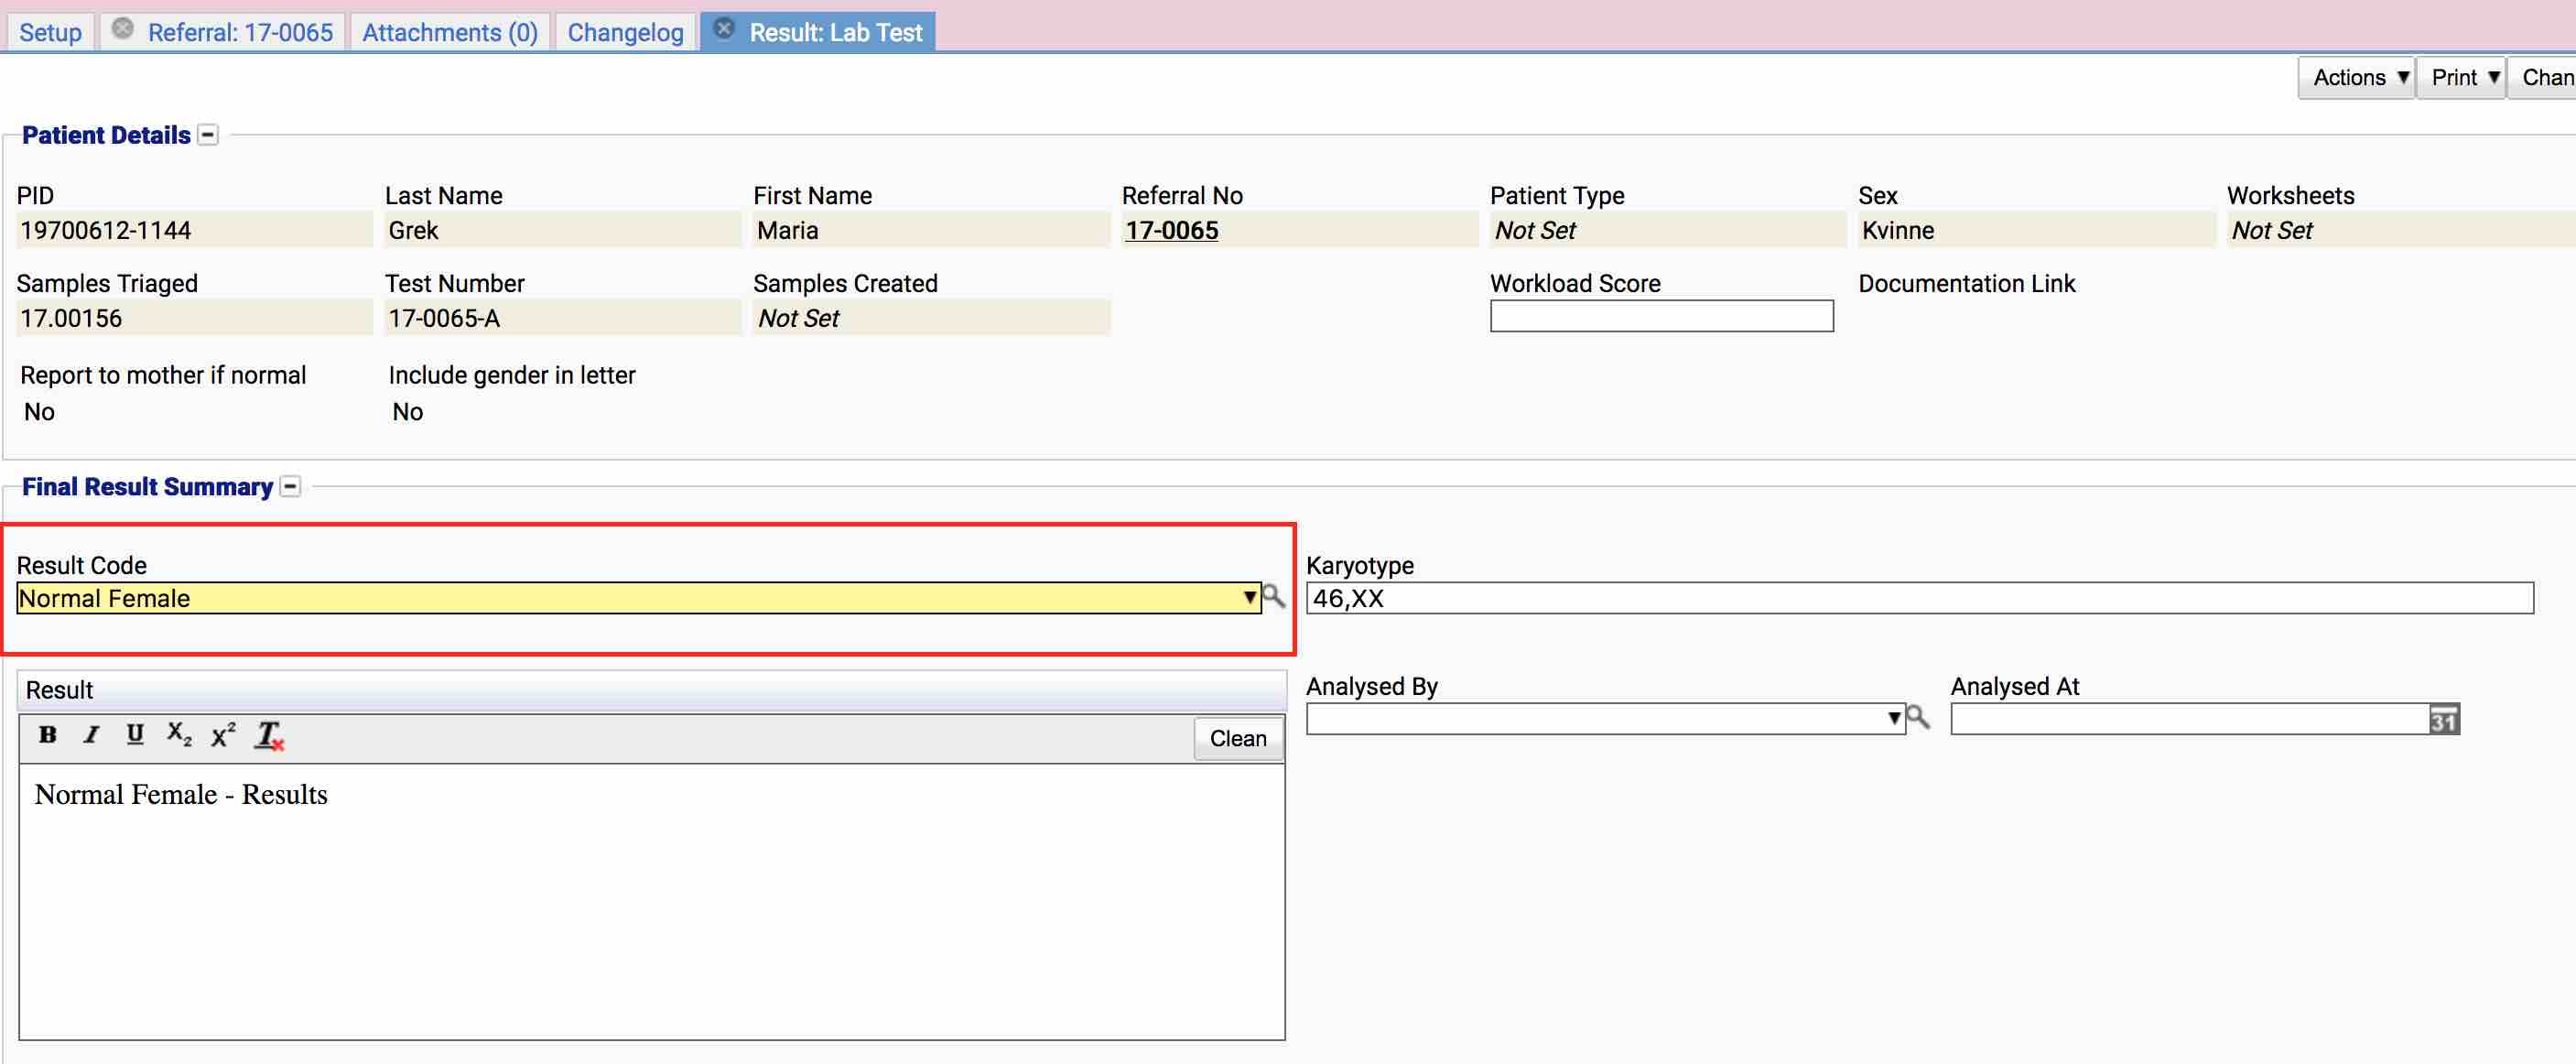
Once a result has been entered (in the Result Code area), iGene will trigger the automatic state change of Results Entered:

Changing the status automatically when a result code has been entered may be undesirable for certain sites. In this instance, the state change for result entered would be left blank and instead a manual transition from Testing to Results Entered would be setup.
At this stage, the result would be checked and authorised so that a report could be created:
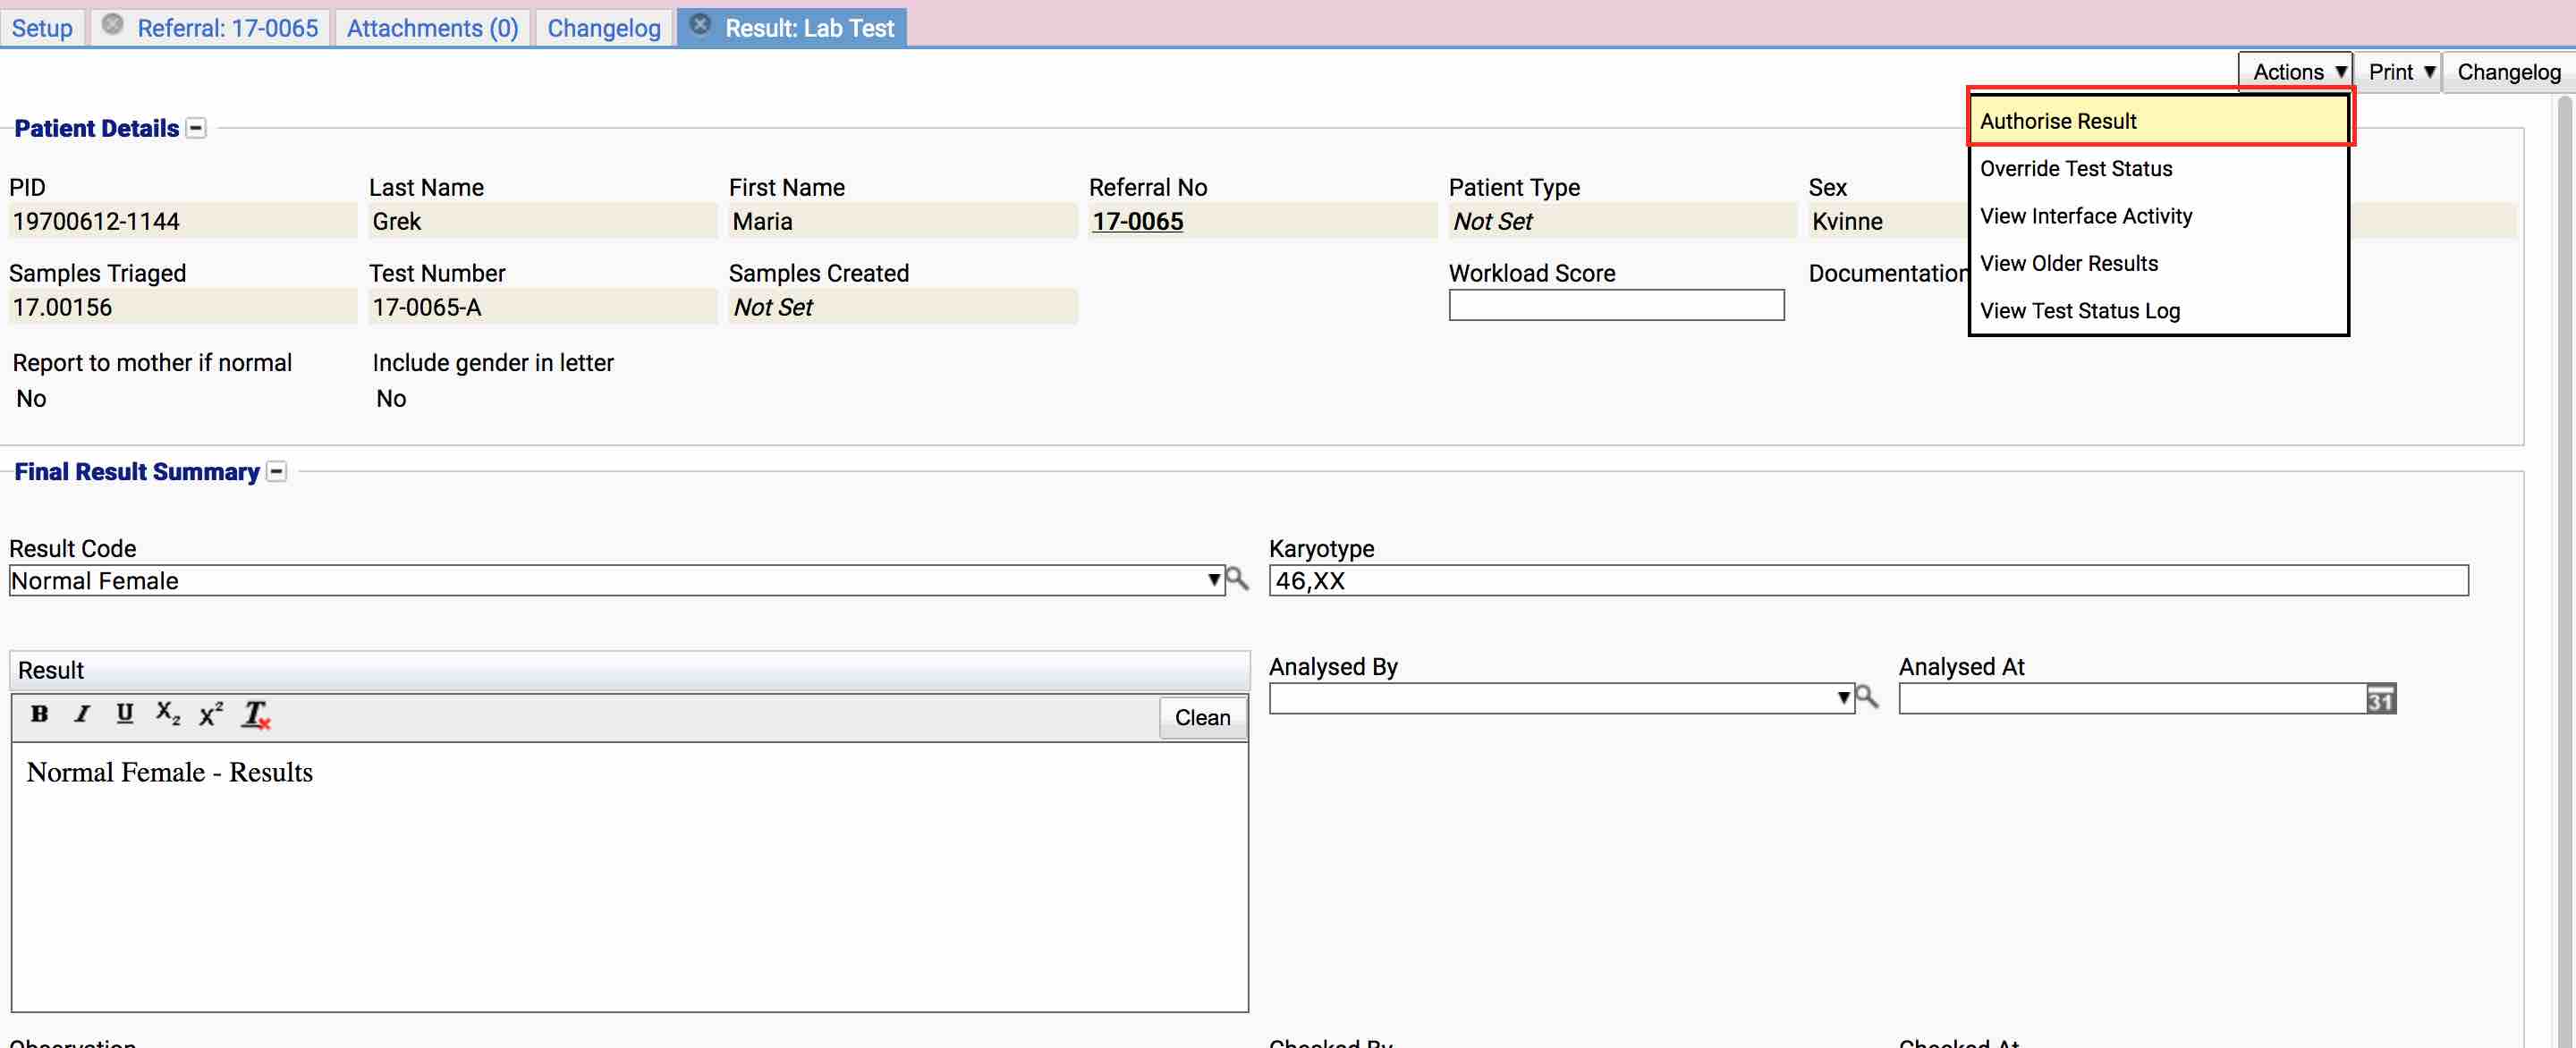
Once authorised, the result becomes readonly:
and the status changes to Results Authorised

At this stage, if the result is invalid or contains a mistake, the result will need to be deauthorised before it can be edited again. Since the test status template defines Results Deauthorisation as Revert, the status would change back to Results Entered.
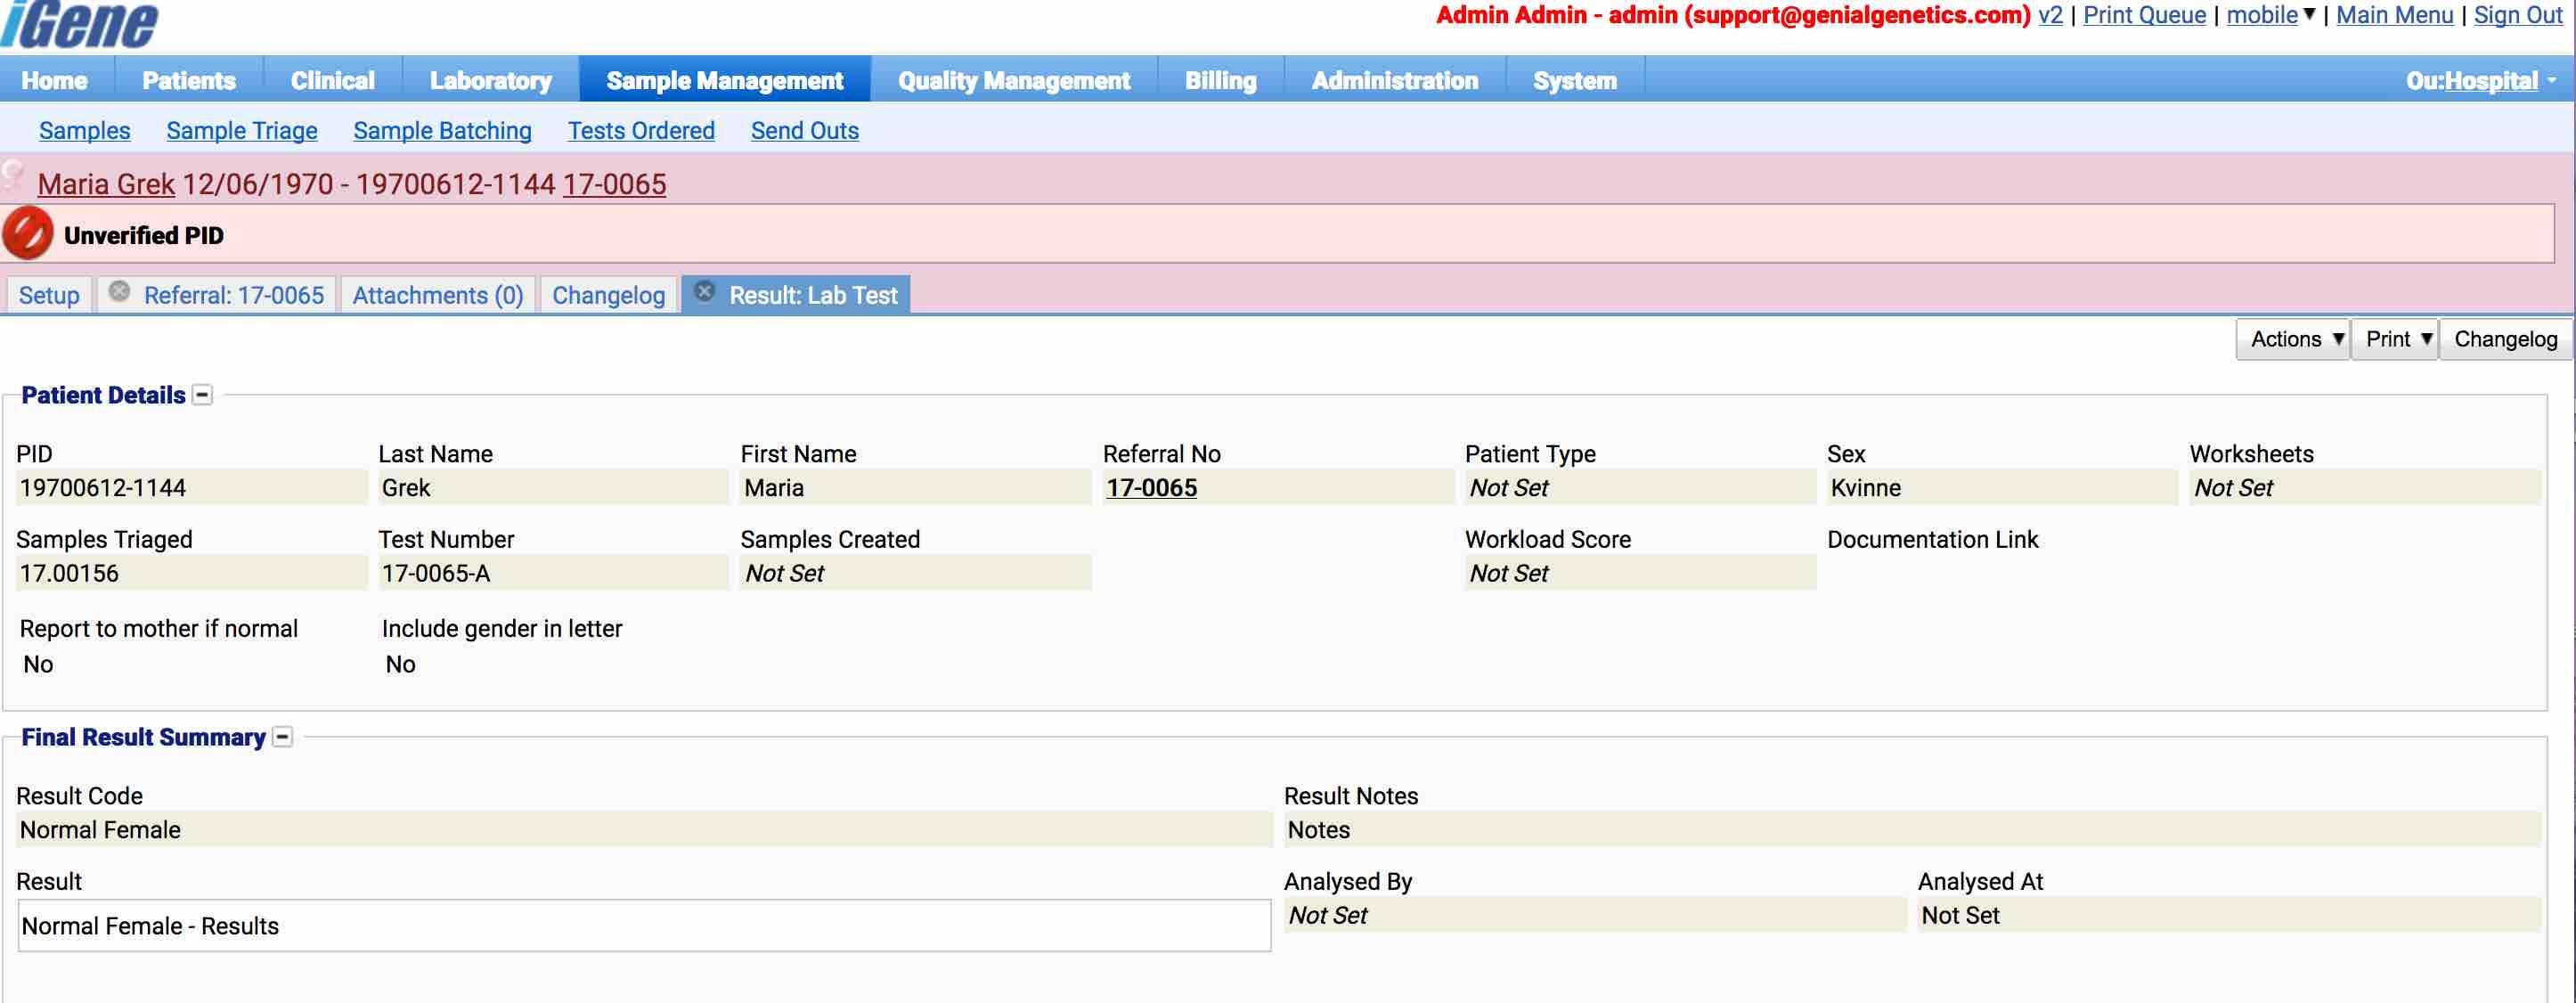
Now the results have been authorised, the system will allow a report to be created:
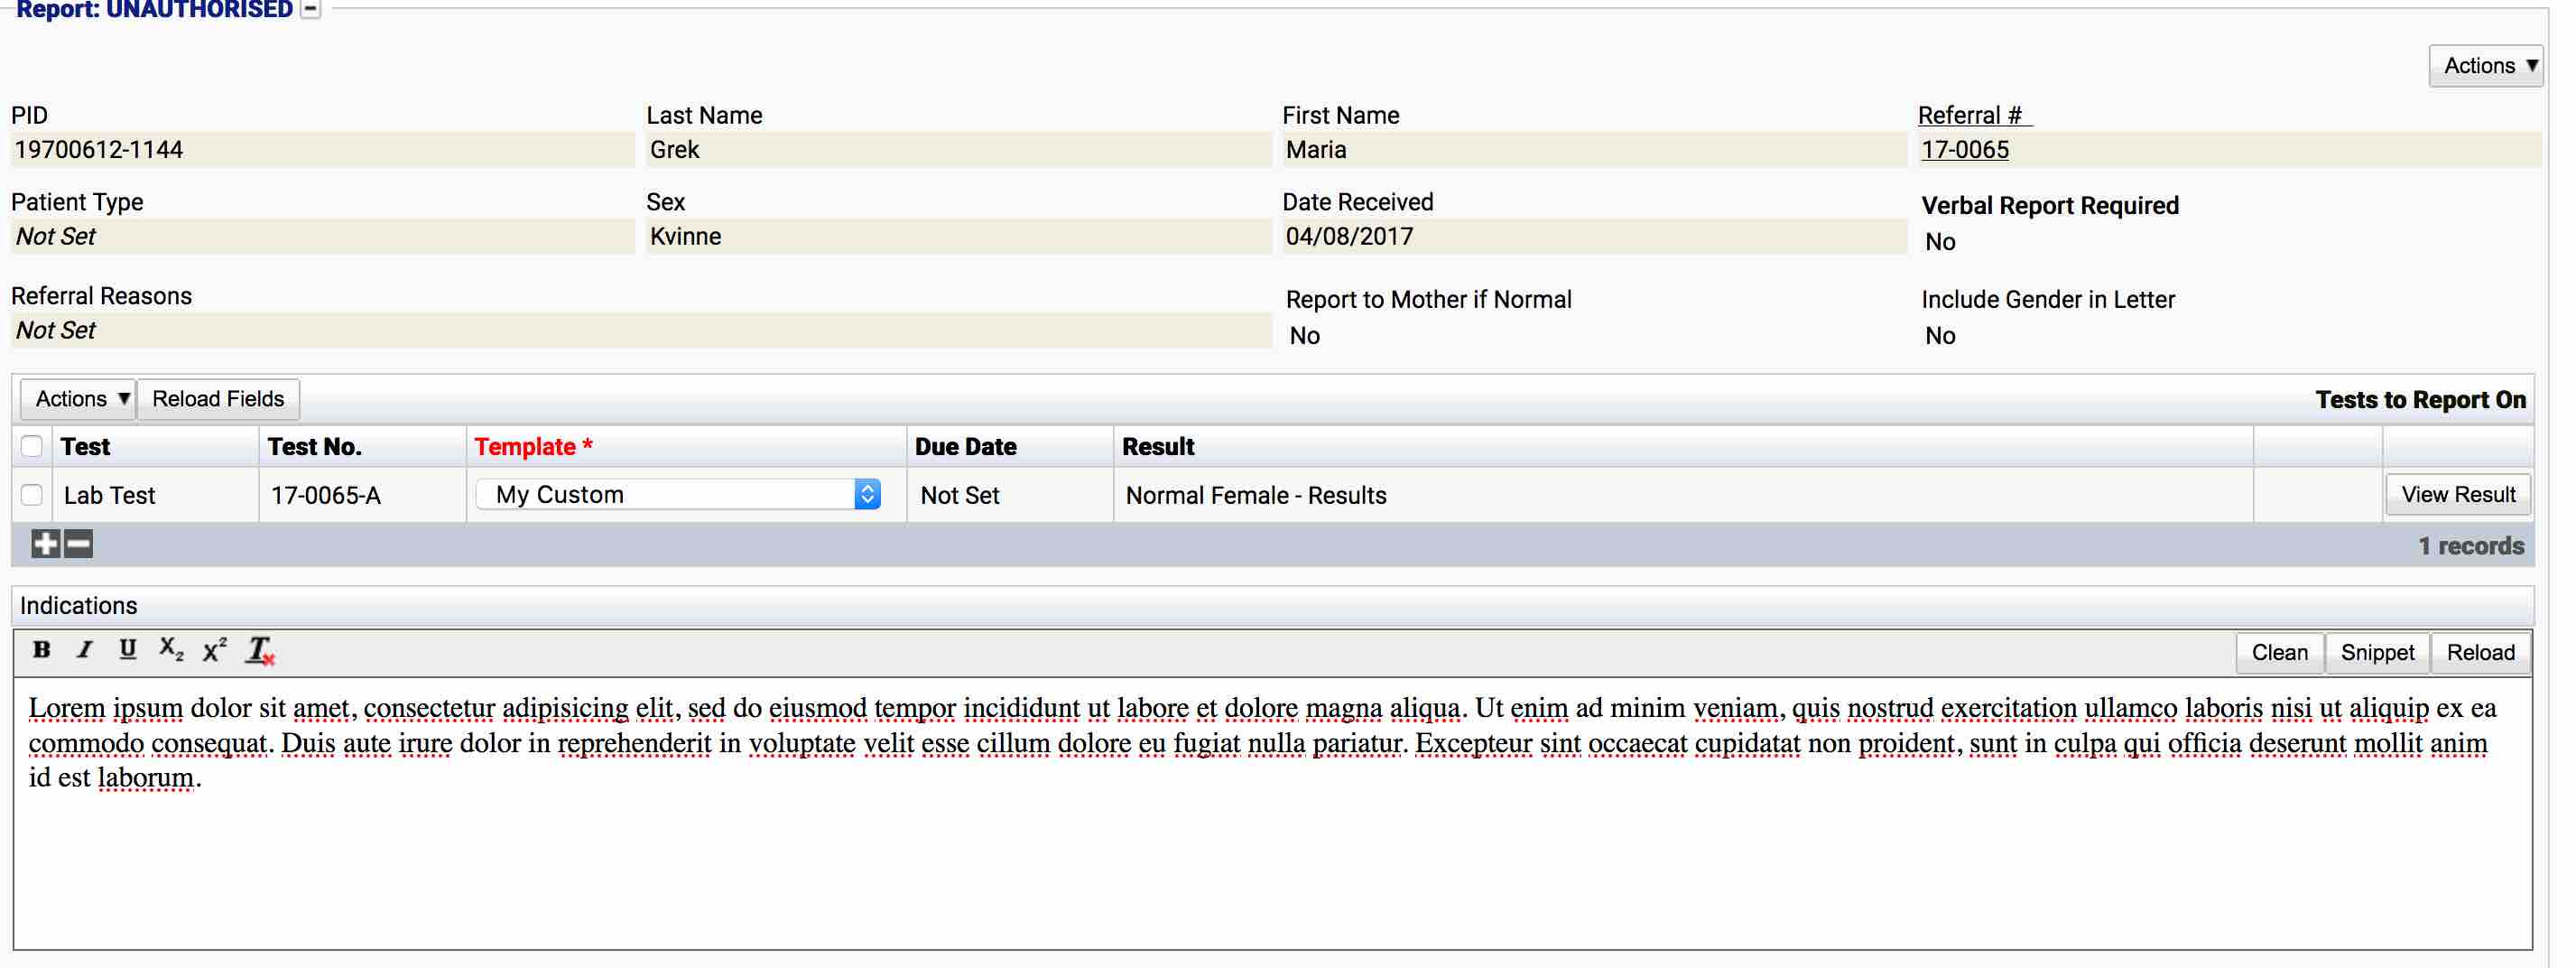
and a draft report created:

Once a draft report has been created, the status will change to Reported (Unauthorised)

iGene will now allow the report to be authorised (or signed off by users on the signatures list):
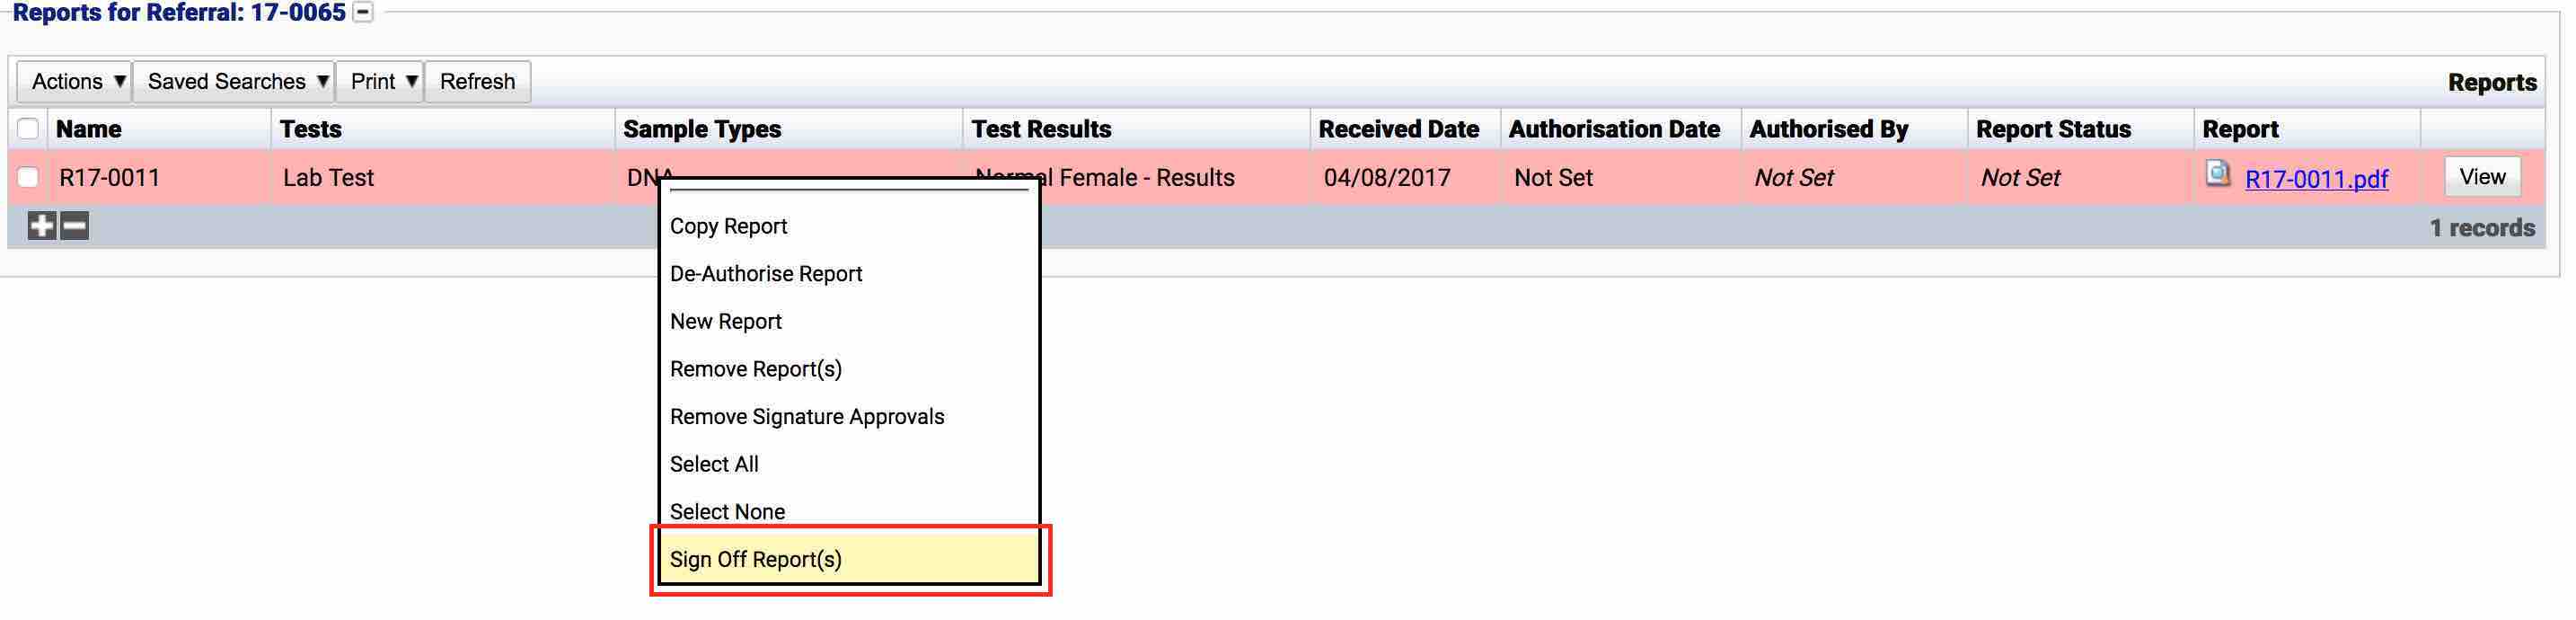

iGene supports both authorising and signing off reports. The difference is that authorising a report can be any user who has permission to authorise reports, whereas the signing off method uses a preset list of required signatures. For signatures, all users must sign off the report before it becomes authorised. Generally during the configuration stage of an iGene deployment, a site will decide which method they would prefer to use. However, both methods work the same in regards to test statuses.
The report (now authorised) becomes readonly:
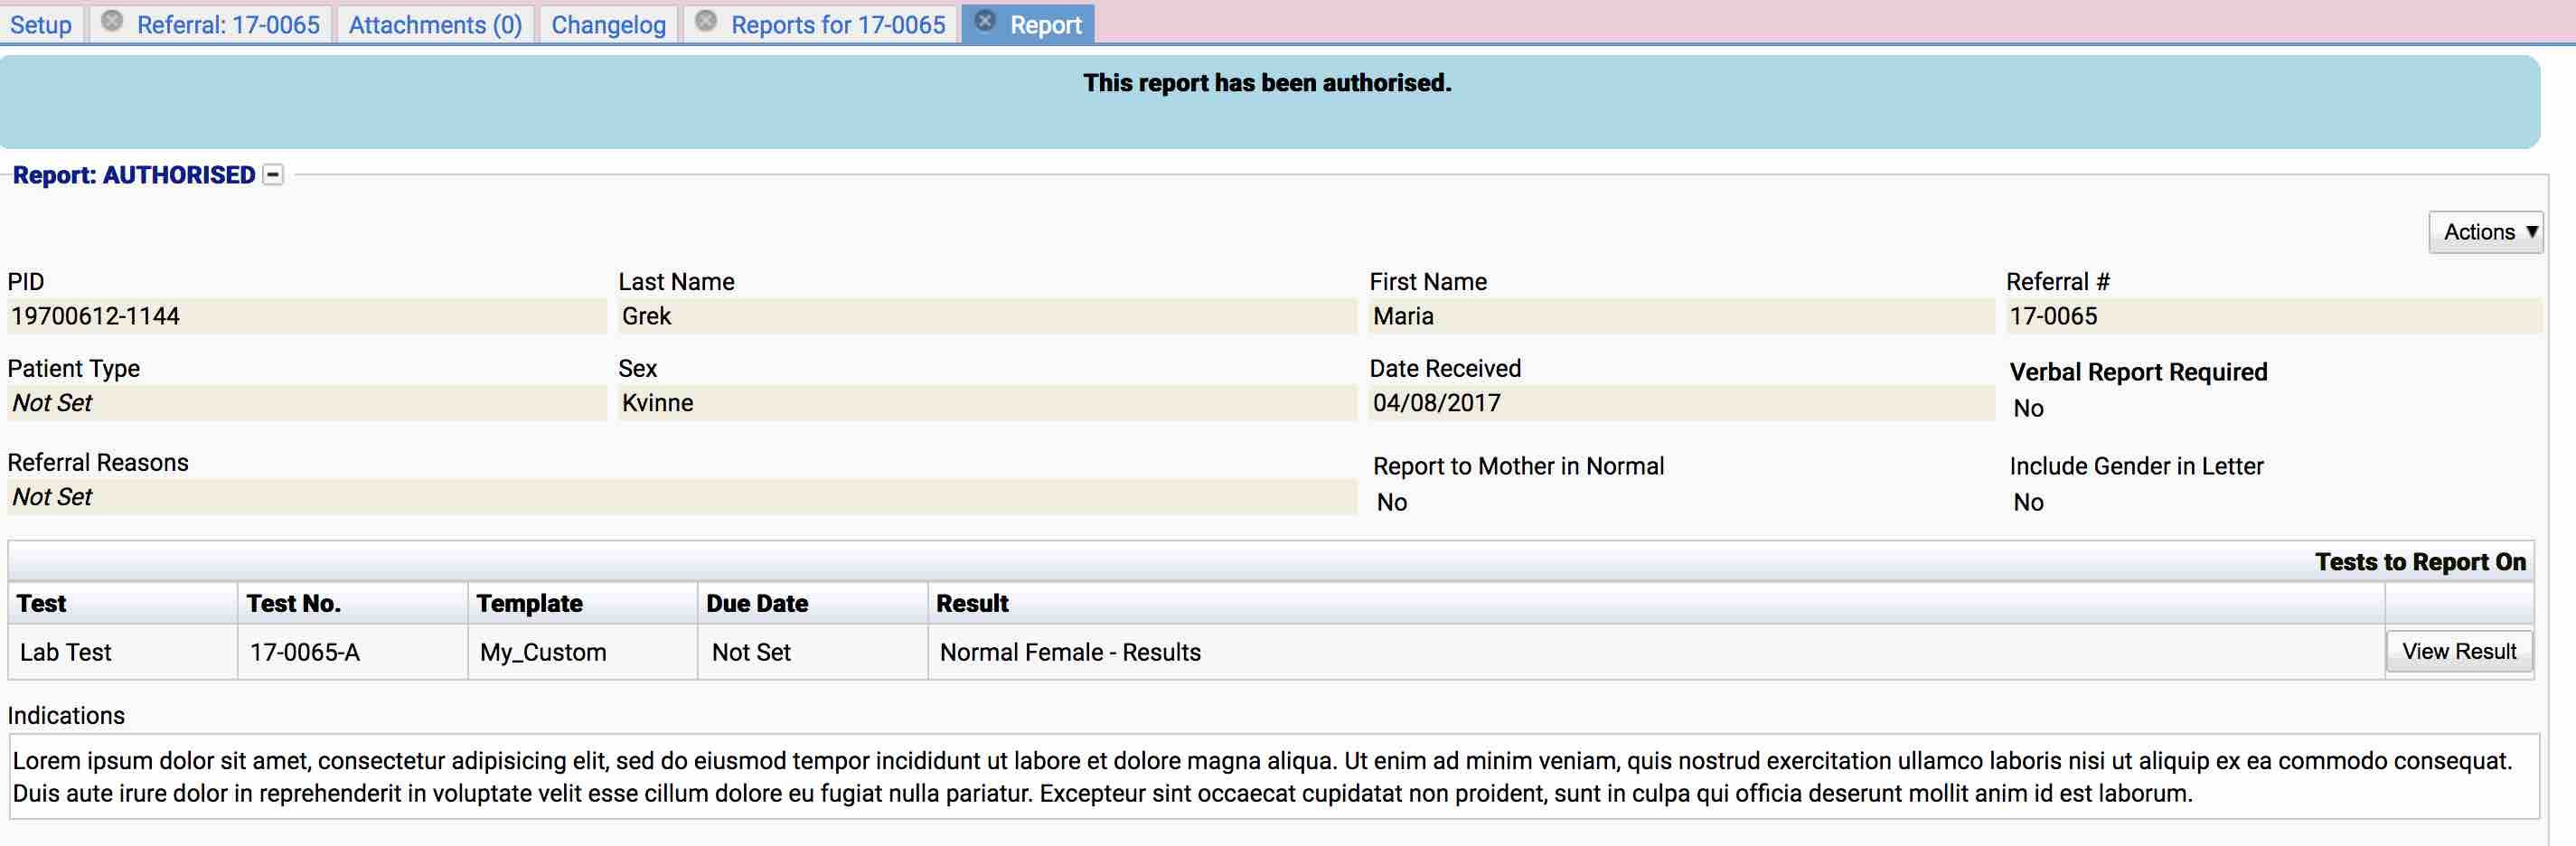
and the status changes to Reported:

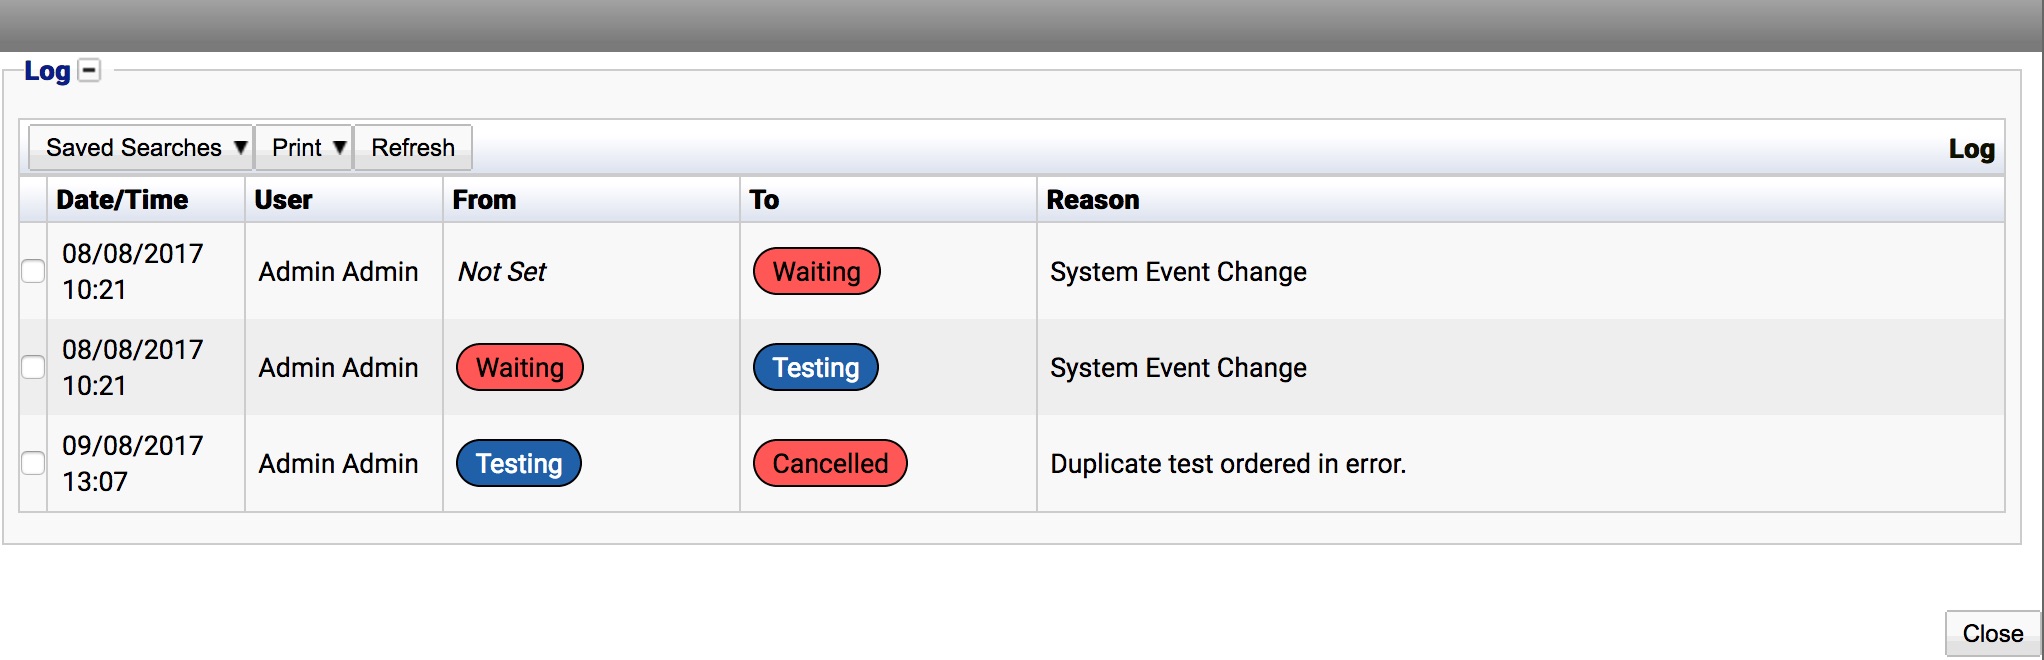
The log for the test will give a full history of the test statuses, including time/date and the user who performed the actions:
Overriding a Test Status
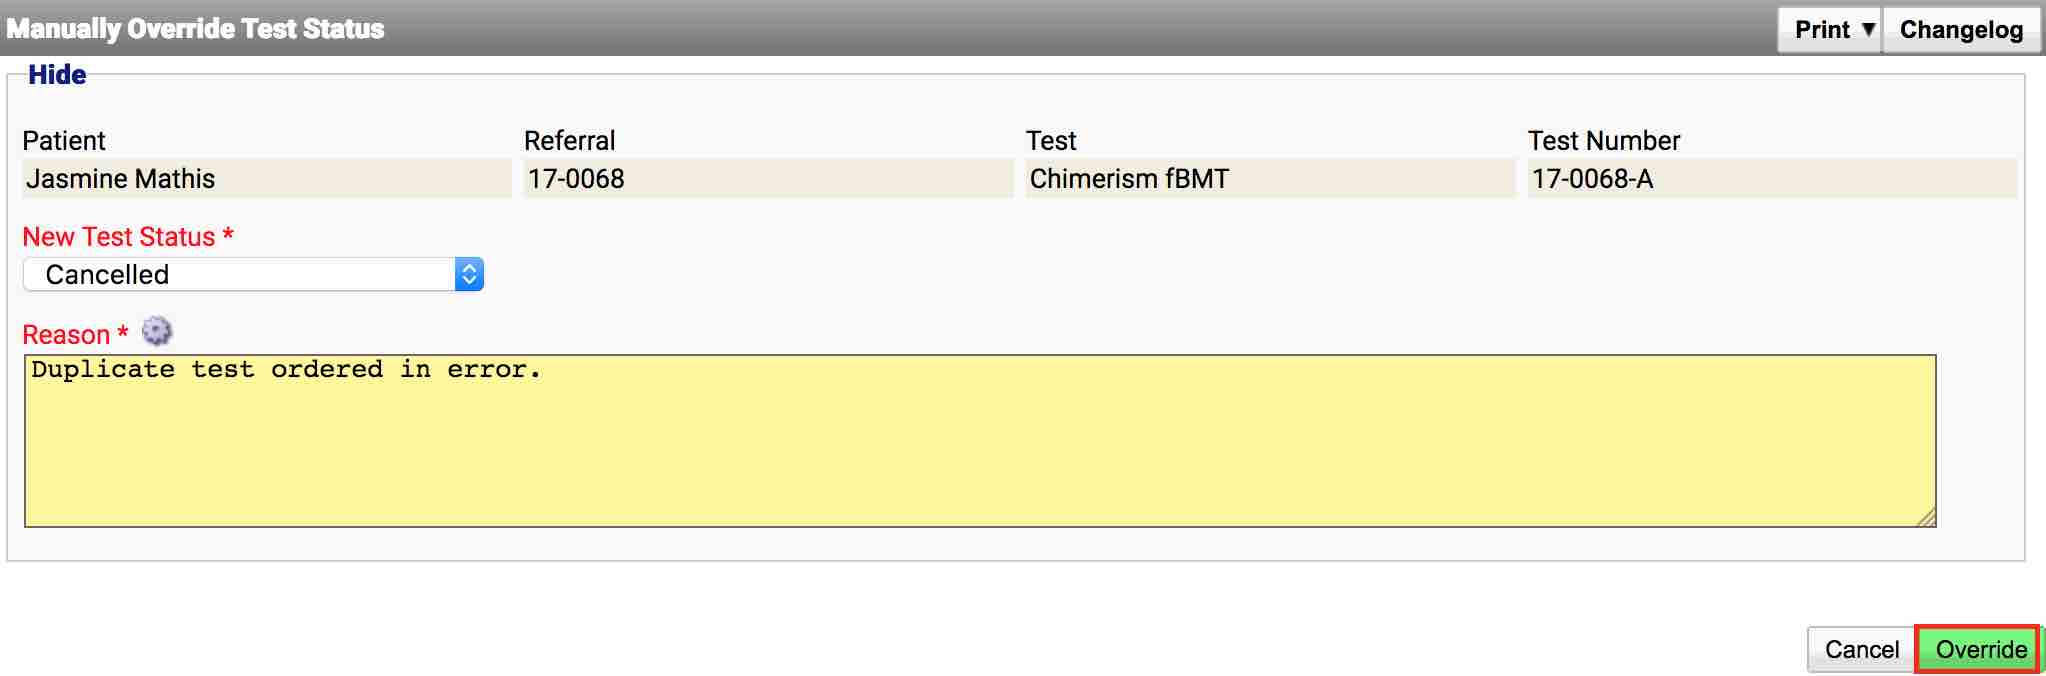
There may be cases where a test has an incorrect test status, e.g. A user has accidently triggered the wrong status or a test needs to be cancelled later in the workflow when there is no available transition. For these cases, iGene provides an Override Test Status option which can be used to manually change the status of any test to any test status available on the system.
N.B. In order to override a test status, a user must be in a role that has the permission Override Test Statuses. It is advisable to only allow administrators or department heads this permission as the option should not normally be used.
Overriding a test status is done via the Test Details popup screen which is accessible in a few areas throughout the application, e.g:
- The list of tests on the Sample Overview screen.
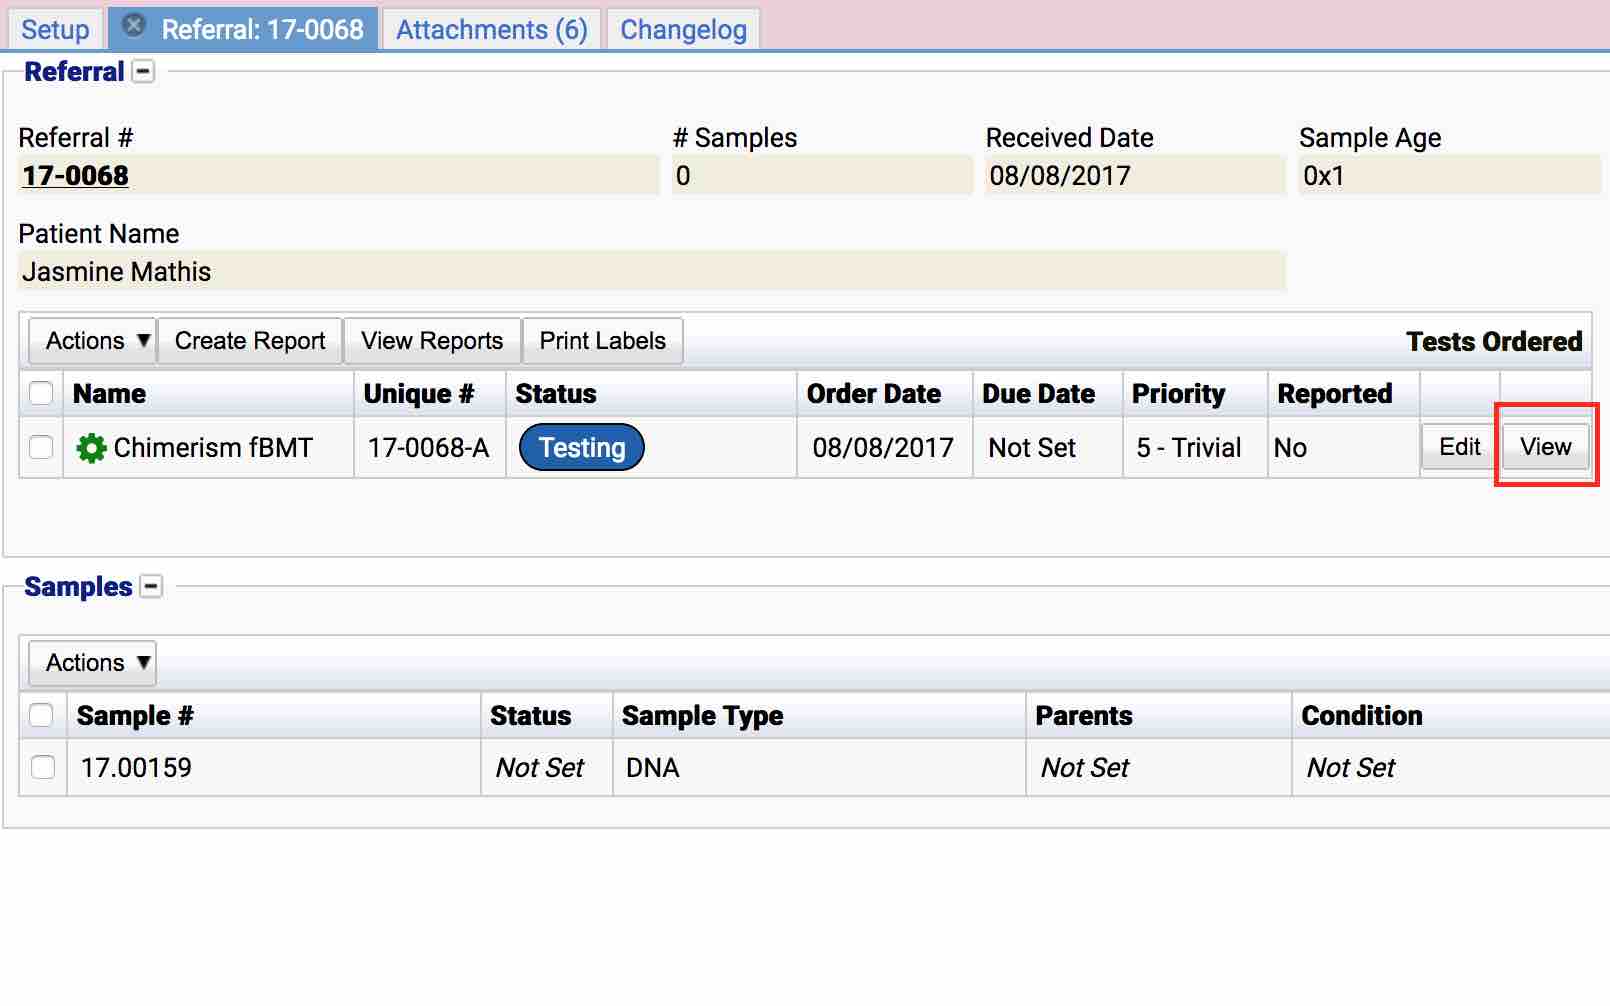
- The list of tests on the Lab Referral screen.

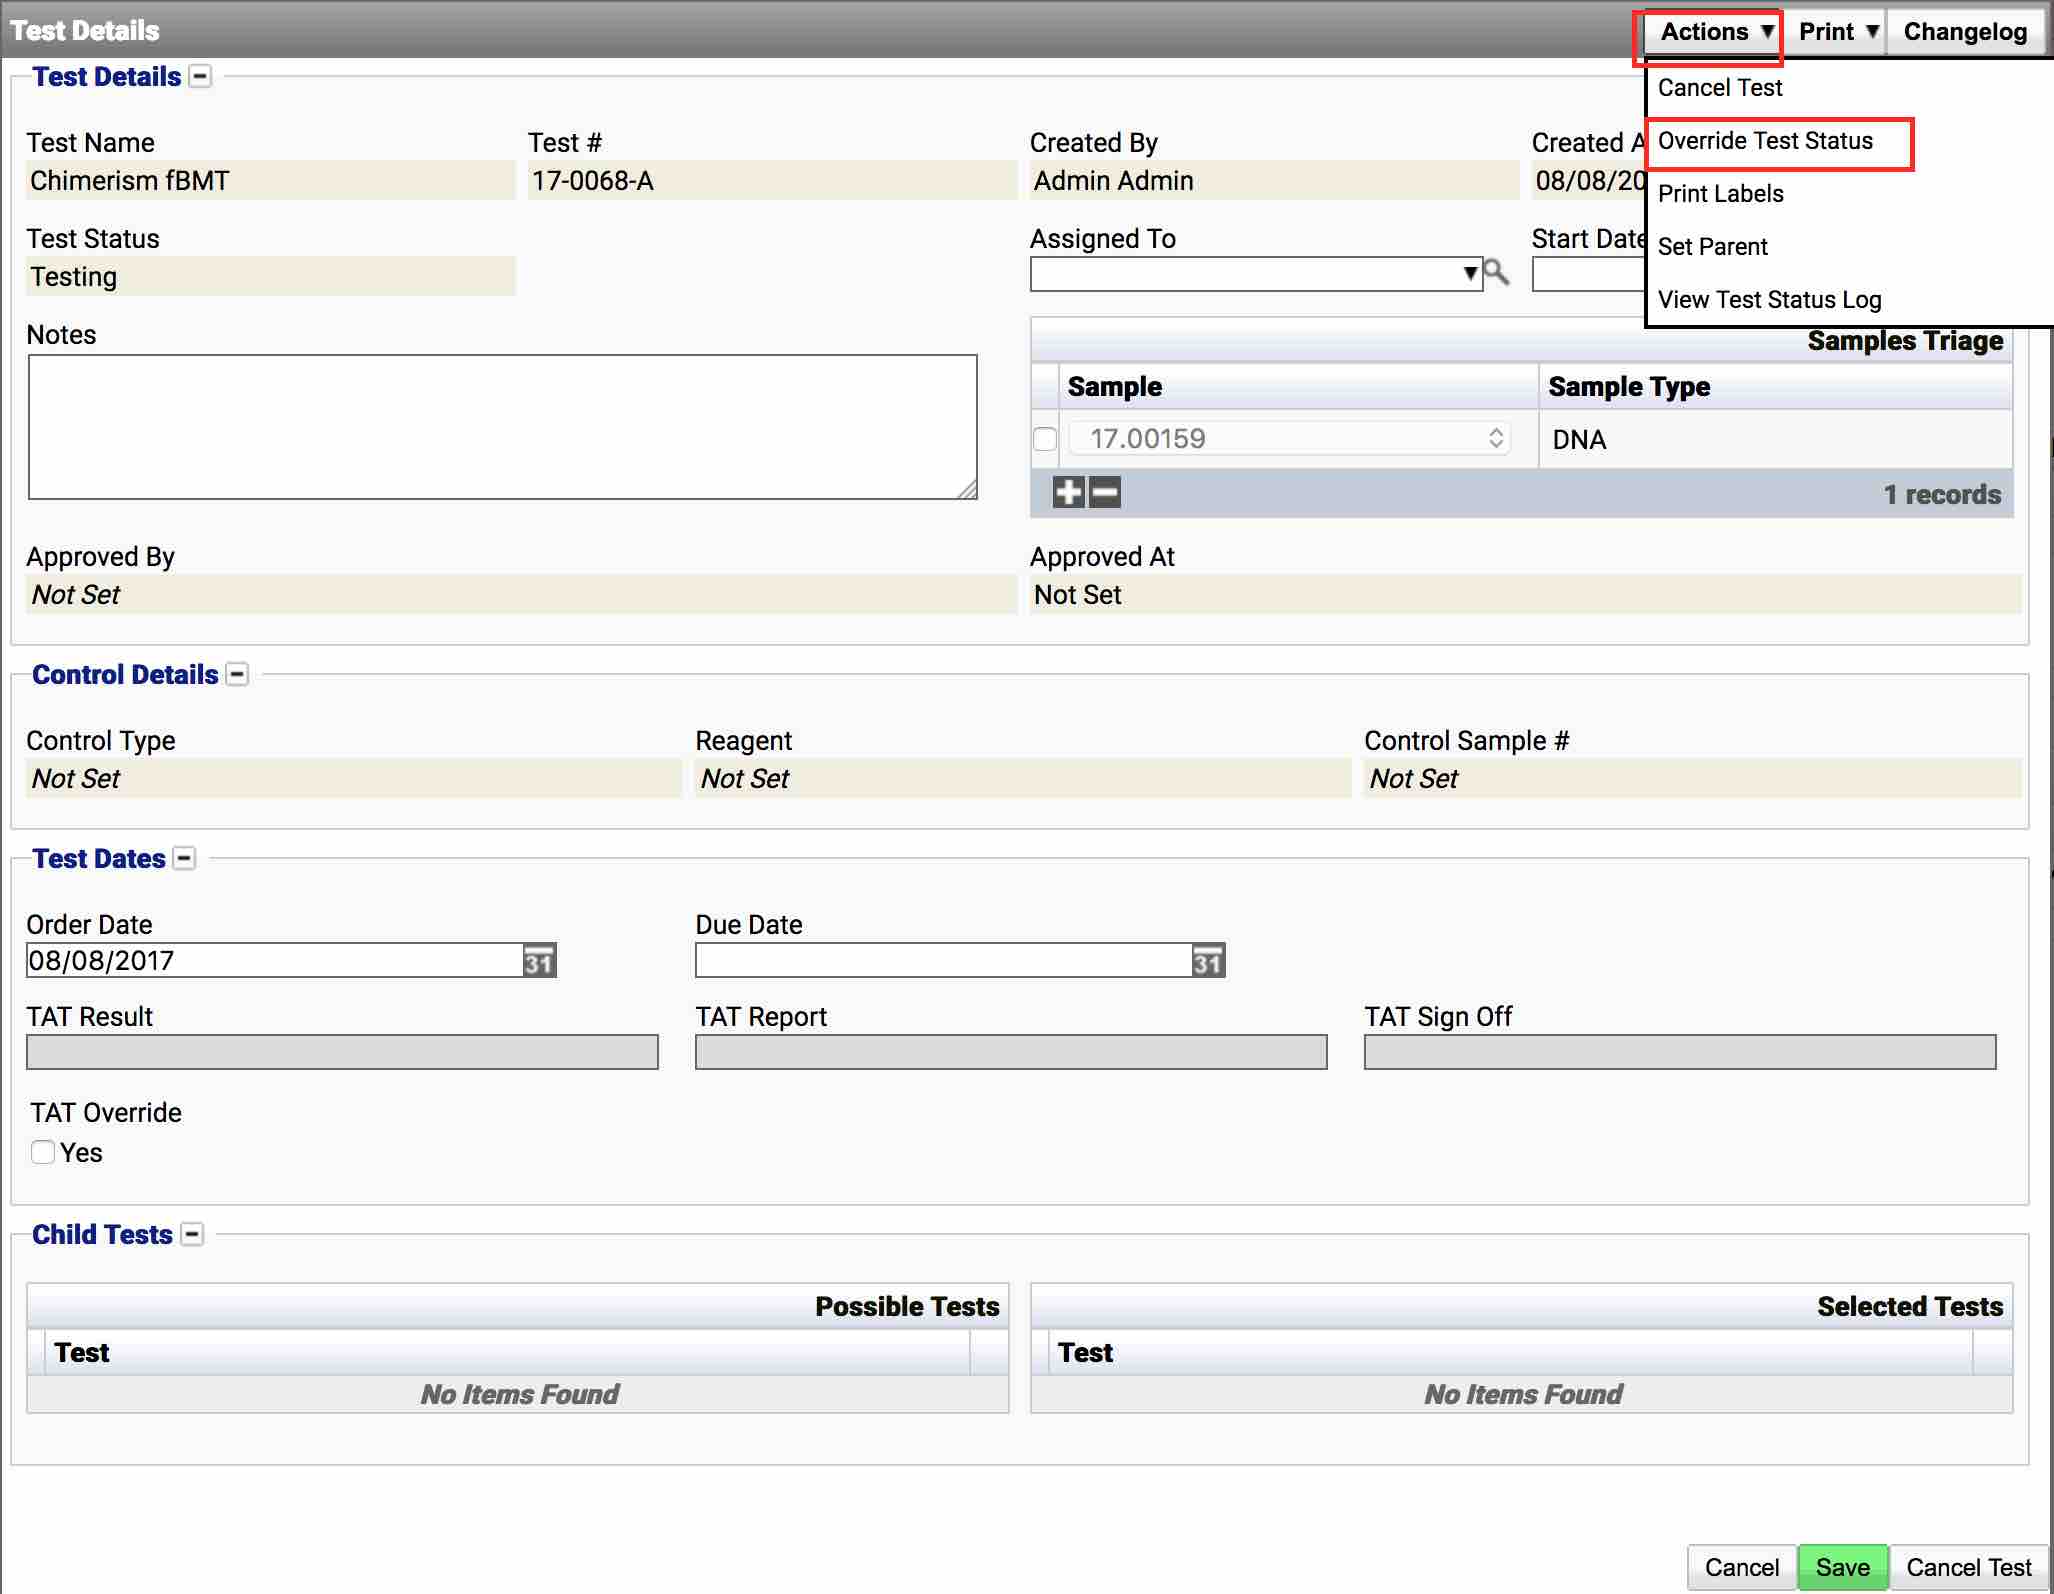
From the Test Details popup screen, select Actions -> Override Test Status:
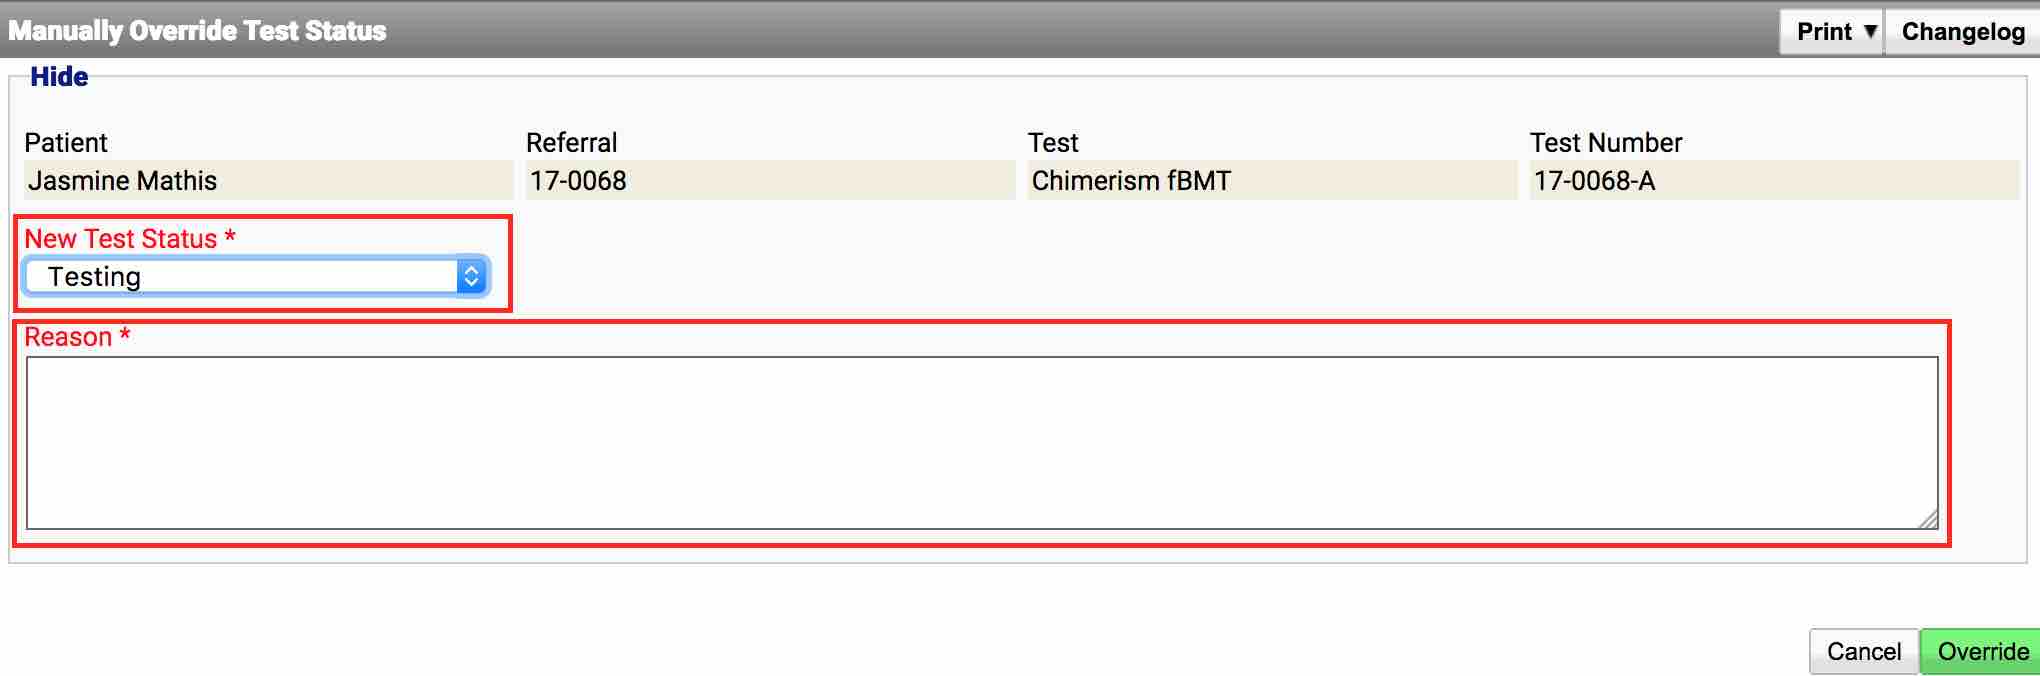
The Manually Override Test Status popup dialog will appear. From this screen a new test status can be chosen, however a reason must be given on why the change is taking place. Select a test status from the New Test Status dropdown list, and fill out a reason in the Reason area:
Select Override to apply the changes:
The test status is then changed:

N.B. Just as any other status change in the system, the details, time/date and user will be logged as shown below:
 0Trackers