Installing and Updating Java
iGene and Tomcat run on a Java virtual machine, so it is important that Java is installed correctly and kept up to date with security releases. This comes down to two things:
- A valid version of Java
- The
JAVA_HOMEenvironment variable set correctly, with the systemPathpointing at it
This guide covers both the first-time installation and routine updates.
Two conventions in this guide are what make future updates simple. Java lives at a fixed path, C:\java\jre1.8, rather than in a folder named after the version, and Path is set to %JAVA_HOME%\bin rather than a specific version folder. Together they mean a Java update is a matter of swapping the contents of one folder, with no environment variable to change and nothing to hunt through in the system settings.
Some of the screen recordings on this page were made when this guide installed Java under C:\Program Files, so that is the path they show. The steps themselves are unchanged. Use C:\java\jre1.8 as described in the text.
Installing Java
Download Amazon Corretto
Due to changes with Oracle and Java licensing, Genial now recommend iGene is run on Amazon’s production-ready distribution of the Open Java Development Kit (OpenJDK), Amazon Corretto.
Download the latest Amazon Corretto 8 JRE from the link below. Generally, customers will be using the Windows x64 version:
Download from: https://docs.aws.amazon.com/corretto/latest/corretto-8-ug/downloads-list.html

Stay on Java 8 unless Genial has advised otherwise. iGene runs on Java 8, so use Amazon Corretto 8 rather than Corretto 11 or 17.
Unzip and Move to ‘C:\java’
Create a folder called C:\java if the server does not already have one.
Once downloaded, unzip the Corretto archive, rename the extracted folder to jre1.8, and place it in C:\java so that the finished path is:
C:\java\jre1.8

We used 7Zip instead of the default Zip program on Windows as it’s generally quicker.
There are two reasons for this path. It contains no spaces, and a path with spaces has to be quoted every single time it is used, so one unquoted reference in a batch file or a Java option is enough to break things. It is also a fixed name rather than a version number, which is what allows a later update to drop the new version into the same folder without anything that refers to Java having to change.
Set JAVA_HOME
Open the advanced system settings and click Environment Variables. Under system variables, create a new variable called JAVA_HOME and set it to:
C:\java\jre1.8
Because the folder name is fixed, you can type this in directly rather than copying it out of Explorer.
Below are two examples:
Windows 7, Server 2012

Windows 10, Server 2019

Add Java to the Path
Still in Environment Variables, under system variables, select the existing Path variable and click Edit. What you see next depends on the version of Windows.
Windows 10, Server 2016 and later show Path as a list of separate entries, with New, Edit and Delete buttons. Click New and type the entry below. Windows takes care of the separators for you.
Windows 7, Server 2012 show the whole of Path as a single line of text. Click at the very end of that line, type a semicolon ; to separate your new entry from the one before it, then type the entry below. So the end of the line will read ...;%JAVA_HOME%\bin.
The entry to add is:
%JAVA_HOME%\bin
On the older single-line editor, take care not to delete what is already there. The Path variable holds entries for many different programs, and overwriting it, or running two entries together by forgetting the semicolon, will stop other software on the server working.
Add %JAVA_HOME%\bin exactly as written, rather than typing out the full path to the version you just installed. Windows expands the variable each time the path is used, so this entry keeps working after a Java update with no further changes.
If an entry for a specific Java version is already present, for example C:\Program Files\jre1.8.0_202\bin, remove it so that only the %JAVA_HOME%\bin entry remains. On the single-line editor, remember to remove the semicolon that went with it.
Now restart the machine. Windows does not pass changed environment variables to programs that are already running, and that includes the Windows service manager, so a restart is the only reliable way to be sure everything picks up JAVA_HOME. This applies to a first-time installation, and to the one-off move described under If Java Is Currently Under ‘C:\Program Files’ below. Routine Java updates change no environment variable and need no restart.
Check Everything Is Set Up Correctly
Open a command prompt and run:
java -version
This is the check that matters. Because it does not give the full path, Windows has to find Java using the Path entry, so a correct result proves that Path is resolving through JAVA_HOME and that it is picking up the version you intended rather than another copy of Java already on the machine.
It should report Corretto-8, along with the version number you installed.
If That Doesn’t Look Right
If the command says it is not recognised, or reports a version you were not expecting, check the two settings separately. Open a command prompt and type in the following, including the ":
echo %JAVA_HOME%
"%JAVA_HOME%\bin\java" -version
echo %JAVA_HOME% should show the folder you installed. The second command should then report Corretto-8, like this:

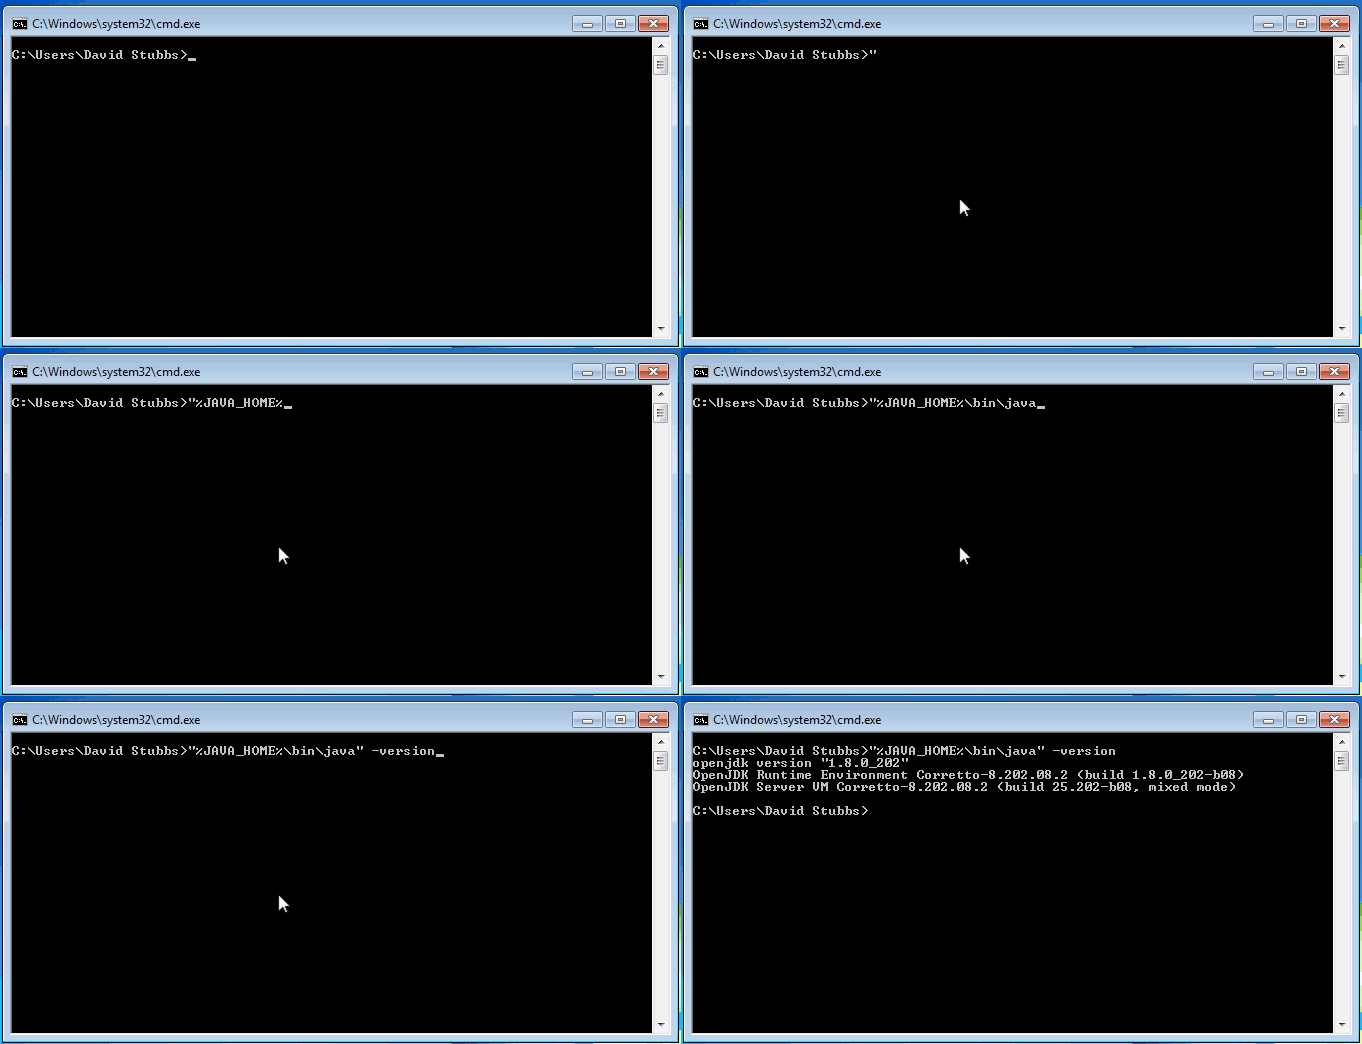
If those two are correct but java -version is not, the problem is the Path entry. If the machine has not been restarted since the variables were changed, restart it and try again.
Updating Java
Java should be kept up to date so that the server continues to receive security fixes.
Because Java lives at the fixed path C:\java\jre1.8, updating is a matter of moving the current version aside and putting the new one in its place. JAVA_HOME, the Path entry and the Tomcat service configuration all carry on pointing at that same folder, so none of them change and the machine does not need restarting. The old version stays on disk under its own version number until you are satisfied the new one is working, which makes rolling back straightforward.
Before You Start
- Agree a maintenance window. Tomcat has to be stopped, so iGene will be unavailable to users.
- Confirm you have administrator access to the server.
- Record the current version and path, as described below.
Open a command prompt and run both of the following, making a note of the results:
"%JAVA_HOME%\bin\java" -version
echo %JAVA_HOME%
You will need the old path if you have to roll back.
If Java Is Currently Under ‘C:\Program Files’
Servers built before this guide changed will have Java under C:\Program Files, with JAVA_HOME pointing there. Move it to C:\java\jre1.8 as part of this update. It is a one-off, and every update after it follows the routine steps below.
Carry out the update as described, but in place of the rename step:
- Create
C:\javaif it does not already exist. - Extract the new Corretto build into
C:\javaand rename the extracted folder tojre1.8. - Edit
JAVA_HOMEto readC:\java\jre1.8. - Check that the
Pathentry reads%JAVA_HOME%\bin, and that the service’s Java Virtual Machine path reads%JAVA_HOME%\bin\server\jvm.dll, as described under Check the Tomcat Service below. - Restart the machine, because
JAVA_HOMEhas changed. This is the only time a Java update needs one. - Start Tomcat and validate as described below.
Leave the old folder under C:\Program Files where it is until the update has been validated. It is the rollback.
Download the New Version
Download the latest Amazon Corretto 8 JRE, as described in the installation section above. Do not extract it yet.
Stop Tomcat
net stop iGene
Alternatively, open Services, find the iGene service and stop it there. Wait until it has fully stopped before continuing.
If the service on this server has a different name. Servers built before this naming standard will have a service called Tomcat9, and their configuration tool will be tomcat9w.exe rather than iGenew.exe. Check the name in Services and use it in place of iGene throughout this page. Do not rename an existing service as part of a Java update.
Move the Current Version Aside
Rename C:\java\jre1.8 to the version it actually holds, using the version you recorded earlier:
C:\java\jre1.8 renamed to C:\java\jre1.8.0_202
Do not delete or overwrite the existing Java folder. Renaming it is what allows you to roll back.
If Windows refuses the rename, something still has the folder open. Check that the Tomcat service has fully stopped, and close any Explorer window or command prompt sitting inside it.
Name the backup after the build it contains rather than something like jre1.8.old. The live folder is always called jre1.8, so the version number on the folder next to it is the only thing telling you what you would be rolling back to.
Put the New Version in Its Place
Extract the download into C:\java and rename the extracted folder to jre1.8, so that the live path is once again:
C:\java\jre1.8
You should now have two folders present, for example:
C:\java\jre1.8          the new version, in use
C:\java\jre1.8.0_202    the previous version, kept for rollback
JAVA_HOME still reads C:\java\jre1.8 and does not need changing. Neither does the Path entry, nor the Tomcat service configuration.
Check the Tomcat Service
On a server set up as described in this guide there is nothing to do here, and you can go straight to starting Tomcat. It is worth checking once, on the first update you carry out on any given server.
When Tomcat is installed as a Windows service, the installer reads JAVA_HOME at that moment and writes the path of the Java virtual machine into the service’s own configuration. The service then uses that stored path and does not re-read JAVA_HOME when it starts.
Because Java now lives at a fixed path, a stored path reading C:\java\jre1.8\bin\server\jvm.dll keeps working across this update, so a hard-coded path here no longer breaks an update the way it used to. It is still worth changing it to %JAVA_HOME%\bin\server\jvm.dll, because that is what turns a future move, to Java 11 at C:\java\jre11 for instance, into a single change to one variable.
A stored path naming a folder under C:\Program Files does have to be corrected, because that is no longer where Java lives.
Open the service configuration tool:
C:\path\to\tomcat\bin\iGenew.exe
Go to the Java tab and look at the Java Virtual Machine path. It should read:
%JAVA_HOME%\bin\server\jvm.dll
If it already reads that, there is nothing to do. The service will pick up the new Java when it restarts.
If it names a specific version instead, for example C:\Program Files\jre1.8.0_202\bin\server\jvm.dll, change it to %JAVA_HOME%\bin\server\jvm.dll now. Click Apply, then OK. You will not have to touch this setting again on future Java updates.
Tomcat supports environment variables in this field, which is what allows the service to follow JAVA_HOME. Do not use the Use default tickbox to achieve the same thing: that looks the Java virtual machine up in the Windows registry rather than following JAVA_HOME, and a copy of Corretto installed by unzipping it does not create those registry entries.
If the Java tab appears to save but nothing changes, the tool is editing a different service. It acts on whichever service matches its own filename, so on a server where the tool and the service names do not match it will silently edit the wrong one, or one that does not exist. Open it with the service name given explicitly, for example tomcat9w.exe //ES//iGene.
There is no need to remove and reinstall the Tomcat service to pick up a new Java version. Reinstalling loses the memory settings, Java options, log paths, service account and recovery actions, all of which are stored against the service rather than in the Tomcat folder.
While you have this window open, make a note of the memory settings on the Java tab. You will need them if the service ever has to be reinstalled.
Start Tomcat
net start iGene
Allow sufficient time for iGene to deploy and start.
Validate
Open a command prompt and confirm the new version is being reported:
java -versionBecause no environment variable has changed, an already-open command prompt will do. It resolves to the same folder, which now holds the new version.
This should show the version you have just installed. If it still reports the old one, the new build has not gone into
C:\java\jre1.8, or something else on thePathis being found first.Open iGene in a web browser.
Log in with a valid user account.
Carry out a quick functional check to confirm the application is operating correctly.
Roll Back (if needed)
If iGene does not start, or does not behave correctly:
- Stop the Tomcat service.
- Rename
C:\java\jre1.8to the version it holds, for exampleC:\java\jre1.8.0_452. - Rename the previous version, for example
C:\java\jre1.8.0_202, back toC:\java\jre1.8. - Start the Tomcat service.
- Confirm iGene is operating correctly on the previous version.
Because the old version is still on disk and everything points at C:\java\jre1.8, swapping the two folder names is the only change needed. No environment variable, no service setting, and no restart.
If this update also moved Java out of C:\Program Files, roll back by setting JAVA_HOME back to the old folder instead, and restart the machine.
Remove the Old Version
Once the new version has been running without problems for an agreed period, the previous version’s folder, for example C:\java\jre1.8.0_202, can be deleted. There is no need to remove it immediately, and keeping it until the next maintenance window is a reasonable precaution.
If Java was moved out of C:\Program Files during this update, the old folder there can be removed at the same time.