Patient Demographics
The patient demographics screen in iGene is where all of the patient details are stored. This is one of the main screens which is heavily customised per location. A lot of fields can be removed from this screen if they are not needed.
The demographics screen is accessed by:
- Navigating to Patients > Patient Search/Add.
- Locating the patient the user wishes to view.
- Clicking the View button on the table.
All fields with none removed

The main demographics screen can be split into 2 areas:
General Details
The General Details area is where the patient’s main demographics are stored. There are a lot of options within this area and the majority are removed per installation. The full list of the options is provided below:
- Valid From - This is the date the patient record was created.
- Valid Till - This is the date the patient record will become invalid.
- Patient # - This is the unique identifier for the patient within iGene. This is normally a number but can be a string of characters.
- Last Name - The last name of the patient.
- First Name - The first name of the patient.
- Middle Name(s) - The middle name(s) of the patient.
- D.O.B. - The date of birth of the patient.
- PID # - This is an external patient identifier. This is normally a number but can be a string. An example of this could be an NHS number.
- Current File Location - This is the current location of the patient file.
- Genetic Gender - This is the genetic sex of the patient.
- Legal Gender - This is the current legal gender for the patient. This can be different from the genetic gender if, for example, the patient is transgender.
- Gender Change Date - This is the date the patient changed their gender.
- Maiden Name - This is the maiden name of the patient.
- Alias - This is the alias name of the patient.
- Title - This is the title of the patient. This is used if wanting to use freetext titles.
- Salutation - This is the salutation of the patient. This is used if wanting to the dropdown list of salutations set in Preferences.
- Suffix - This is the suffix of the patient.
- Professional Suffix - This is the professional suffix of the patient.
- Marriage Status - This is the marriage status of the patient.
- Consanguineous - This is the consanguineous status of the patient.
- Occupation - This is the occupation of the patient.
- Clinician Responsible - This is the clinician responsible for the patient.
- Family Doctor/Physician - This is the family doctor or physician of the patient.
- Practice Details - This is the practice details of the patient.
- GP Facility - This is the GP facility of the patient.
- Is Deceased - This is a checkbox to mark the patient as deceased.
- Deceased Date - This is the date the patient died.
- Age - This is the age of the patient.
- Reason For Death - This is the reason for the patient’s death.
- Patient Type - This is the patient type. This is a dropdown list of patient types set in Preferences.
- Health Board/Trust - This is the health board or trust the patient is under.
- Patient Numbers - This is a table of patient numbers. This is used to store external patient numbers.
- Languages Spoken - This is a table of languages spoken by the patient.
- Patient Visits - This is a table of patient visits.
- Servicing Facility - This is the servicing facility of the patient.
- Nationality - This is the nationality of the patient.
- Country of Origin - This is the country of origin of the patient.
- Condition - This is the condition of the patient.
- Ethnicity - This is the ethnicity of the patient.
- Maternal Ethnicity - This is the ethnicity of the patient’s mother.
- Paternal Ethnicity - This is the ethnicity of the patient’s father.
- Religion - This is the religion of the patient.
- Blood Type - This is the blood type of the patient.
- Fetus # - This is the fetus number of the patient.
Contact Details
Contact details within iGene relate to the patient address and contact numbers. These fields are typically fixed per location but some sites do not record this information. The fields are:
- Valid From - This is the date the contact details were created.
- Valid Till - This is the date the contact details will become invalid.
- Address - This is the main address details. Normally, this is the first line of the address.
- Address Notes - Any notes relating to the address.
- City/Town - This is the city or town.
- County - This is the county which the patient is in. This can either be a freetext field or a dropdown list set within the County preference.
- State - This is the state the patient is in. Sometimes this is removed depending on the installed location.
- Post Code/Zip - The naming of this field depends on the installation location. This is the postal code for the patient.
- Country - This is the country the patient is in. The list of countries is controlled via a preference.
- Contact Numbers/Email Addresses - This table is used to store the patient’s email address or phone numbers. In order to add an item here, click the + button.
Patient Histories
Both the General Details and the Contact Details contain the option of having a history of items. This concept is easy to understand for addresses. Most financial transactions require 3 years of address. Using the drop down to set the Display Contact Details For the user can view the address history provided that it has been entered correctly.
The same is true for a patients details. If a patient changes their surname because they get married, the user can create a new contact item. That way, if anyone searches for the previous name then they would see the details from the previous name as well.
It is not a requirement to use these functions in iGene and indeed, most locations do not store address history or patient details history.
Starting with the General Details section, this is how to set a new detail section.
- Locate the Display General Details For drop-down list.

- To the right of this, there is an Actions button.

- Click the Actions button.
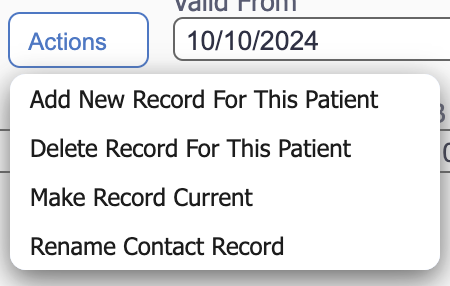
- Select Add New Record For This Patient.
This will then reveal a blank general details area to enter the data in.
The same process is true of the Contact Details.
Pedigree
Patients can be linked together using pedigrees or family numbers. These numbers can be setup using the nomenclatures from the preference area within iGene.
One patient can belong to many pedigrees.
To create a new pedigree for the patient:
- Locate the Pedigree Numbers table.
- Click the + button on the table.
- Complete the details.
- Save the patient by pressing Save Patient.
Patients can also be added to existing pedigrees by:
- Locate the Pedigree Numbers table.
- Click the Actions button.
- Select Search for Pedigree.
- Select the pedigree the patient needs to be added to.
- Save the patient using the Save Patient button.
Insurance
Insurance details can be stored in the patient. This is using a table layout. Insurance companies are stored in iGene as Organisations. For details on adding organisations, please see the organisations area.
To add an insurance company to a patient:
- Locate the Insurance table.
- Click the + button on the table.
- Complete the information.
- Save the patient using the Save Patient button.
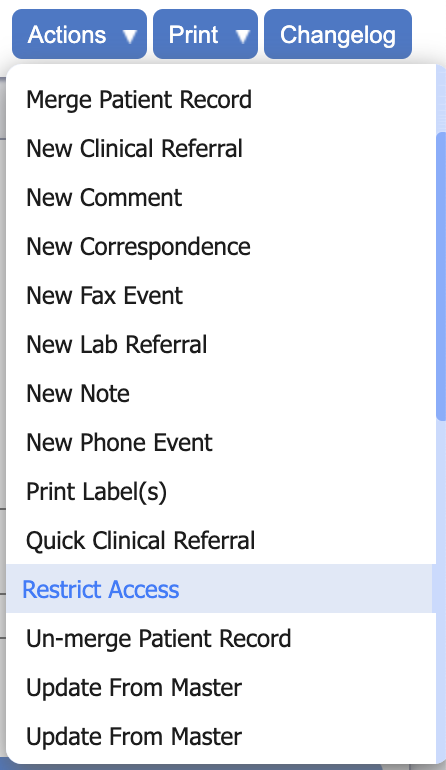
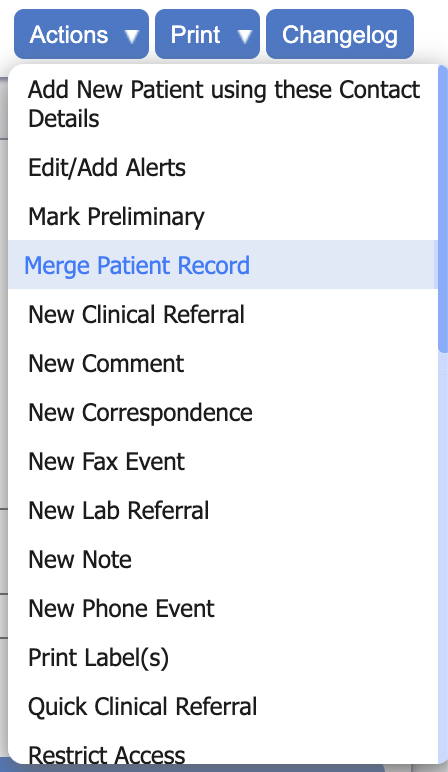
Actions Button
The Actions button on the patient allows different functions to be performed. Details within the list will vary from installation to installation. Typical options from the action button at the top of the patient are:
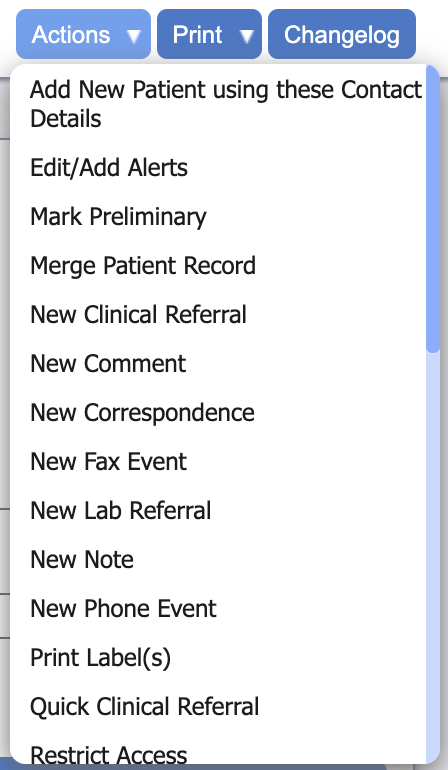
Note that the screen shot above shows links to other interfaces and screening programs. If they are not mentioned below, they are custom items per installation.
- Add New Patient using these Contact Details - Create a new patient but use the same contact details. This is used for creating family members quickly.
- Edit/Add Alerts - Patients can have alerts on them such as ‘Had Bone Marrow Transplant’. For more information on this, please see the Patient Alerts guide.
- Mark Preliminary - Set the patient as a preliminary patient. This can be for either checking purposes or for pedigree diagrams.
- Merge Patient Record - Merge 2 or more patients together.
- New Clinical Referral - Create a new clinical referral.
- New Comment - Add a comment to the patient.
- New Correspondence - Create a new correspondence record.
- New Fax Event - Create a new fax event record.
- New Lab Referral - Create a new lab referral for the patient.
- New Note - Create a new note for the patient.
- New Phone Event - Record a new phone event for the patient .
- Print Label(s) - Print labels for the patient, if labels are setup.
- Quick Clinical Referral - Create a quick clinical referral.
- Restrict Access - Restrict access to the patient.
- Un-merge Patient Record - Un-merge patients merged in error.
- View Contact Notes - View notes on the contact details.
- View Interface Activity - View messages sent or received from connected systems.
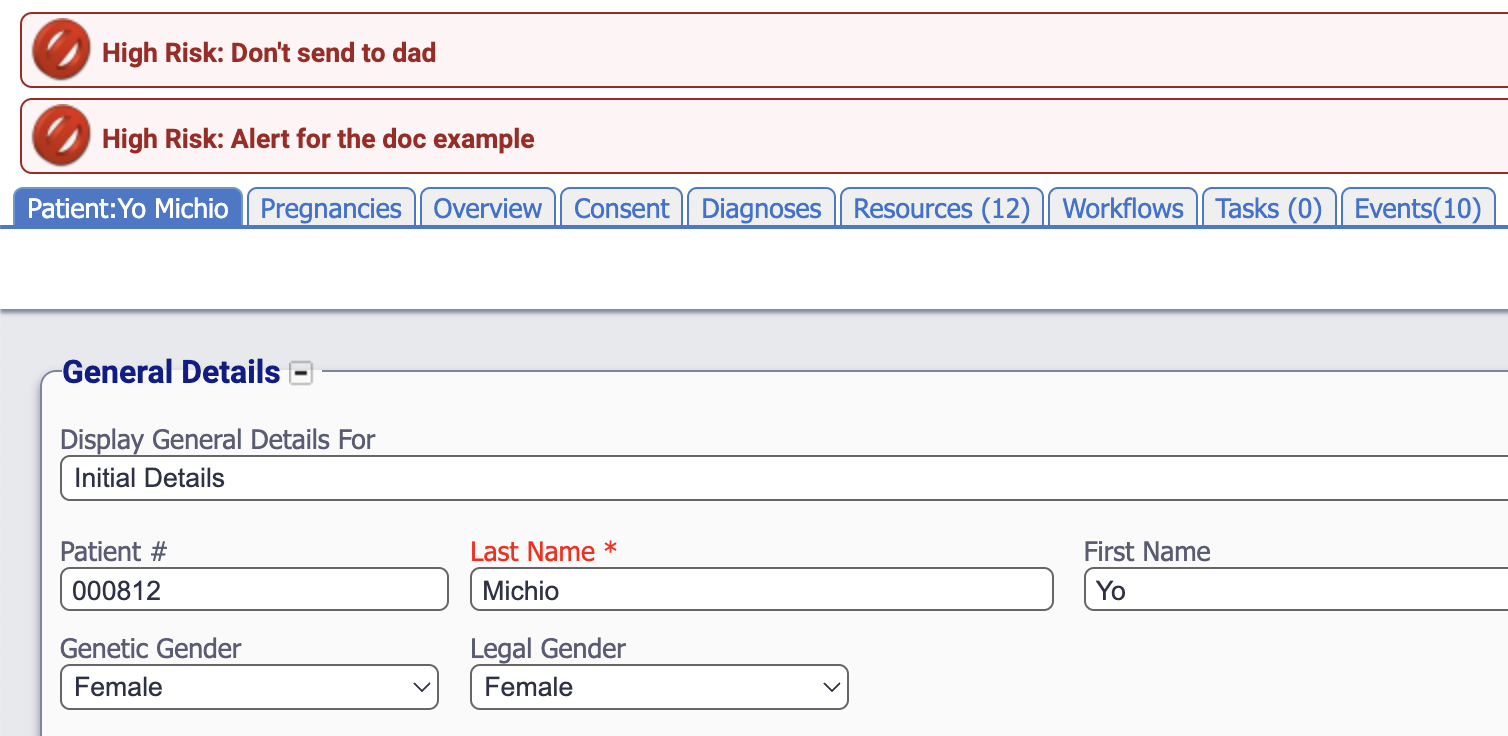
Alerts
It is possible to set an alert for a patient. This is particularly useful if you are using an interface to automatically update patient details. Once a patient is updated, an alert can be placed on for the change. This is common when dealing with new borns who are sometimes registered as ‘Baby Smith’ and later change to the correct name. The correct name might have nothing to do with the original name as the child typically takes the mothers name by default.
Other uses for the alerts are to mark when patients have useful information such as bone marrow transplants. This would alert users to not accept blood samples as they might not match the sex of the patient.
Alerts are visible on a referral belonging to that patient as well as on all patient demographics screens.
To set an alert on a patient, the user first needs to perform some administration to setup the alert to display. There are 2 preferences to change, Alert Type and also Alert.
It is best to configure Alert Type (if not already done) before configuring Alert.
Instructions on how to do this are under the Preferences menu. See Alert Type and Alert.
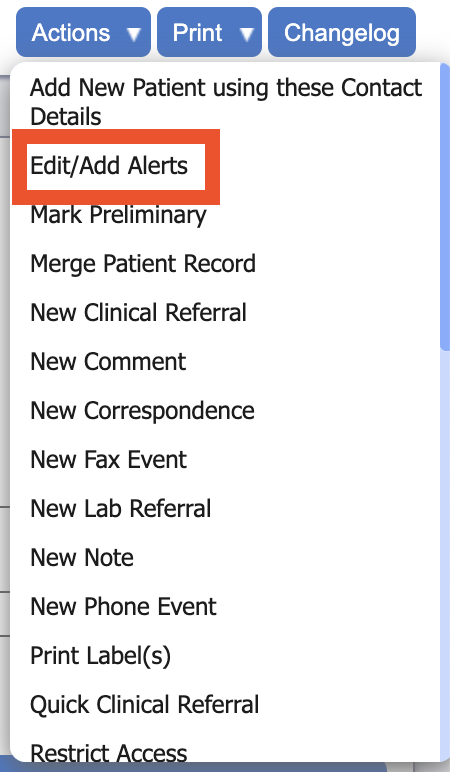
Once configured, add the created alert to a patient:
- Open the patient demographics view.
- Click on the Actions button.
- Click Edit/Add Alerts.
- A new popup window will appear.

- Click the + button to add a new row.
- Select the desired alert from the drop-down list under Alert *.
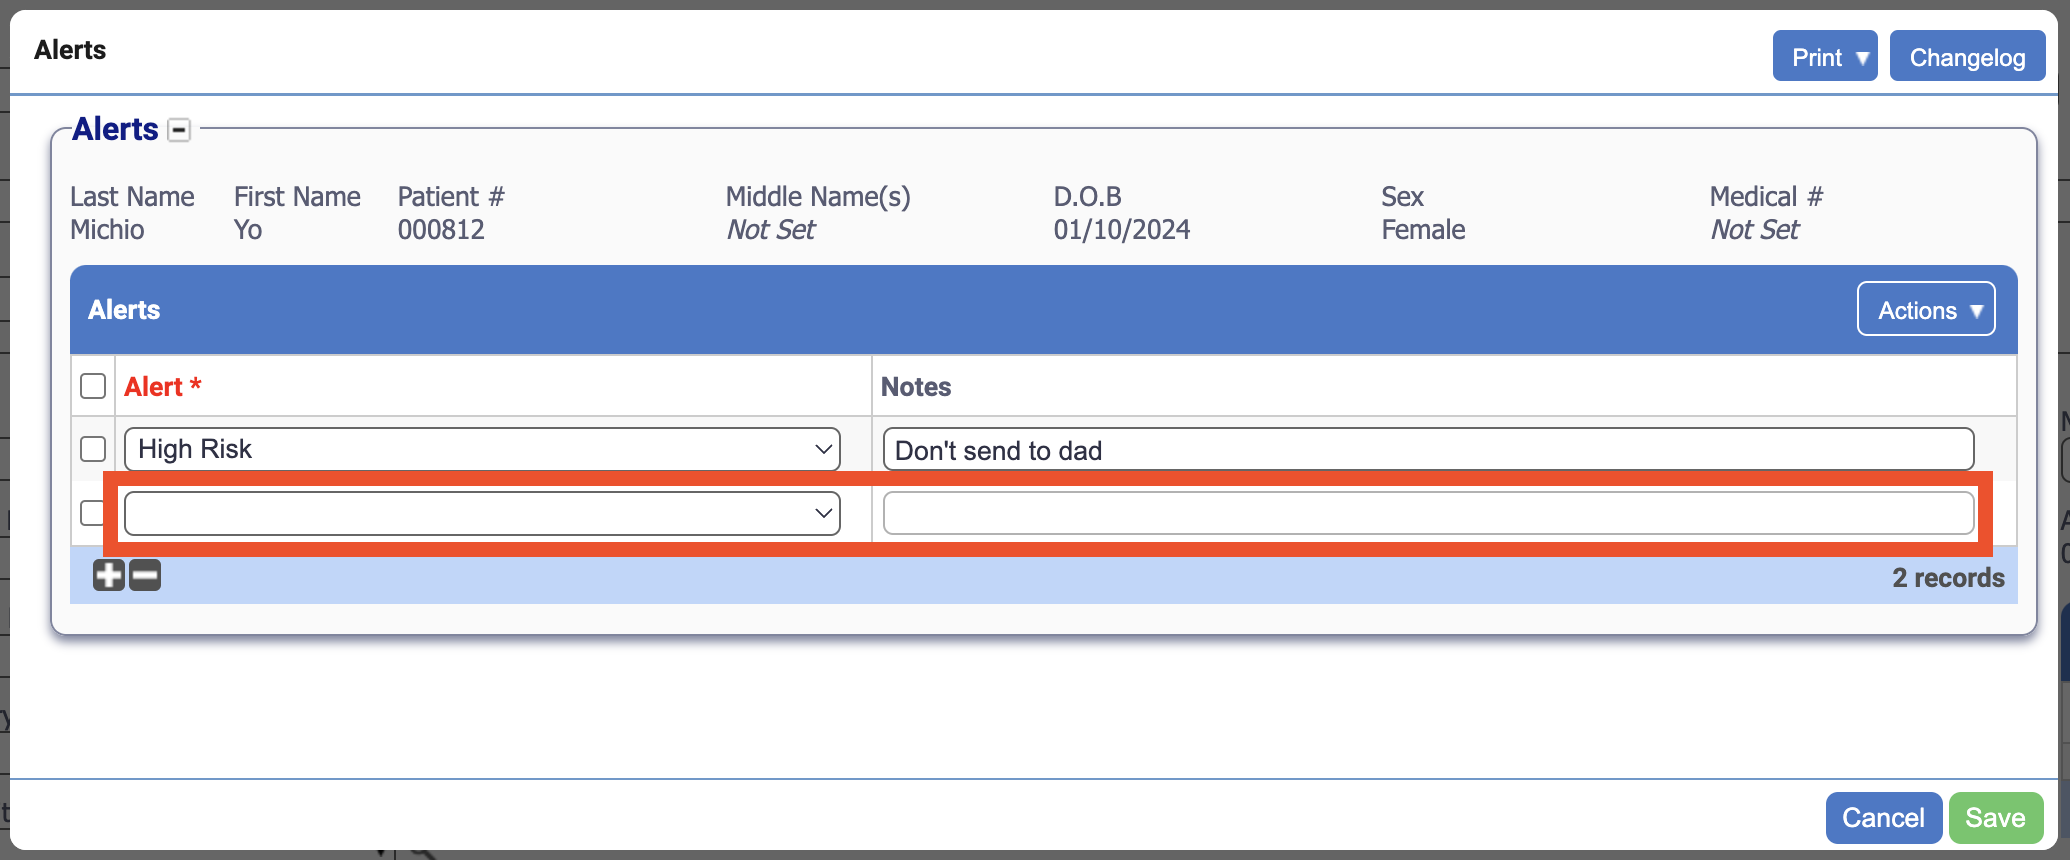
- If the alert allows and the user wishes, a note can be added at this point too.
- Save the alert using the Save button.
The alert will now appear at the top of the screen below the dashboard. It is possible to have multiple alerts set per patient.
Restrict access
In some locations of the world, it is a legal requirement that a patient can be hidden completely from a user. An example of this is if a neighbour of a member of staff is being tested and that individual requests the member of staff not know they are in the system. iGene has the ability to hide that person so it would be like they are not in the system.
This does not apply to a pedigree diagram as it is not possible to hide an entry. Pedigree diagrams should be treated as anonymous when being shown or displayed to patients / family members.
In order to set a patient as restricted.
- Open the patient demographics view.
- Click the Actions button.
- Select Restrict Access from the drop down list.
- A popup window will appear.
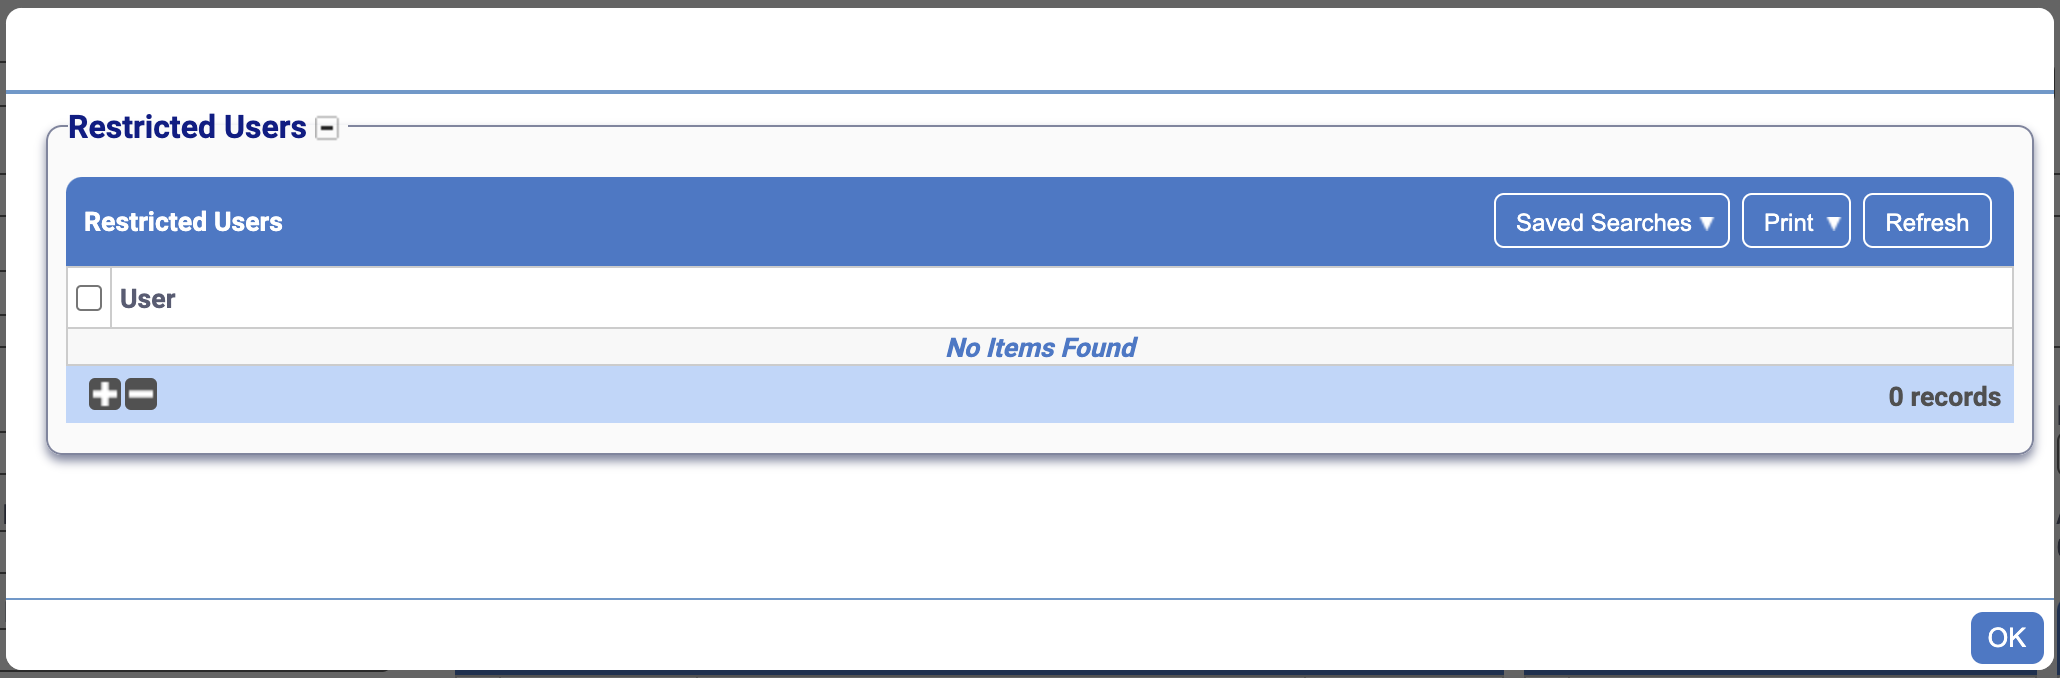
- Add a new line by clicking the + button.
- A further popup will appear with a list of the users in the application.
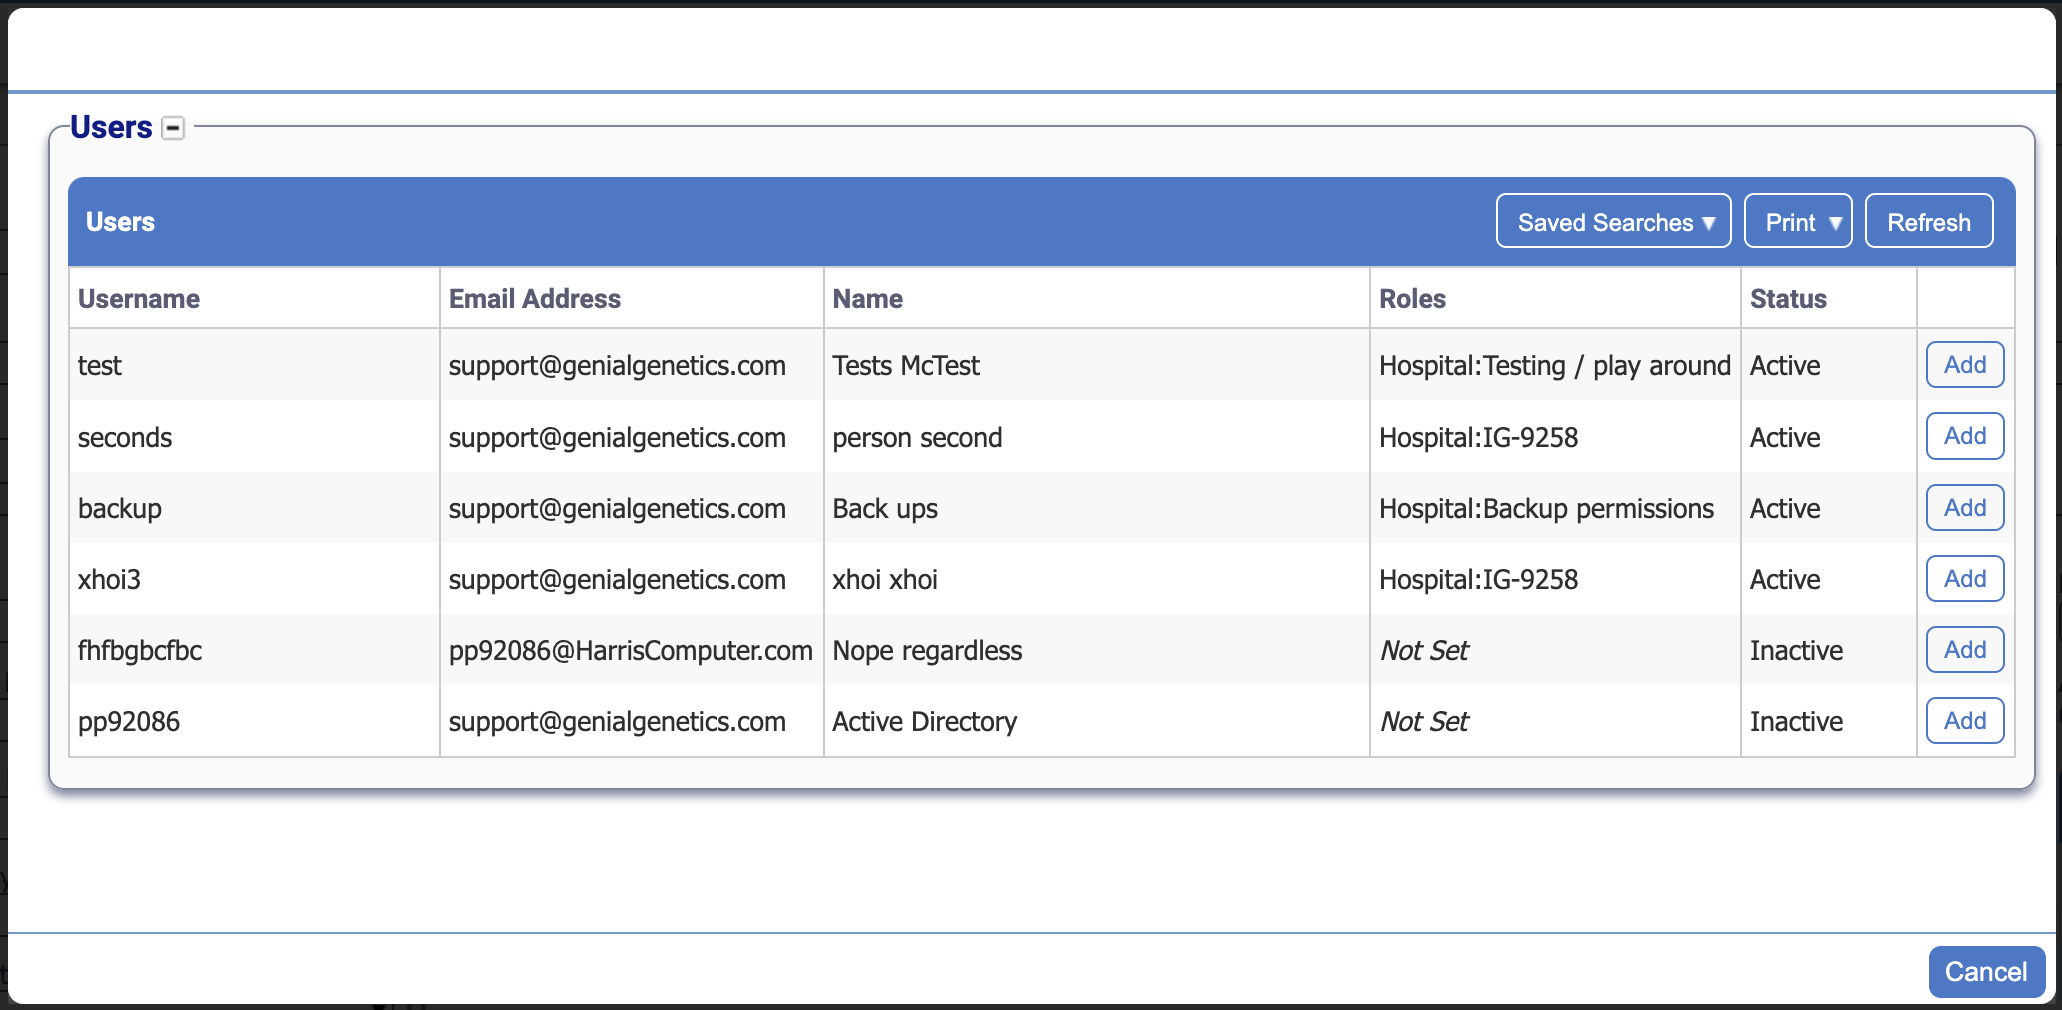
- Search for the user.
- Once located, click the Add button.
- Repeat 7 & 8 for as many users as you need to hide the patient from.
- Once complete, press the Cancel button.
- Finally, click the OK button.
The patient is now restricted from being located by the users selected.
To unrestrict access to a patient:
- Open the patient demographics view.
- Click the Actions button.
- Select Restrict Access from the drop down list.
- A popup window will appear.
- Tick the checkbox next to the row the user wishes to remove.
- Click the - button to delete that row.
- Finally, click the OK button.
Merging / Un-Merging
It is possible to merge a patient with another if you have a duplicated patient. It is also possible to un-merge a patient should the action be performed incorrectly. This is very useful for installations with an interface as it is possible to enter a patient in iGene, then that patient is registered in another system which would send an update and iGene would create a new patient.
To merge a patient in iGene:
- Locate the patient the user wishes to keep and open the demographics view.
- Click the Actions button.
- Select Merge Patient Record from the drop down list.
- A popup window will appear listing all the patients within the application.
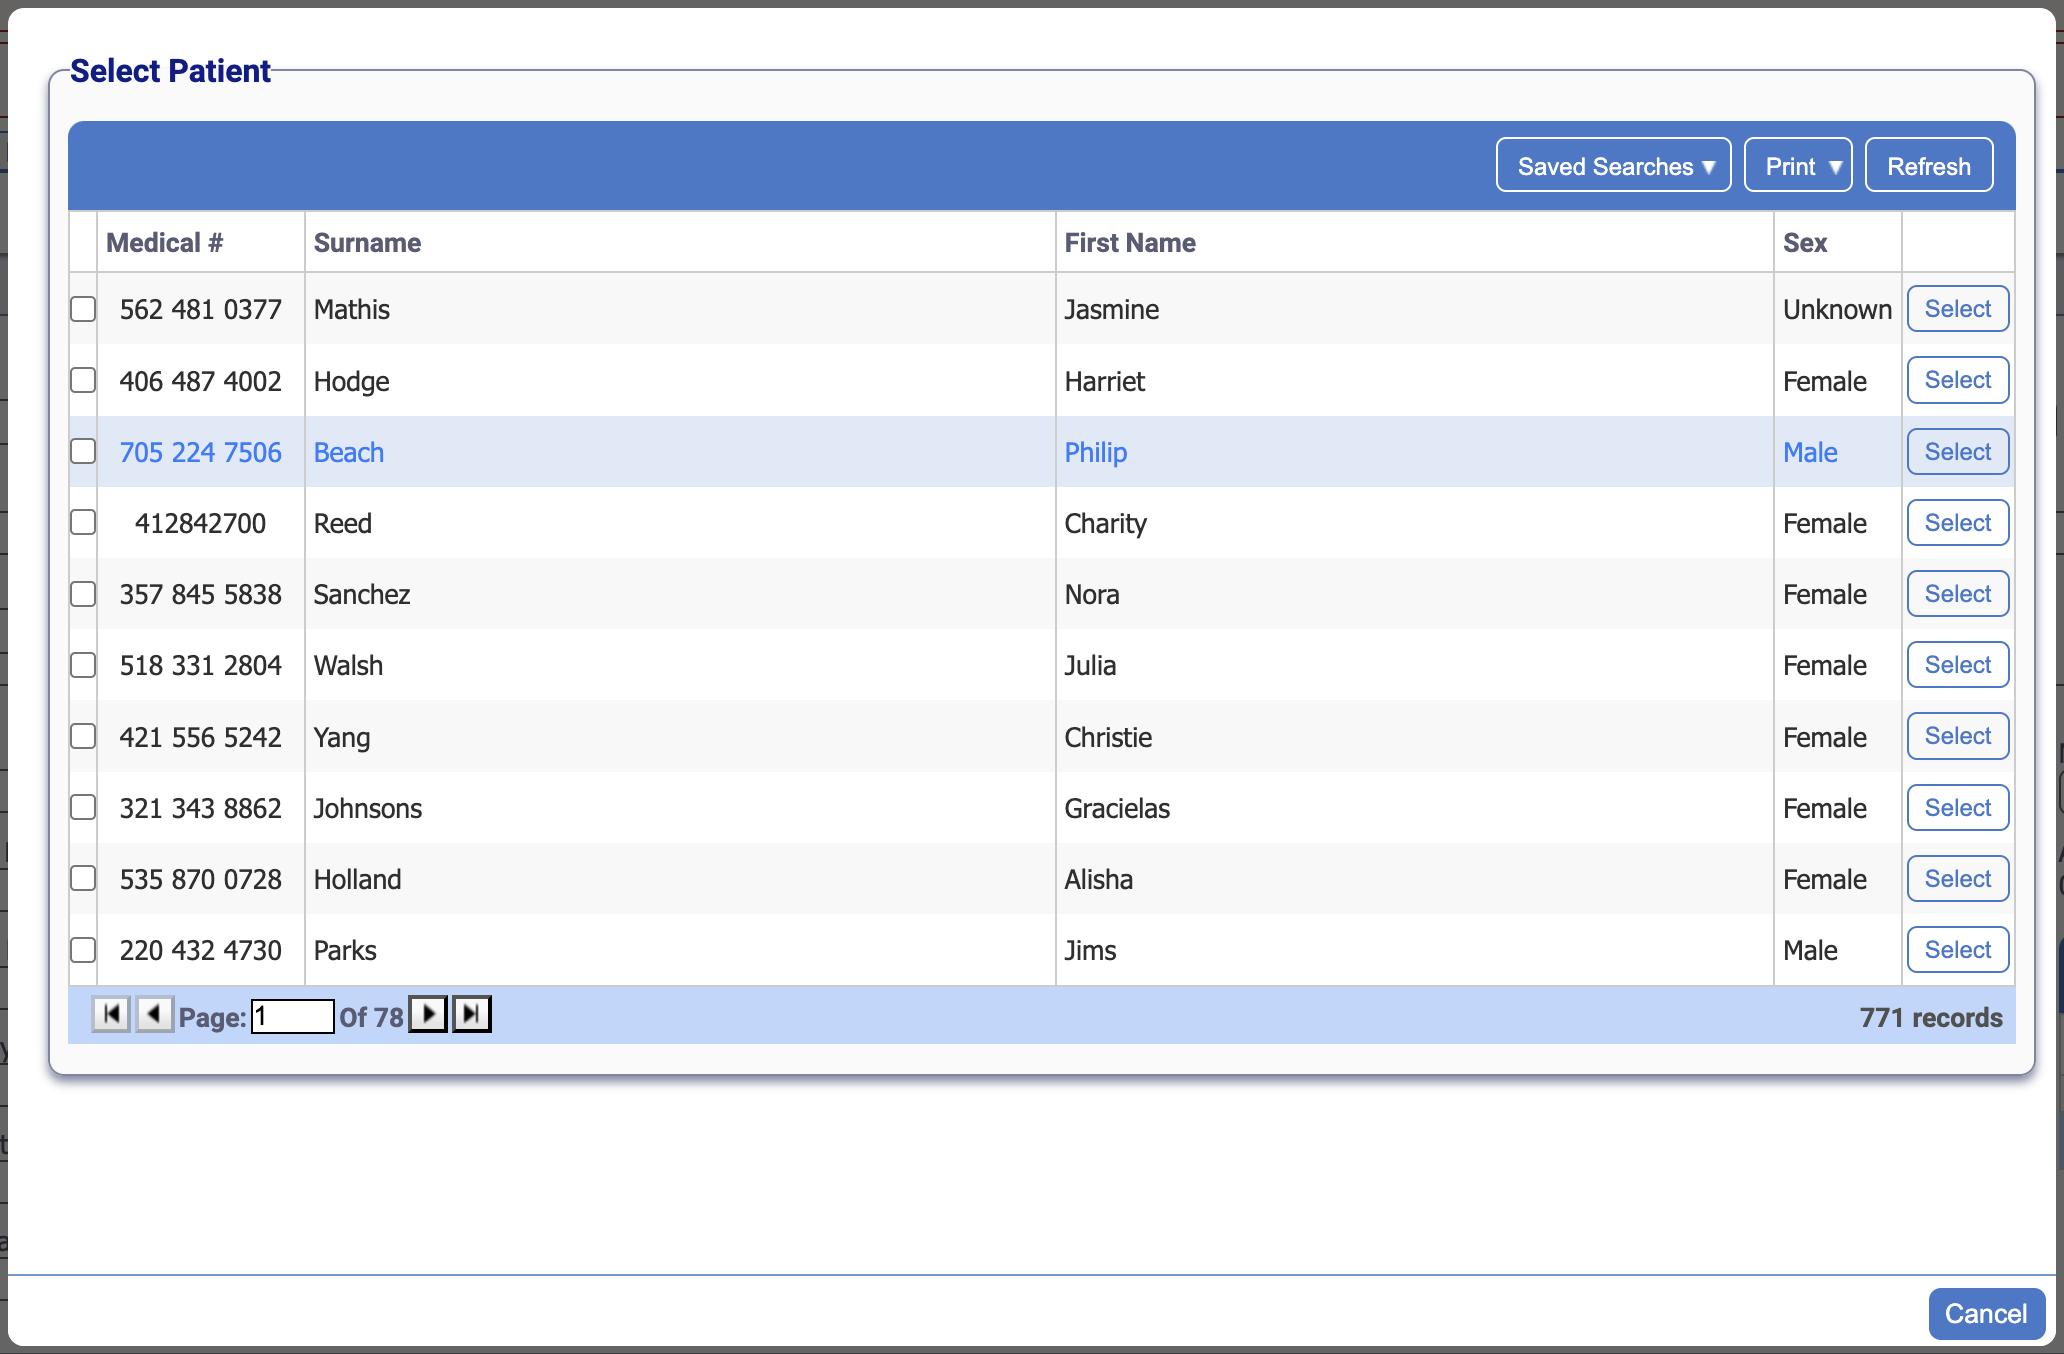
- Search for the patient the user wishes to merge away.
- Once located, press Select.
- A final popup window will appear which will detail the actions to take place.

- Carefully check the details. Key areas are:
- Merge To - This will be the patient that is kept as the main record.
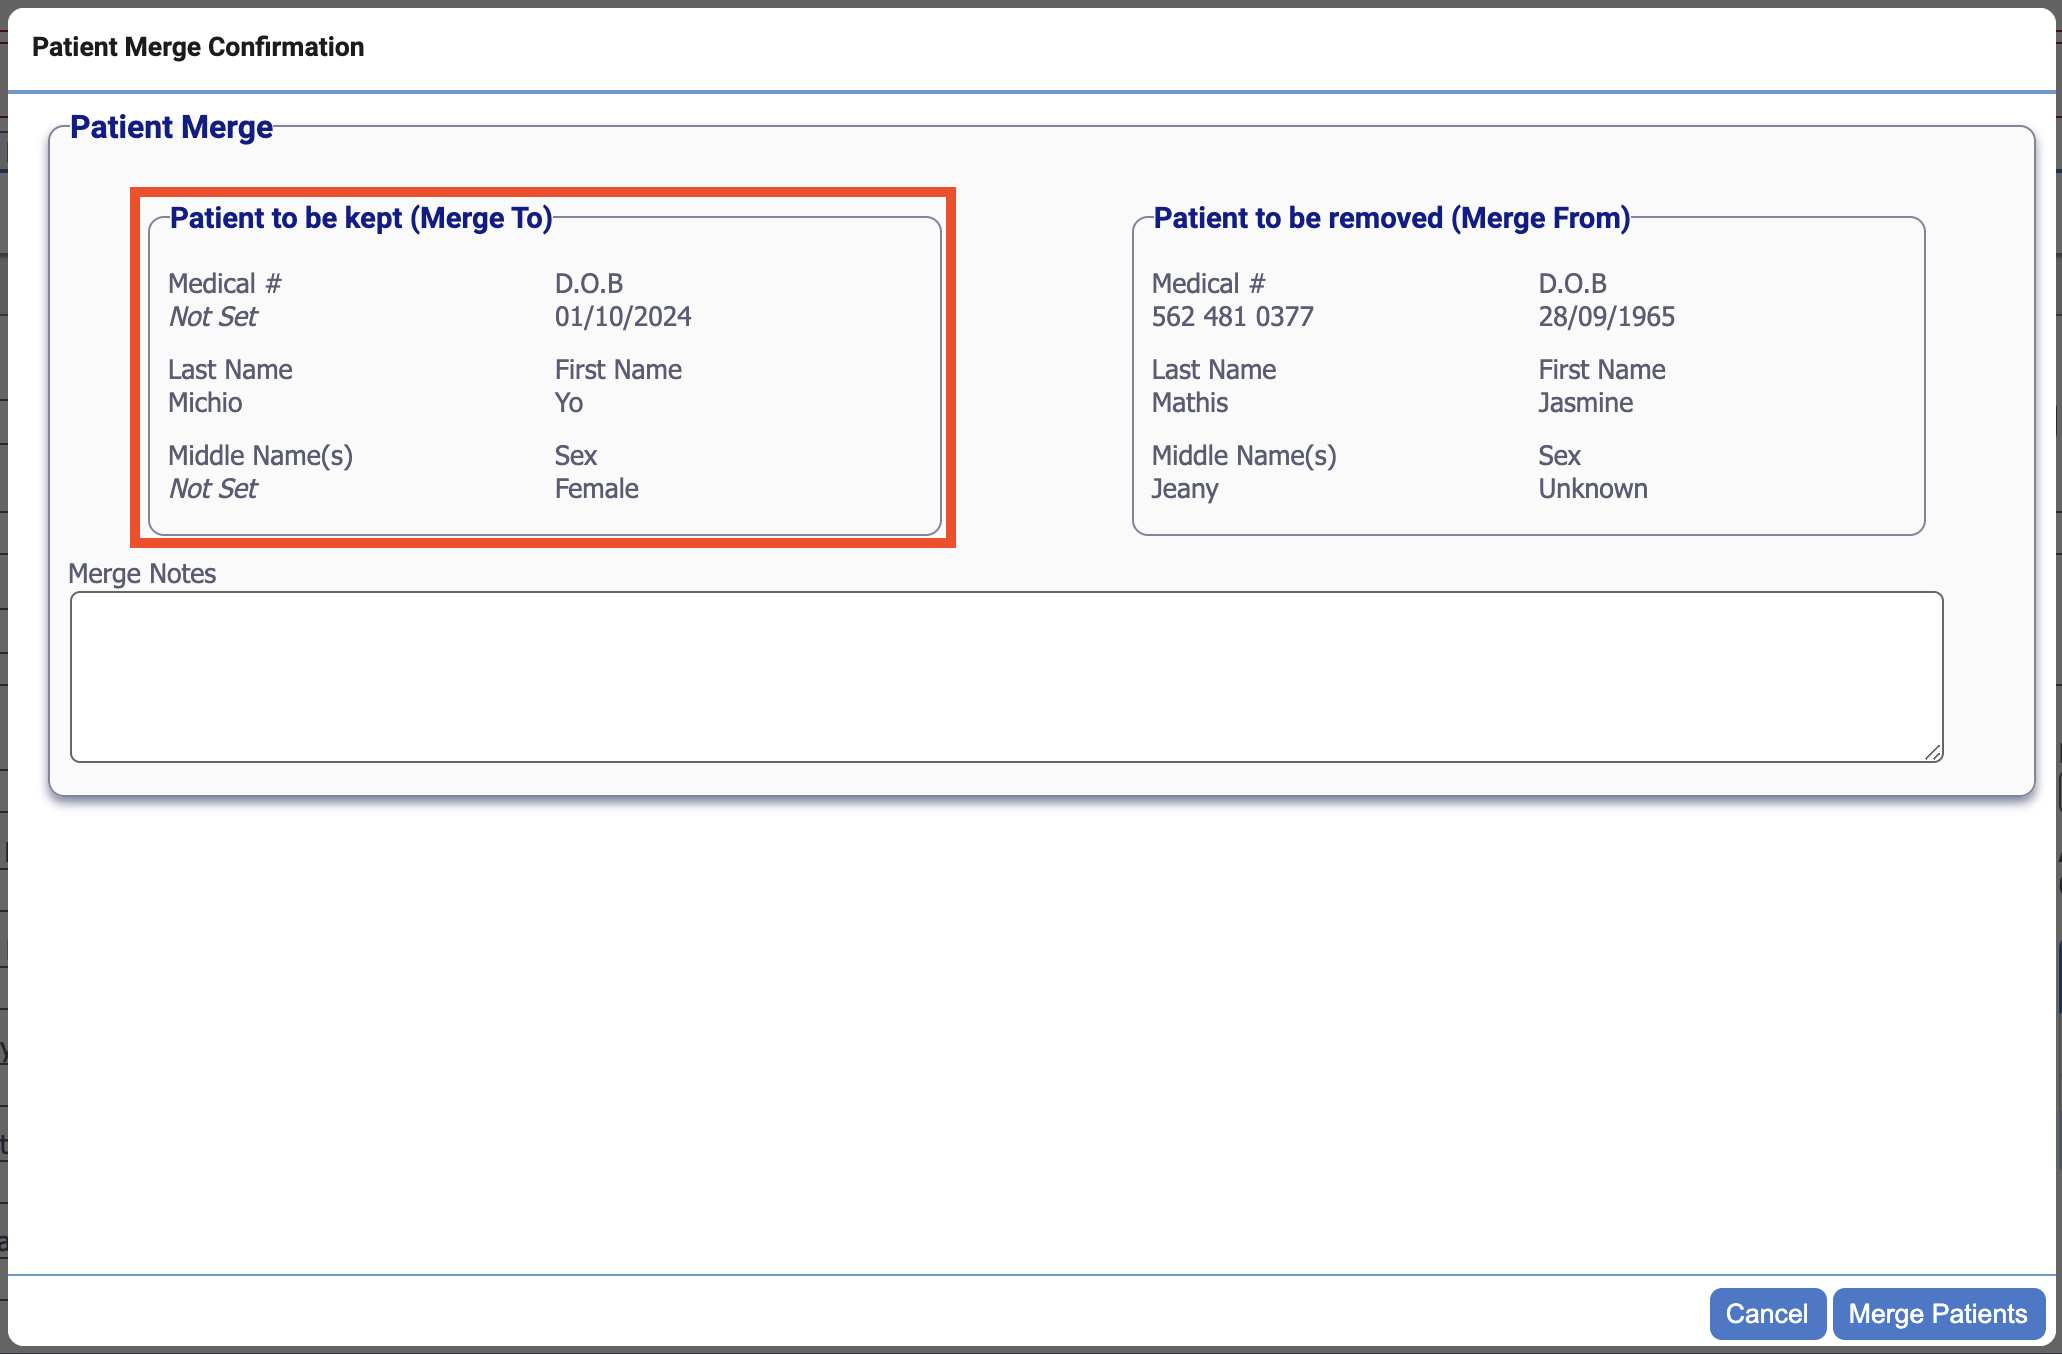
- Merge From - This is the patient which will appear to be removed.
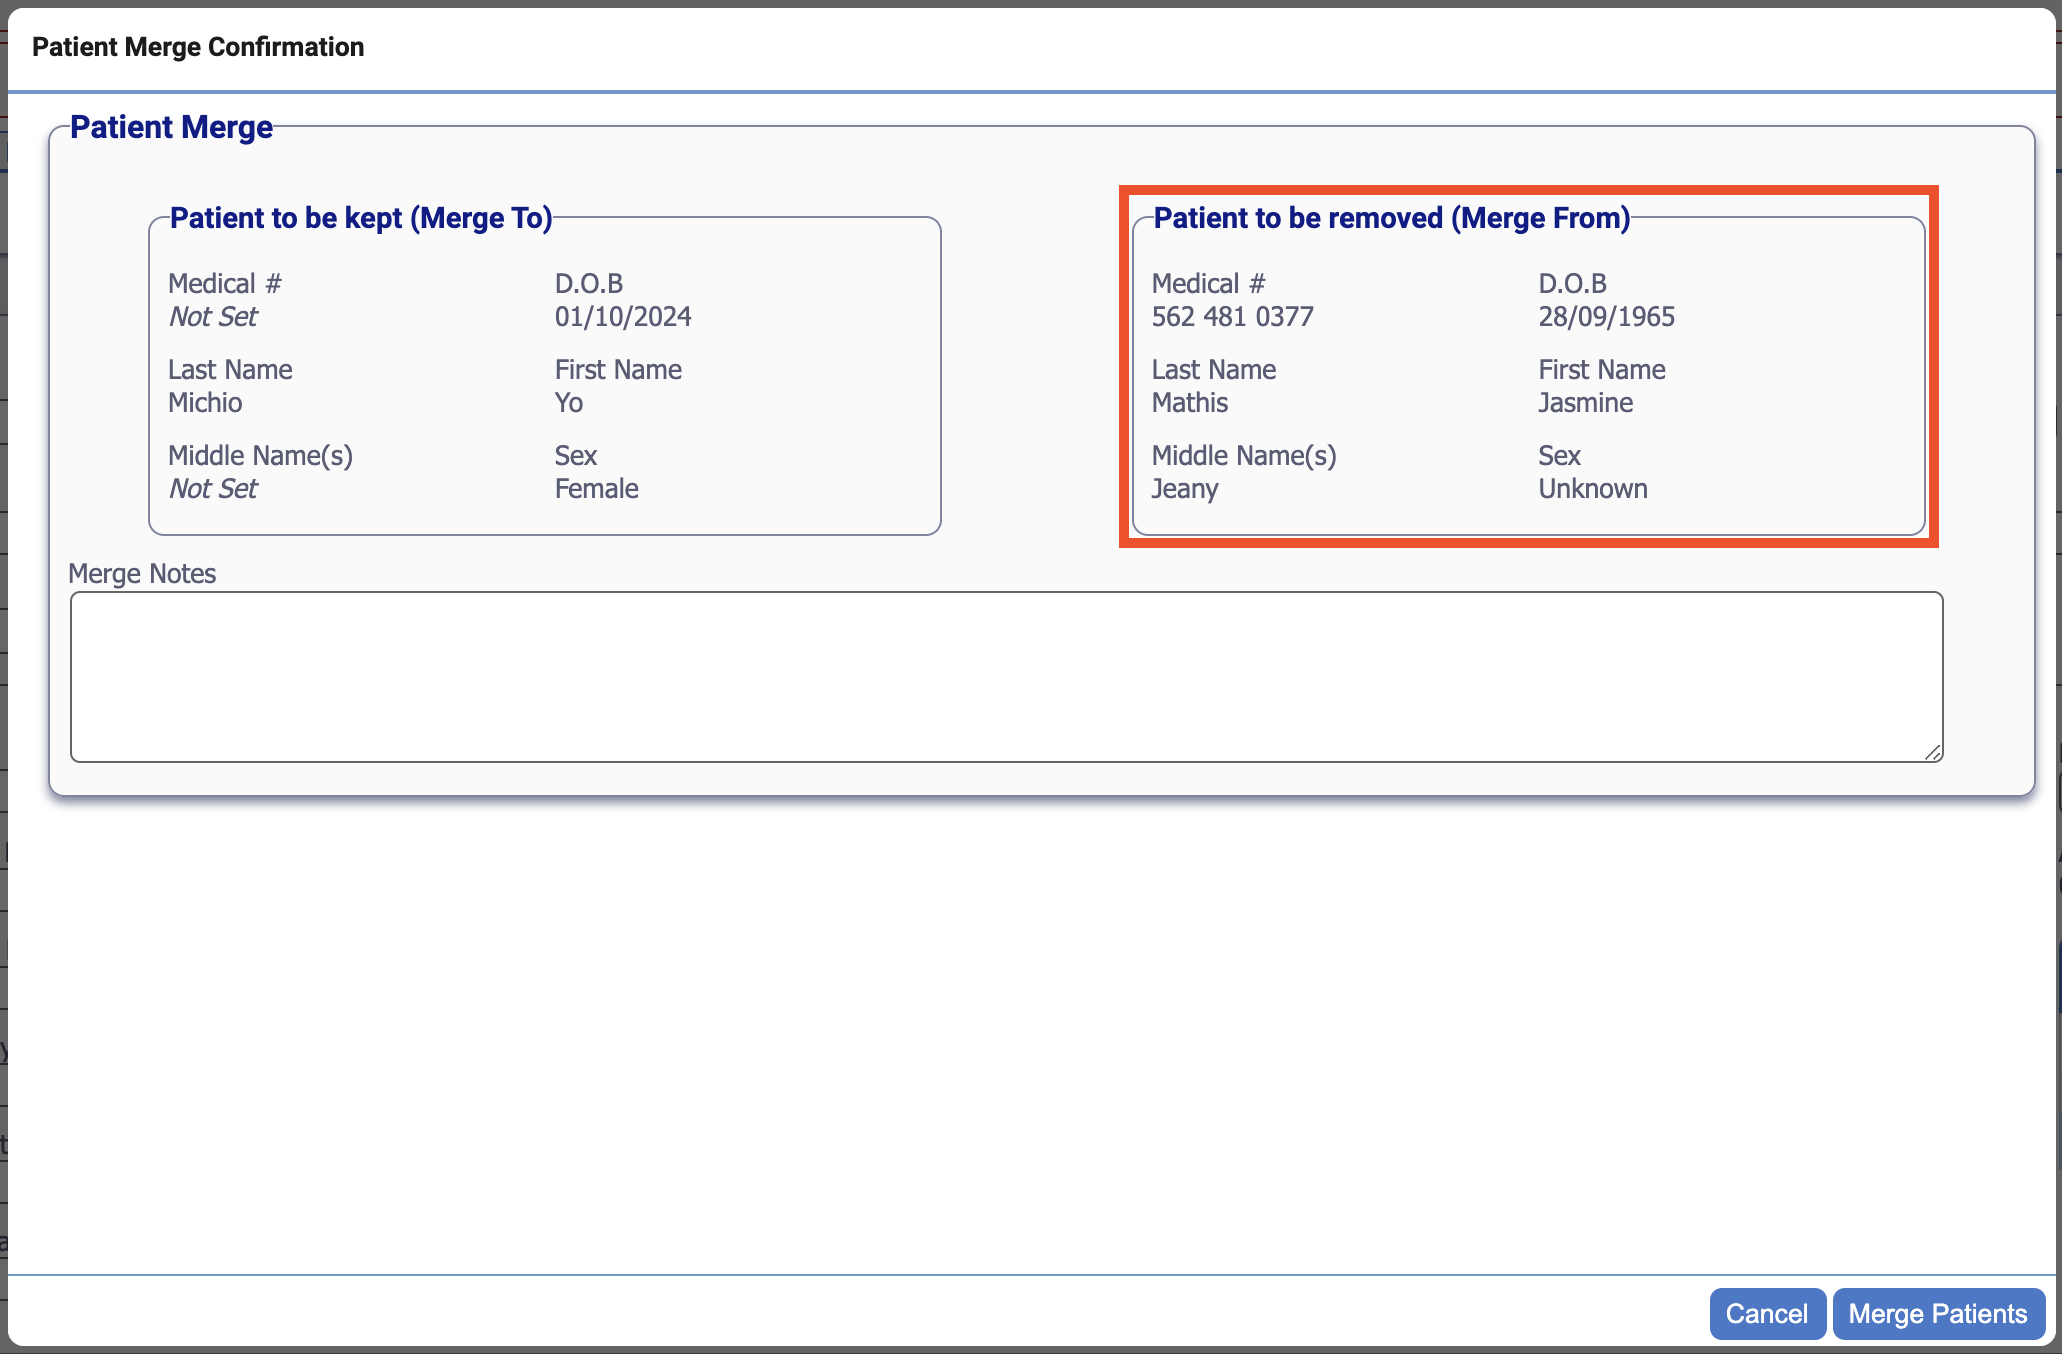
- Merge To - This will be the patient that is kept as the main record.
- Once happy with the changes, click Merge Patients to perform the merge.
The merge will now be completed. In order to see the details, the browser window must be refreshed. To do this, click the refresh button or press F5 and this will reload the information.
To un-merge the patient(s):
- Locate the patient the user wishes to un-merge and open the demographics view.
- Click the Actions button.
- Select Un-merge Patient Record from the drop down list.

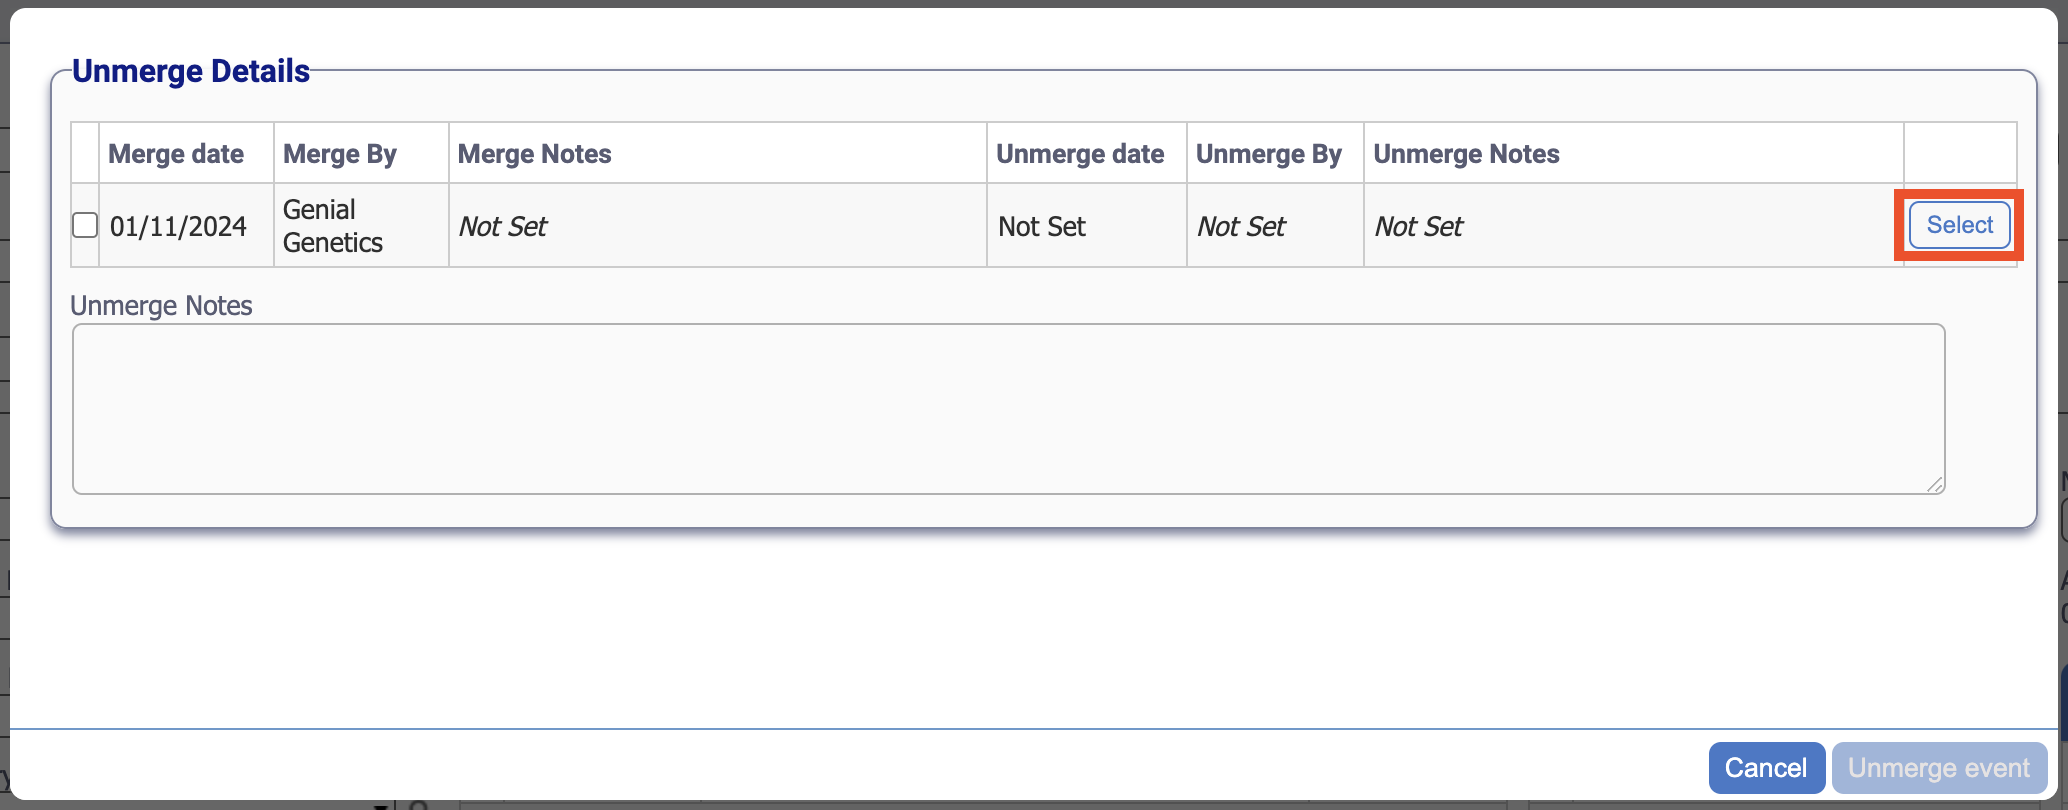
- A popup window will appear listing all the historical merge actions.
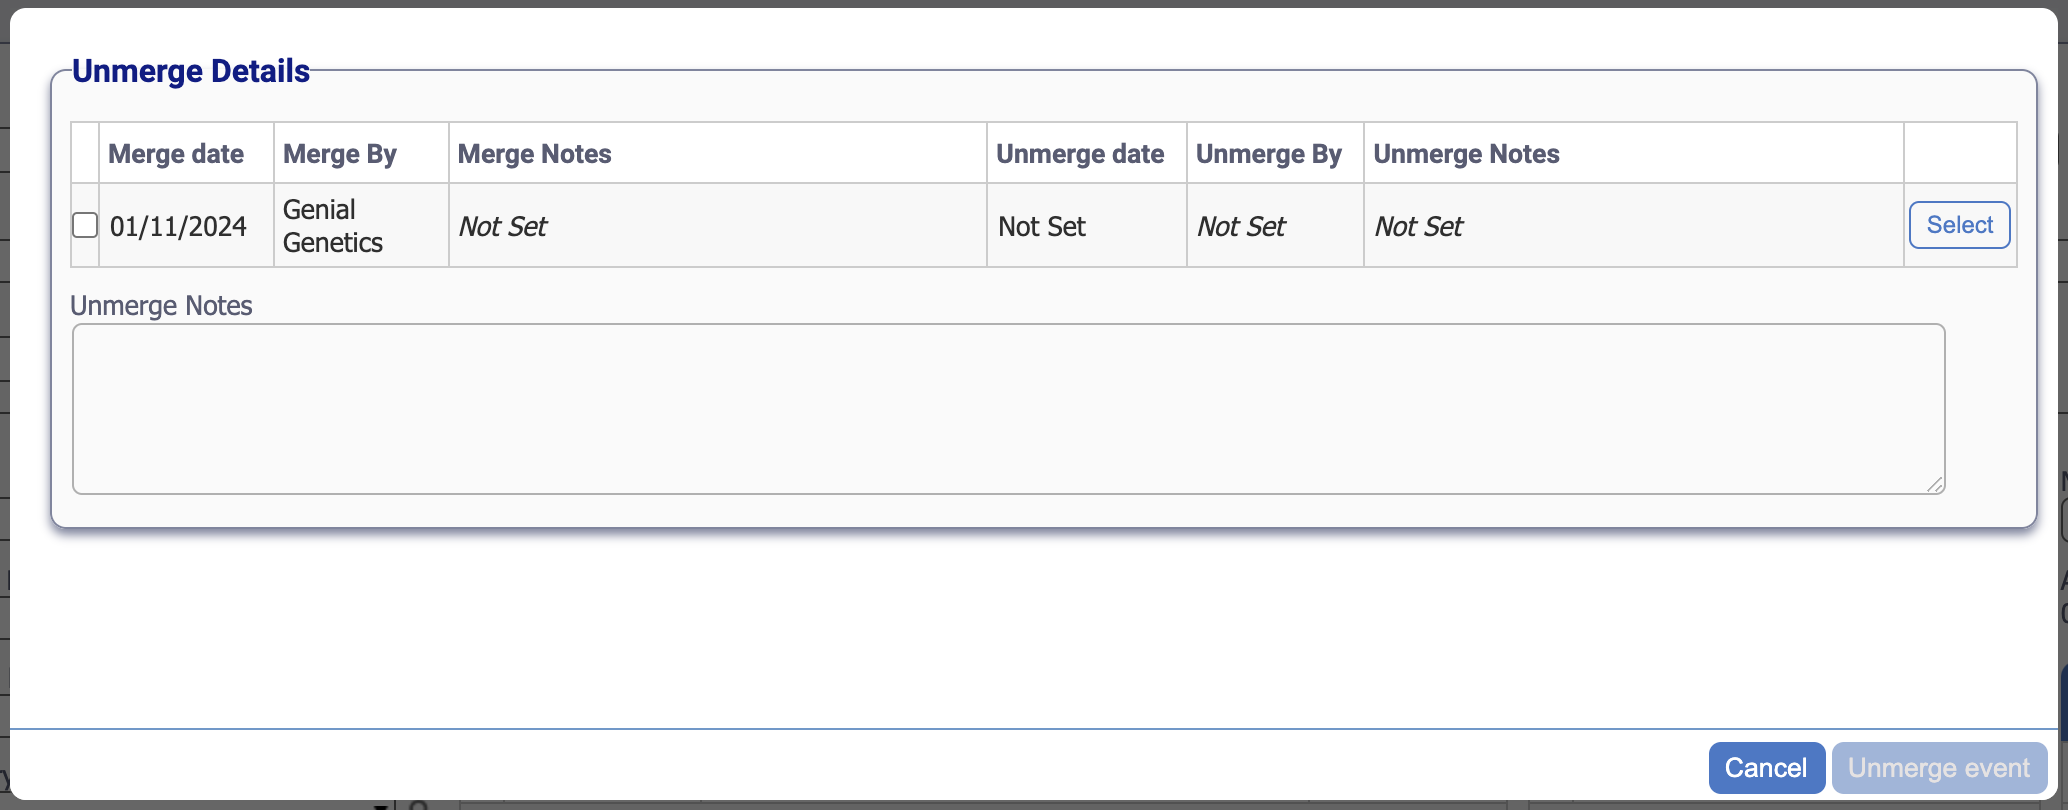
- Click Unmerge on the historic action that needs to be undone.
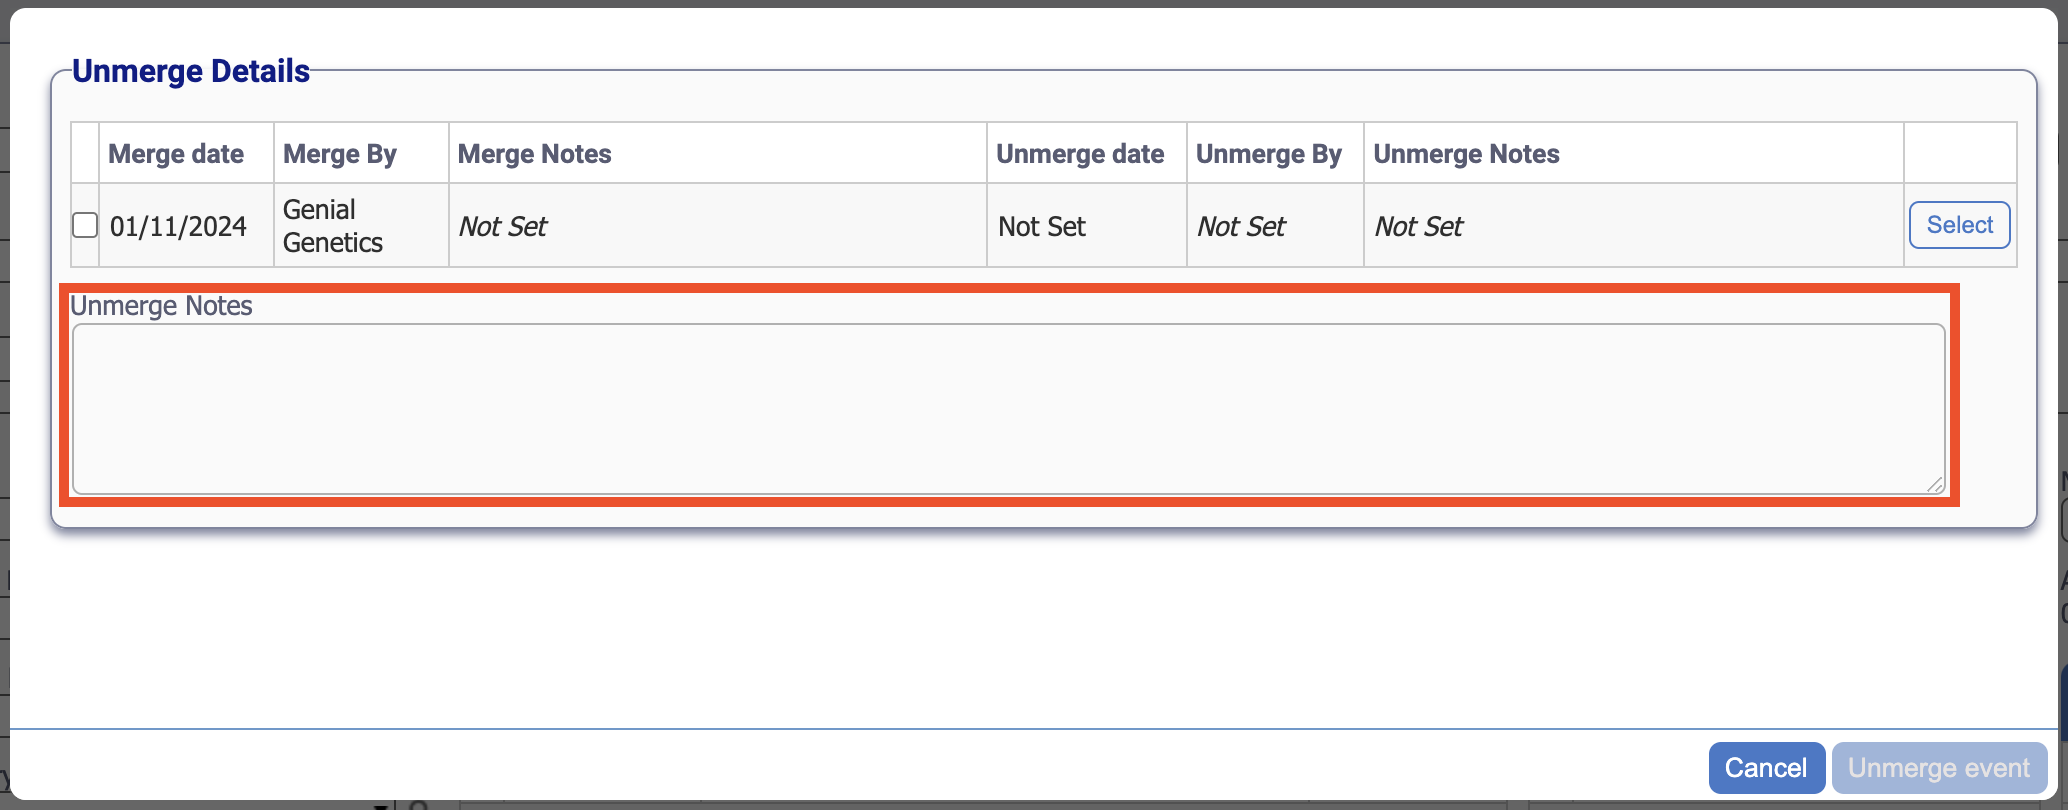
- A note is required. Enter some information in the Unmerge Notes field.
- Finally, click Un-merge event.
The un-merge is now completed. In order to see the details, the browser window must be refreshed. To do this, click the refresh button or press F5 and this will reload the information.