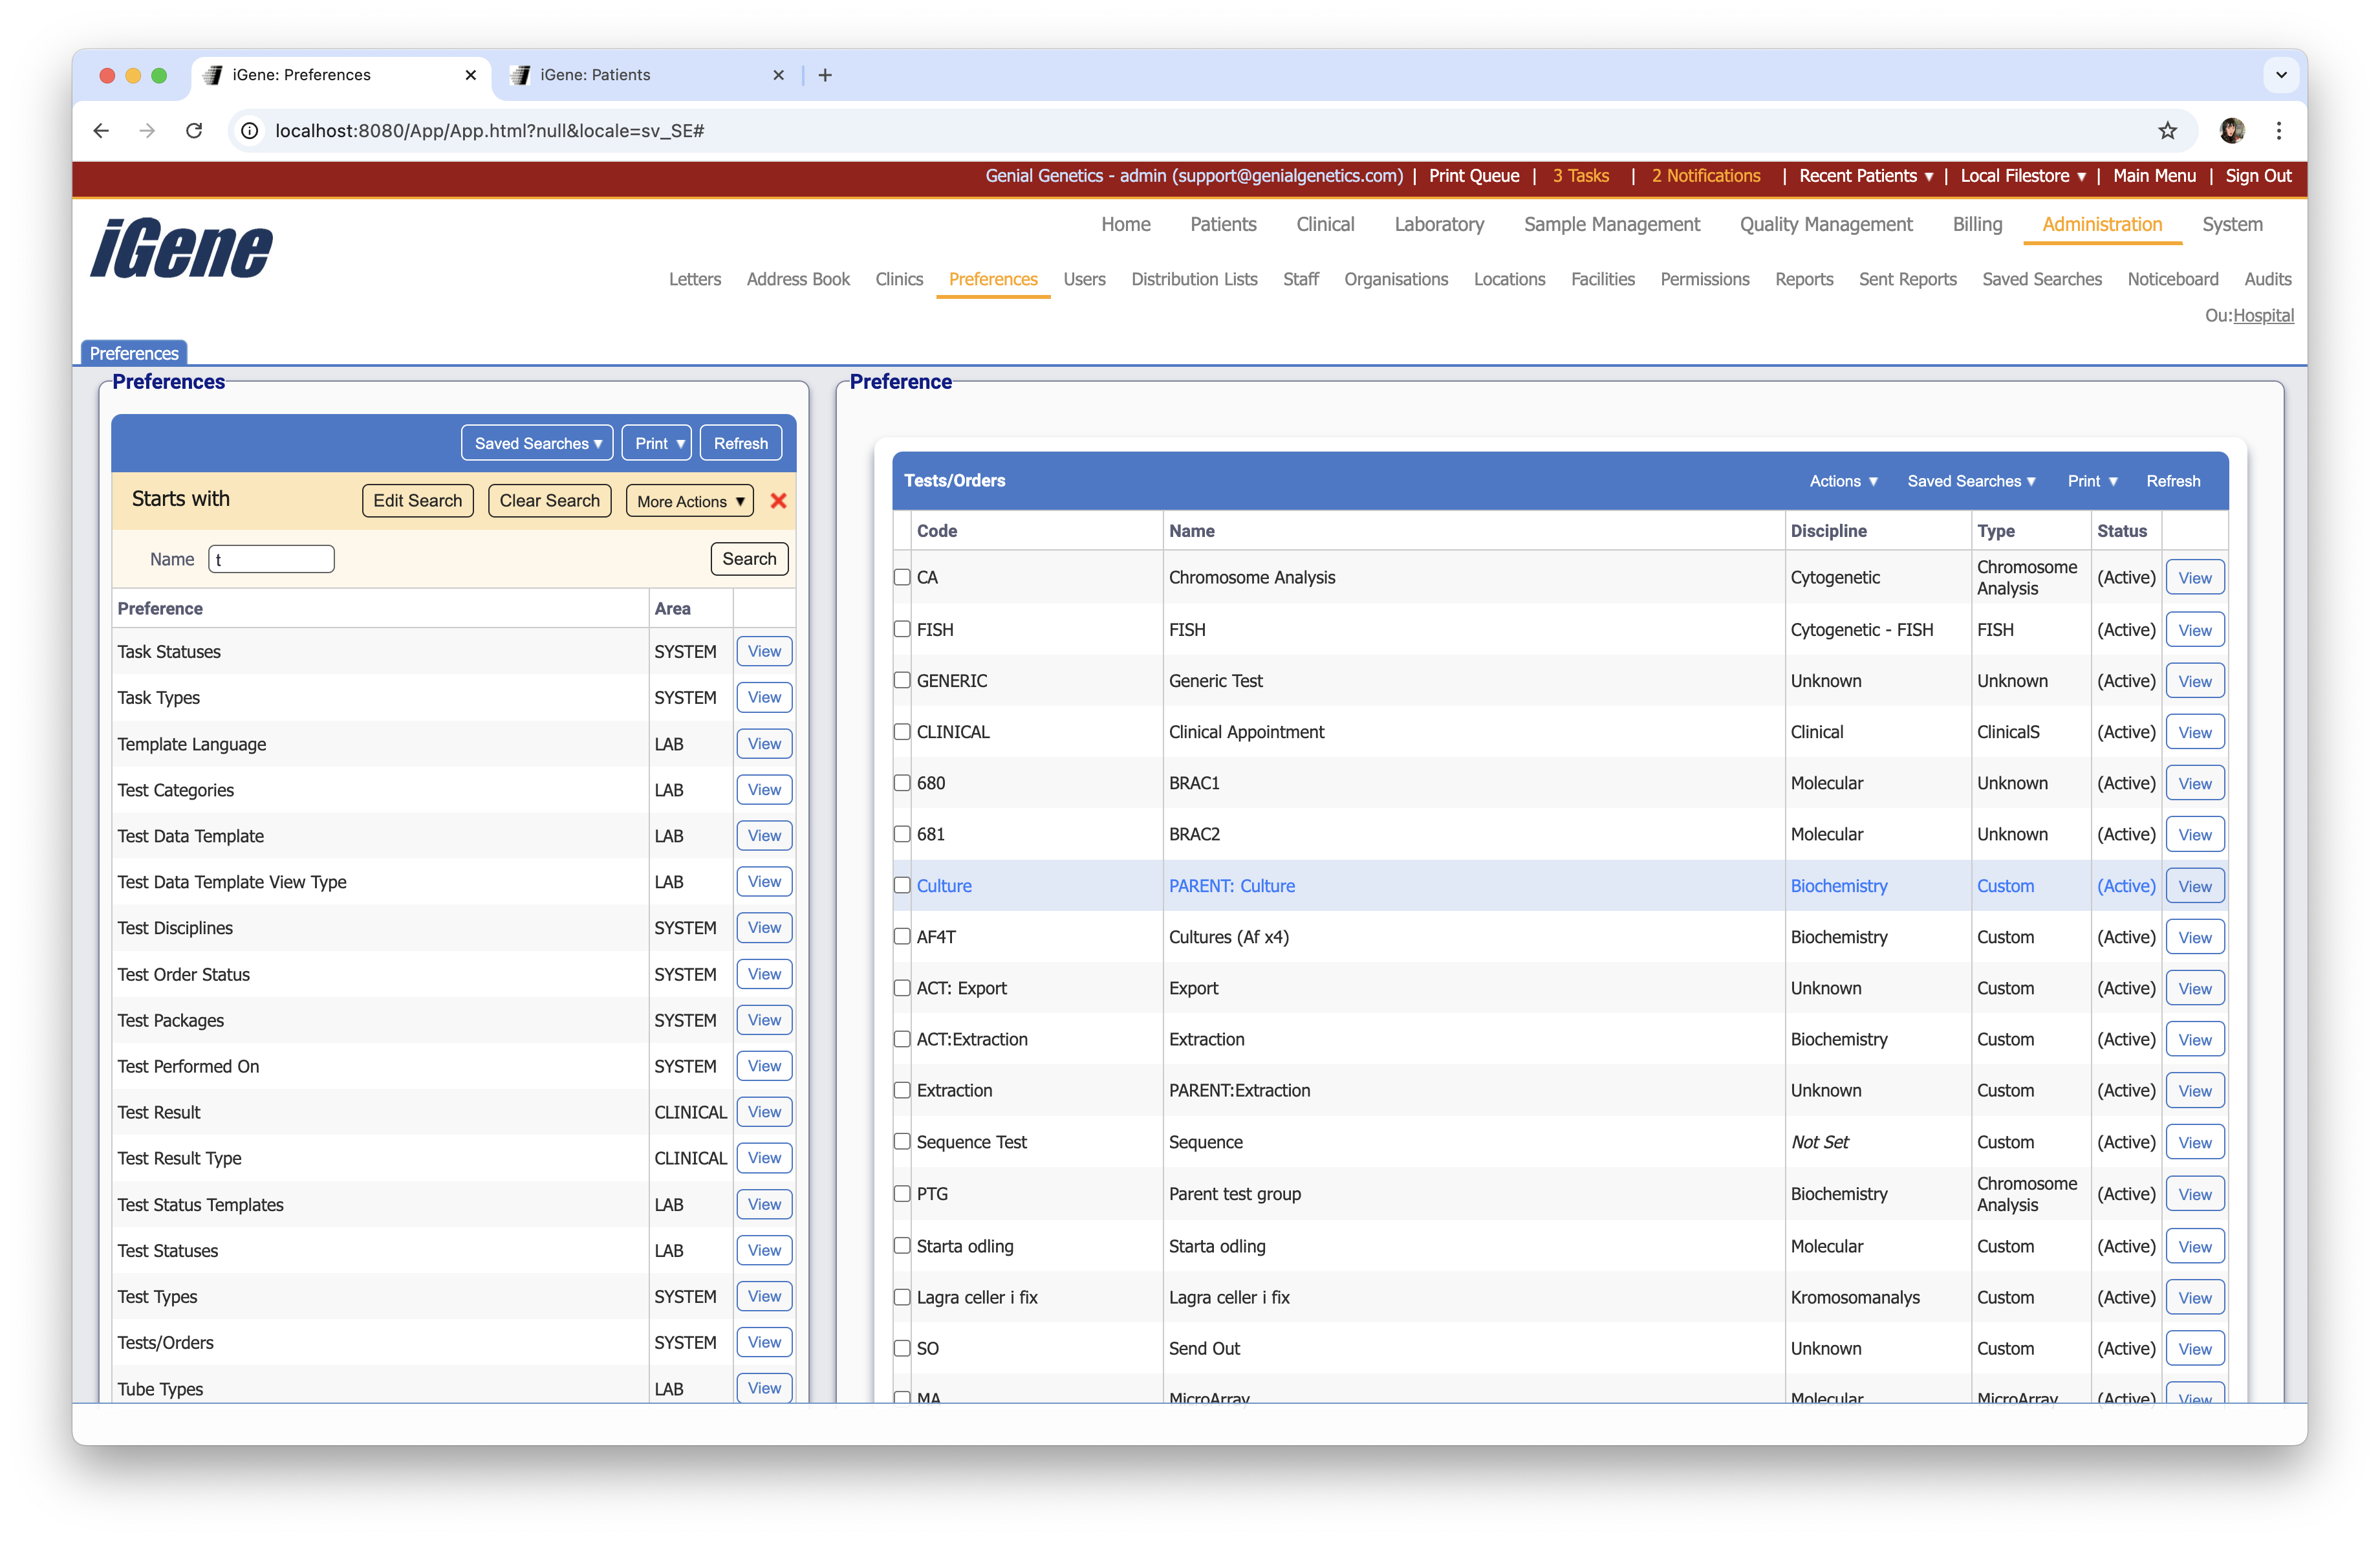
Tests/Orders
Tests/Orders are any actions that are performed on a sample. This could be a genetic test (FISH, Chromosome Analysis, QF-PCR etc.) which may have results and anything that is subject to billing or any task which transforms a sample from one type to another (DNA extraction).
Some examples of Tests/Orders are:
- Chromosome Analysis Tests
- Clinical Appointments
- DNA Extractions
- FISH Tests
- Sample Aliquots
- CONNEXIN 26 (GJB2 mutations)
Test Type
For a test to work in the iGene correctly it needs to be assigned a Test Type. iGene supports the following test types:
- Generic Test: Generic Tests are used to store a basic result code and some text which is copied to the report.
- Chromosome Analysis: Chromosome Analysis tests have a result code and fields specific for Chromosome Analysis tests.
- FISH: FISH tests have a result code and a list of probes with information relevant for FISH tests.
- Custom Test: Custom tests are the most powerful type of tests as they let users set up their own fields and decide which information they wish to record.
- Clinical Appointment: Clinical Appointments are used for billing purposes when using the clinical workflow.
- Molecular Test: A legacy test type providing a list of variants attached to a result (this test has been superseded by Custom Tests).
When creating a new test via preferences, it is imperative that the correct Test Type is chosen as it will not be possible to change the test type after it has been used.
Hierarchy of Tests
iGene supports a hierarchy of Tests/Orders. It can either be a parent, standalone or a child of another test/order. Using this hierarchy, it is possible to set up groupings of related tests/orders that should be together.
Location
Configuration
When first opening the test, the general details area will be visible:
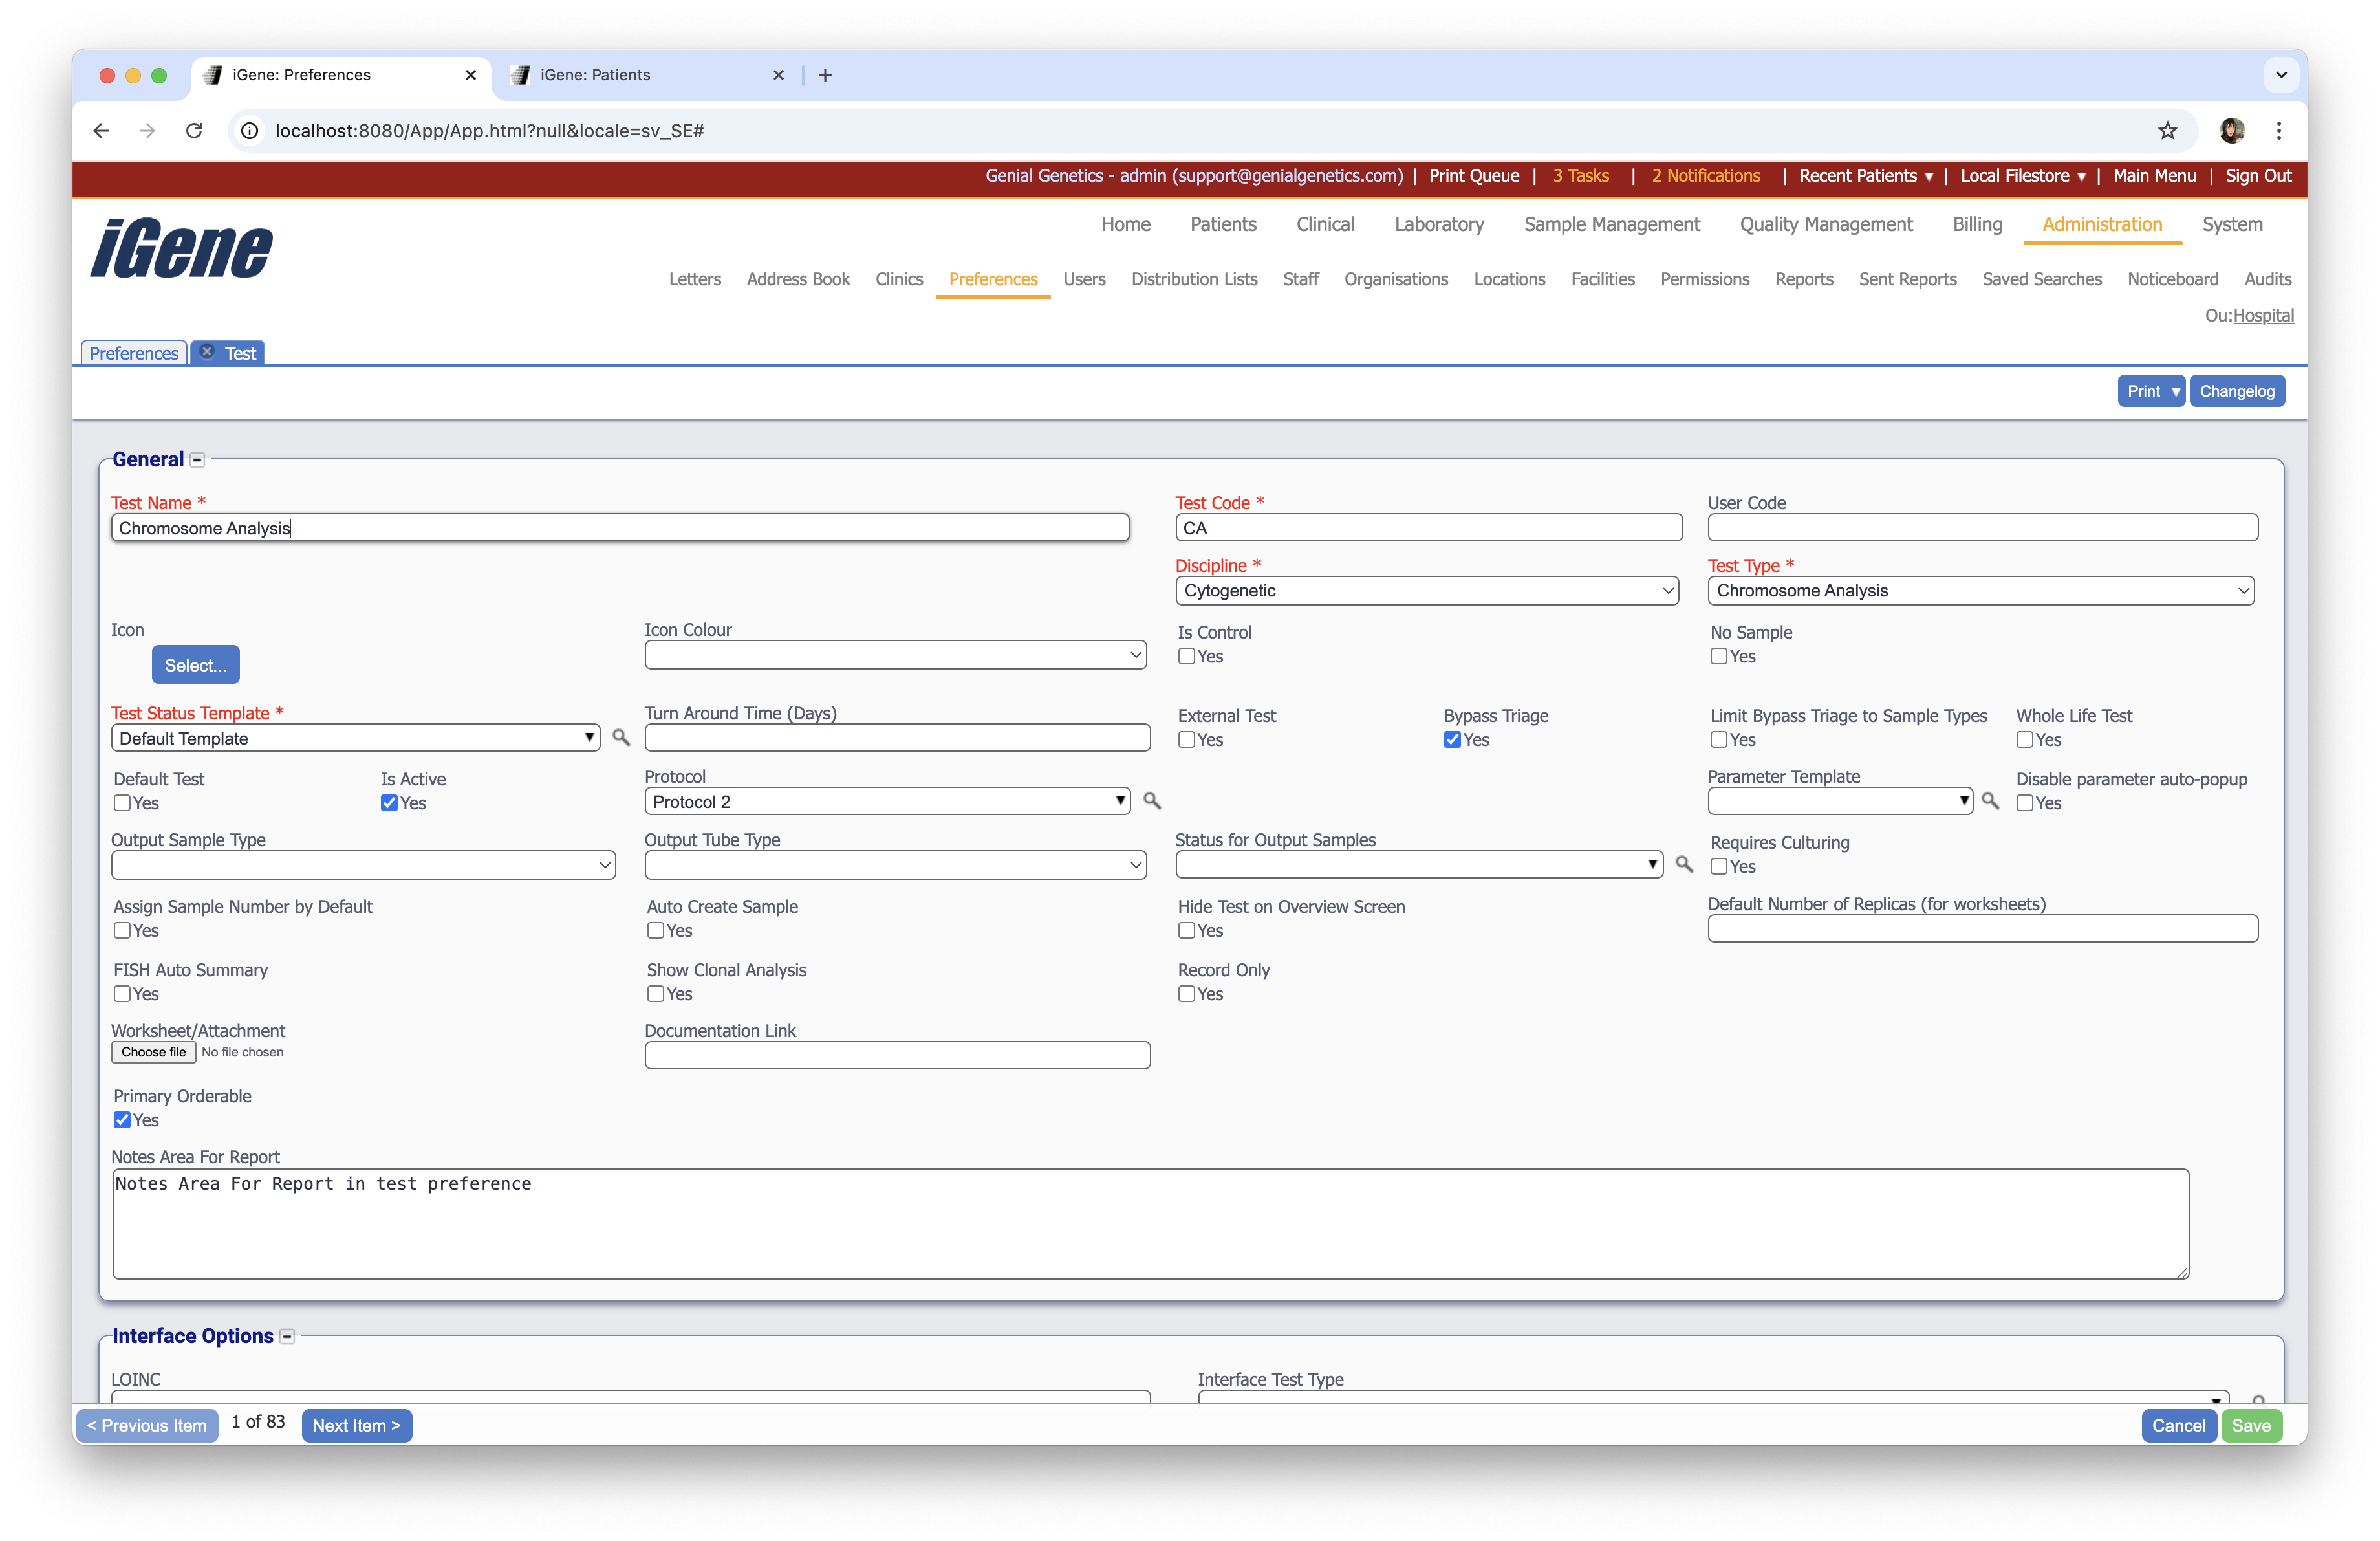
Each of the fields available are described below:
- Test Name (Required): A unique name for the test, e.g. Chromosome Analysis.
- Test Code (Required): A short unique code for the test. Codes can be used to quickly search for tests or for use in custom code inside reports.
- User Code: An optional code that can be used to link the test to a user.
- Discipline: The discipline dropdown is used to group the test into various disciplines, e.g. Molecular, Cytogenetics, Clinical etc. The discipline is often used for producing statistical reports or as a method of changing fields in a report based on the department. The discipline of a test can be used to drive the test, or sample numbering, see Nomenclatures. TODO
- Test Type (Required): The test type defines what type of test this is. Supported types are listed above, e.g. FISH. The test type will determine the behaviour of the test and which fields it will have in the result screen.
Once a test type has been set and tests have been booked, the test type should not be changed.
General
- Icon: An optional icon to display along with the test. This can be used to help identify the test quickly in large trees or lists in conjunction with parent child tests.
- Icon Colour: An optional colour to use along with the icon. This can be used to help identify tests quickly in large trees or lists in conjunction with parent child tests.
- Is Control: Defines whether the test is used as a control or not. A control test works differently than a standard test in that it has a present list of samples or a reagent, e.g. A donor’s sample or water. Control tests do not need to be manually triaged.
- No Sample: Normally a test is required to be triaged to one or more samples before it can have a result. Selecting this option will allow the test to be used without any sample. Used for headline results where a parent test has childs. The child tests are linked to samples and contain the actual lab results.
- Test Status Template (Required): The test status template defines the test status workflow used for the test and must be set before the test can be used. To read more about test status templates see Test Status Templates.
- Turn Around Time (Days): The turn around time is used to calculate the due date of a test when it is booked. iGene will take the order date of a test and add the turn around time in days to provide an estimated due date. The due date can be changed if required. This calculation does not take actual workings days into consideration. Note: There is also an option in the Test Grouping area to set turn-around-times for certain sample types on the test.
- External Test: External tests are used for recording send-out tests. External tests generally do not run through the typical lab workflow and are managed in a separate area. Results are attached to the tests (generally as a PDF) rather than being generated by iGene. Selecting External Test will limit many of the other options available for tests.
- Bypass Triage: The bypass triage will allow a test to be used without it needing to be triaged to any particular sample. Unlike the No Sample option, bypass triage tests will be automatically triaged to all samples in the referral. This is a useful option if referrals always contain only one sample and one test as it presumed these should be triaged together.
- Limit Bypass Triage to Sample Types: When bypass triage is selected, this option will allow the test to be bypassed only for the selected sample types. This is useful when a referral contains multiple sample types and only one of them should bypass triage.
- Whole Life Test: A whole life test is used to indicate that the test is a one-off test that is not part of a workflow. This is useful for tests that are not part of the normal lab workflow, e.g. A test that is only performed once in a patient’s life.
- Default Test: The default test option will set the given test as default whenever creating a lab referral. For example, if a site mostly does a single test, then this feature can be used to automatically add the test in whenever a lab referral is created.
- Is Active: Indicates whether the test is available for selection. Tests marked as inactive will not show up as a test that can be booked, but existing tests will remain visible. When tests are no longer used, or needed, it is advisable to set them as inactive rather than deleting the test.
- Protocol: The protocol controls which worksheets the test can be placed on.
- Parameter Template: The parameter template controls which parameters are available for the test. This is used to control which parameters are available for the test.
- Disable parameter auto-popup: When selected, the parameter popup will not automatically appear when booking the test. This is useful for tests that do not require parameters to be entered.
- Output Sample Type: The output sample type defines which sample type will be produced by performing this orderable, e.g. A DNA extraction test would have an output sample type of DNA.
- Output Tube Type: The output tube type defines the sample tube type that will be produced by performing this test.
- Status for Output Samples: The status for output samples defines the status that the output sample will be given when it is created. This is useful for tracking the progress of the sample.
- Requires Culturing: The requires culturing option indicates the test’s sample requires it to be cultured before results can be entered, i.e. via the Laboratory -> Setup screen.
- Assign Sample Number By Default: This option will automatically select the New Number? option when triaging a sample.
- Auto Create Sample: This option will automatically create a sample and triage it to the test.
- Hide Test on Overview Screen: This option will hide the test from the overview screen.
- Default Number of Replicas (for worksheets): The default number of replicas is used to set the number of replicas when a test is placed on a worksheet.
- FISH Auto Summary: When entering FISH results, the ISCN’s of each probe are concatenated and placed into the overall ISCN for the test.
- Show Clonal Analysis: Within a Chromosome Analysis test iGene has the option to show a clonal analysis results area. This allows the same Chromosome Analysis result screen to be used and this information to only show on specific tests.
- Record Only: The record only option specifies that the test is used as a record only, i.e. To log that a specific test has been done on a patient that has not been put through the system. Normally used for clinical workflows.
- Worksheet/Attachment: This option will allow a user to attach a worklist/worksheet to be used when performing the test. Depending on a site’s configuration, this field may or may not be visible when using the worksheets area.
- Documentation Link: A link to an external document. This could be a link to a SOP.
- Primary Orderable: The primary orderable option is used to define which test is the primary test for a referral. This is useful when a referral contains multiple tests and one of them is the primary test.
- Notes Area For Report: The notes area for report is used to define some text that can be automatically placed onto a lab report.
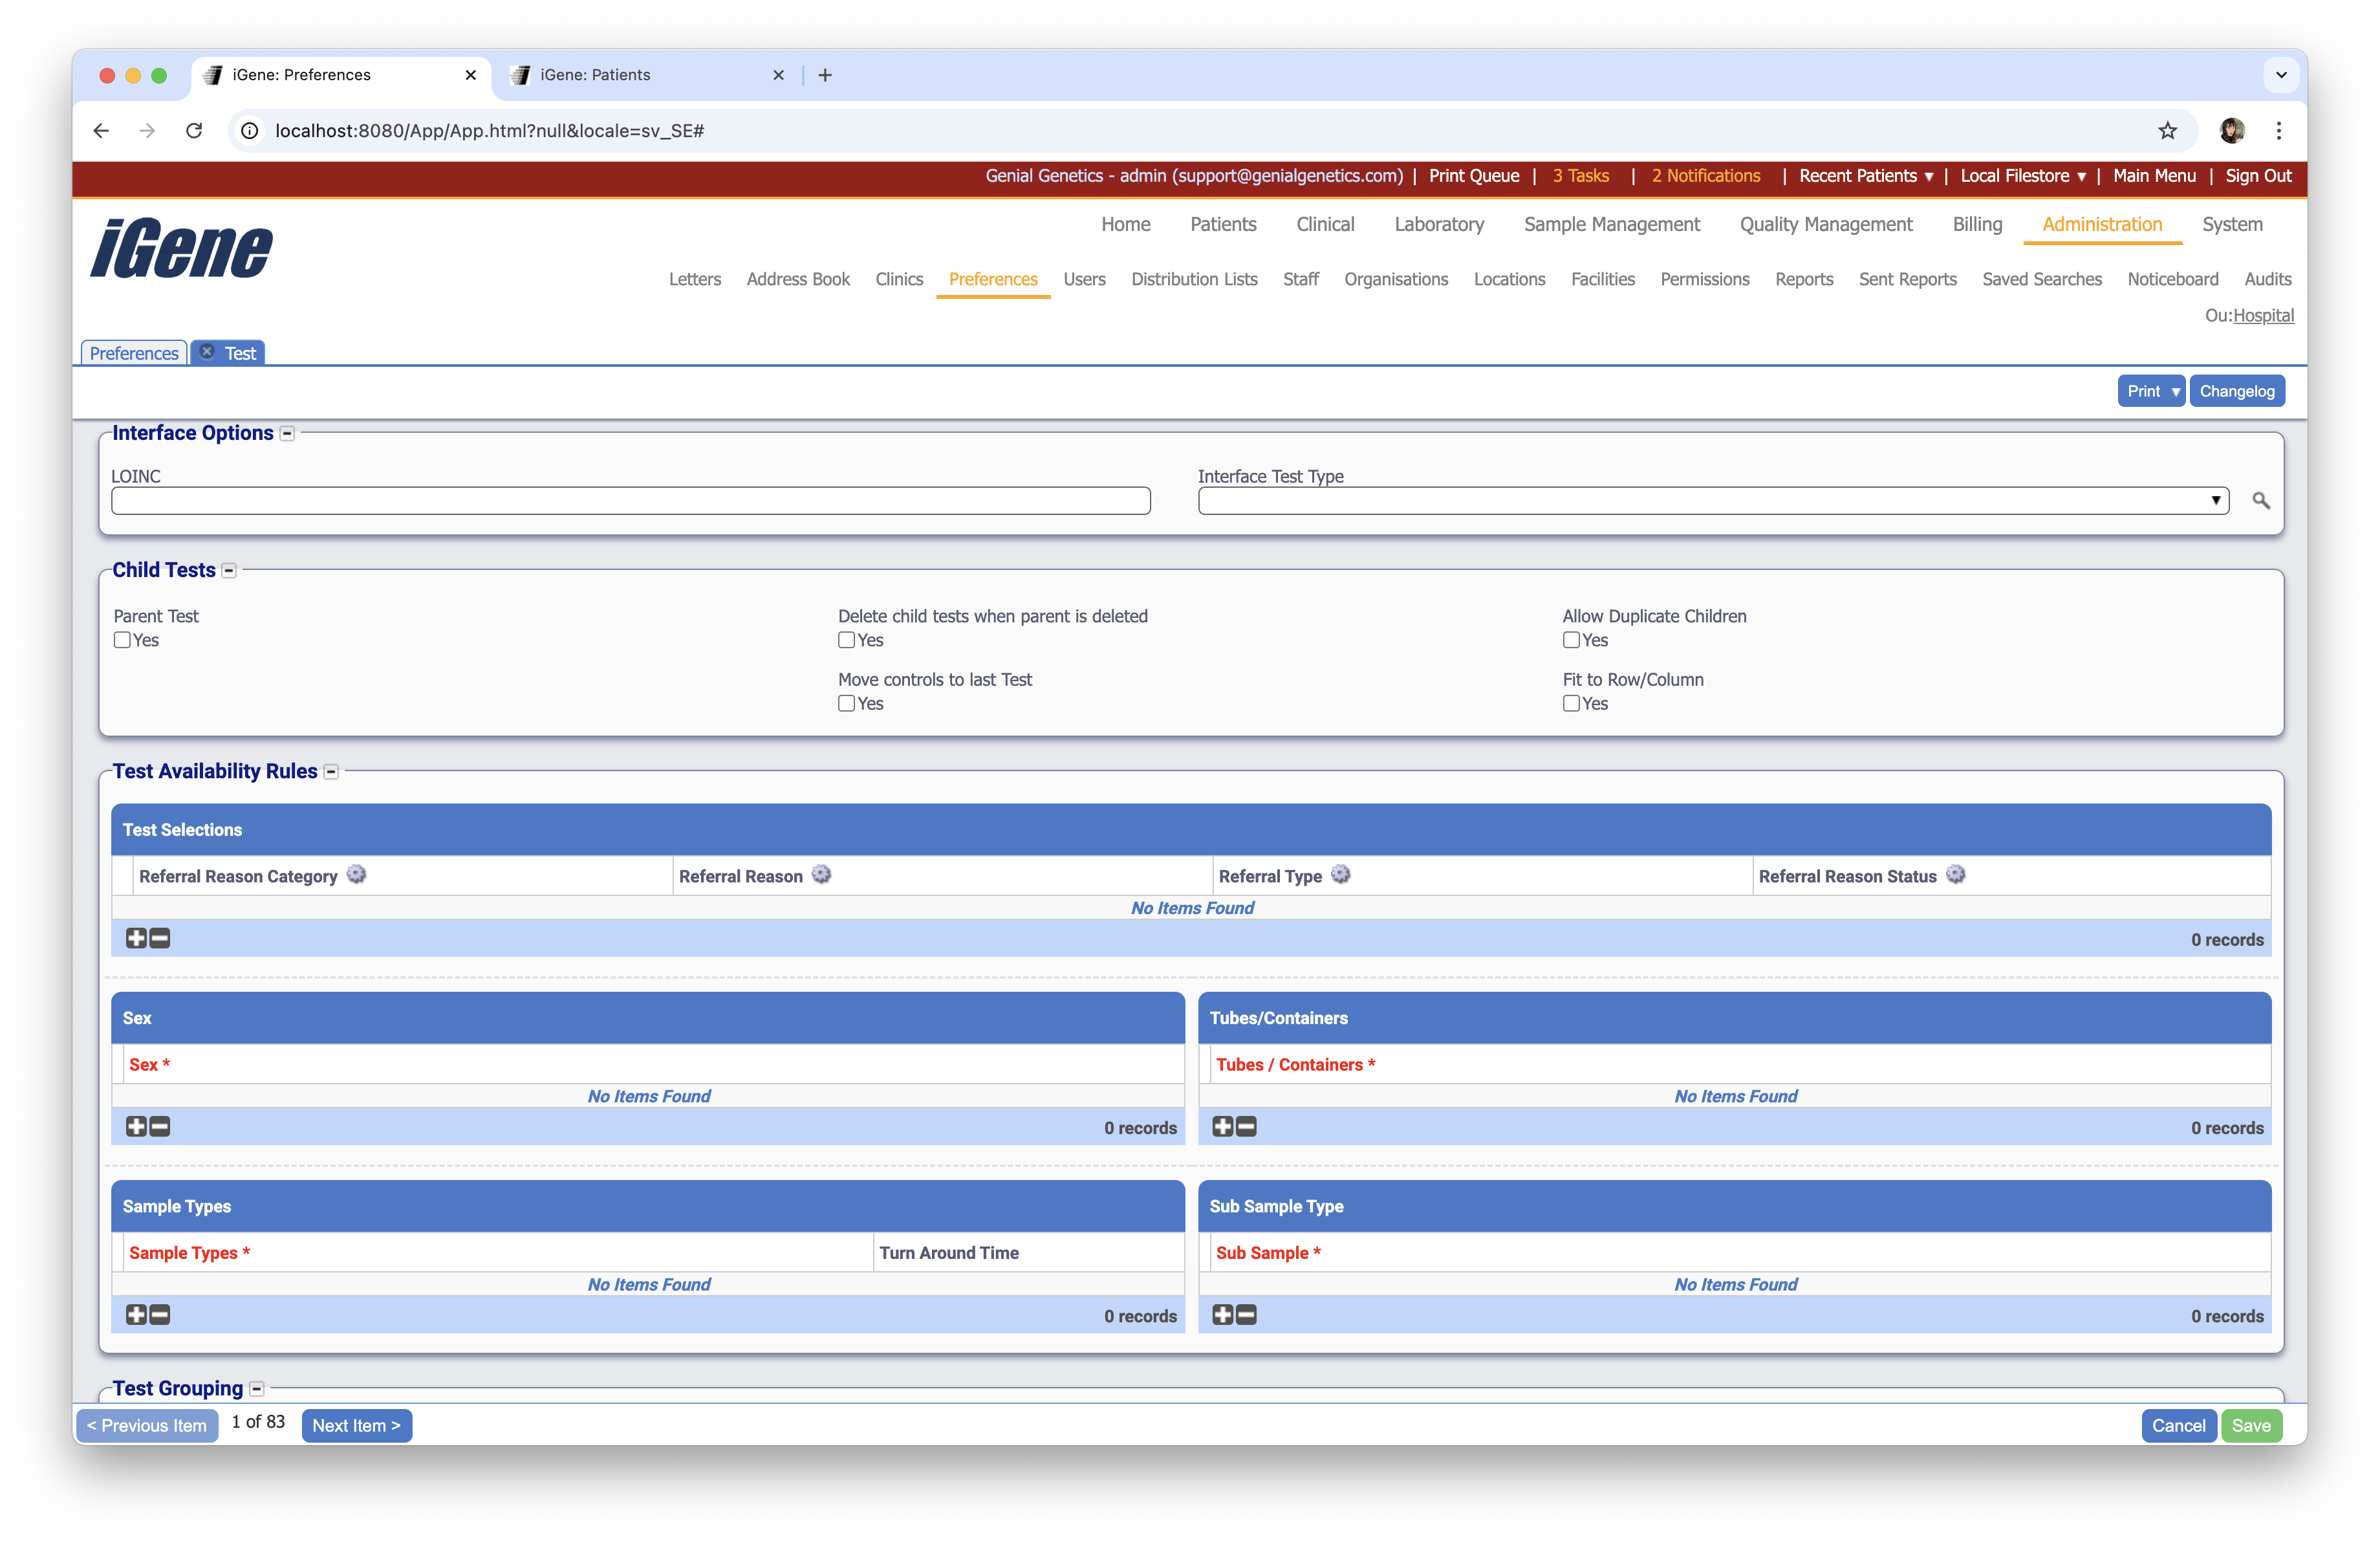
Interface Options
- LOINC. Logical Observation Identifiers Names and Codes (LOINC) is a database and universal standard for identifying medical laboratory observations. This field can be used to enter a single LOINC code for this particular test and can be used when interfacing with external systems.
- Interface Test Type: The interface test type field is used when interfacing with external systems. For example, an external system may only understand a few different test codes and this field will allow iGene tests to be remapped to specific codes when results are sent over the interface. This will prevent the downstream systems from having a complete list of tests to choose from.
Child Tests
The Child Tests area is used to specify that this test is a parent test and to define which child tests it has and when they are added. To set a test as a parent test, check the Parent Test checkbox.
Selecting the Parent Test box will reveal the Test Selections table.
To add test as a child to this test, select the + button at the bottom of the table.
When adding child tests to a parent, the child test must have already been created. Normally when creating a test hierarchy, the child tests should be created first and then finally the parent test. N.B. It is possible to use the same test again in another parent, i.e. Setting a test as a child of another test does not limit it just to that test. Child tests can also be ordered individually without a parent test.
The following options are available for each child test:
- Test Status: This option defines at which point the child test will be ordered. For example, it could be ordered as soon as the parent test is ordered, or ordered when the parent test has the status of Results Entered.
- Test: The test to be added as a child.
- Required: The required checkbox defines whether the test must be performed and will be ordered when the given test status is reached. When required is not checked, the test will be available to order from the test popup dialog, but the user will not be required to order it.
Controls
Controls are a special kind of test that allows the user to use a sample or reagent as a test. Controls do not require triaging because they are are already triaged when they are booked in. To make a test a control test, select the Is Control checkbox.
Control tests cannot be parents of other tests. External tests can also not be control tests. When selecting the control test option, the parent test fieldset will not be visible.
Once a test is marked as a control, the Control fieldset becomes visible.
The Control Type field specifies the type of control and can be one of the following values:
- Family. A family control is used to select a control sample for a patient based on the pedigree/family number.
- Patient. A patient control is used to select a control sample based on a specific patient, e.g. John Doe should always get Sample DNA12344.
- Reagent. A reagent control is used for non sample controls, such as water.
- Sample. A sample control is used for a single sample and allows it to be used with any patient.
Each control type is discussed more in the following sections:
Family Controls
This table lists the sample assignment for each pedigree/family. To add a new Sample, select the + button. A search screen for pedigree/families will be shown.
Locate the pedigree number required and click Select.
Locate and select the required sample by selecting Select. Once selected, the dialog box will close, and the entry will be added to the table.
N.B. If no control is available for a patient’s pedigree when booking the test, the control cannot be used.
Patient Controls
This table lists the sample assignment for each patient. To add a new Sample, select the + button. A search screen for patients will be shown.
Locate the patient required and click Select. The next screen will appear showing available samples.
Locate and select the required sample by selecting Select. Once selected, the dialog box will close, and the entry will be added to the table.
N.B. If no control is available for a patient when booking the test, the control cannot be used.
Reagent Controls
Using the autocomplete Reagent, locate the required reagent.
This test will now be a control with the chosen reagent, e.g. water.
Sample Controls
Using the autocomplete Sample, locate the required sample using the sample number.
This test will now be a control with the chosen sample.
Test Availability Rules
Test Selections
The Test Selections table is used to define filters for the test when ordering via the referral screen. To add a new test selection, select the + button at the bottom of the table:
The table has the following fields:
- Referral Reason Category: Limit the test to a specific referral reason category.
- Referral Reason: Limit the test to a specific referral reason.
- Referral Type: Limit the test to a specific referral type.
- Referral Reason Status: Limit the test to a specific referral reason status.
Each complete row in the table specifies a list of conditions that have to be met. e.g. Defining a Referral Reason and Referral Reason Type together on the same row will require both of the criteria to be met before the test will be available for selection. Adding additional rows will define “or” conditions, so that if the first row in the table does not match, but the second row does match, the test will be available for selection.
Sex
Limit the test to a specific sex. This is useful for tests that are only relevant to a specific sex.
Tubes/Containers
Limit the test to a specific tube type. This is useful for tests that require a specific tube type to be used.
Sample Types
Limit the test to a specific sample type. This is useful for tests that require a specific sample type to be used.
Sub Sample Types
Limit the test to a specific sub sample type. This is useful for tests that require a specific sub sample type to be used.
Test Grouping
The test grouping area allows the test to be categorised based on various options. The options are often used in combination with reports to customise the appearance, e.g. Showing a different doctor’s name if the category of the test meets specific criteria.
Tests can be grouped in the following ways:
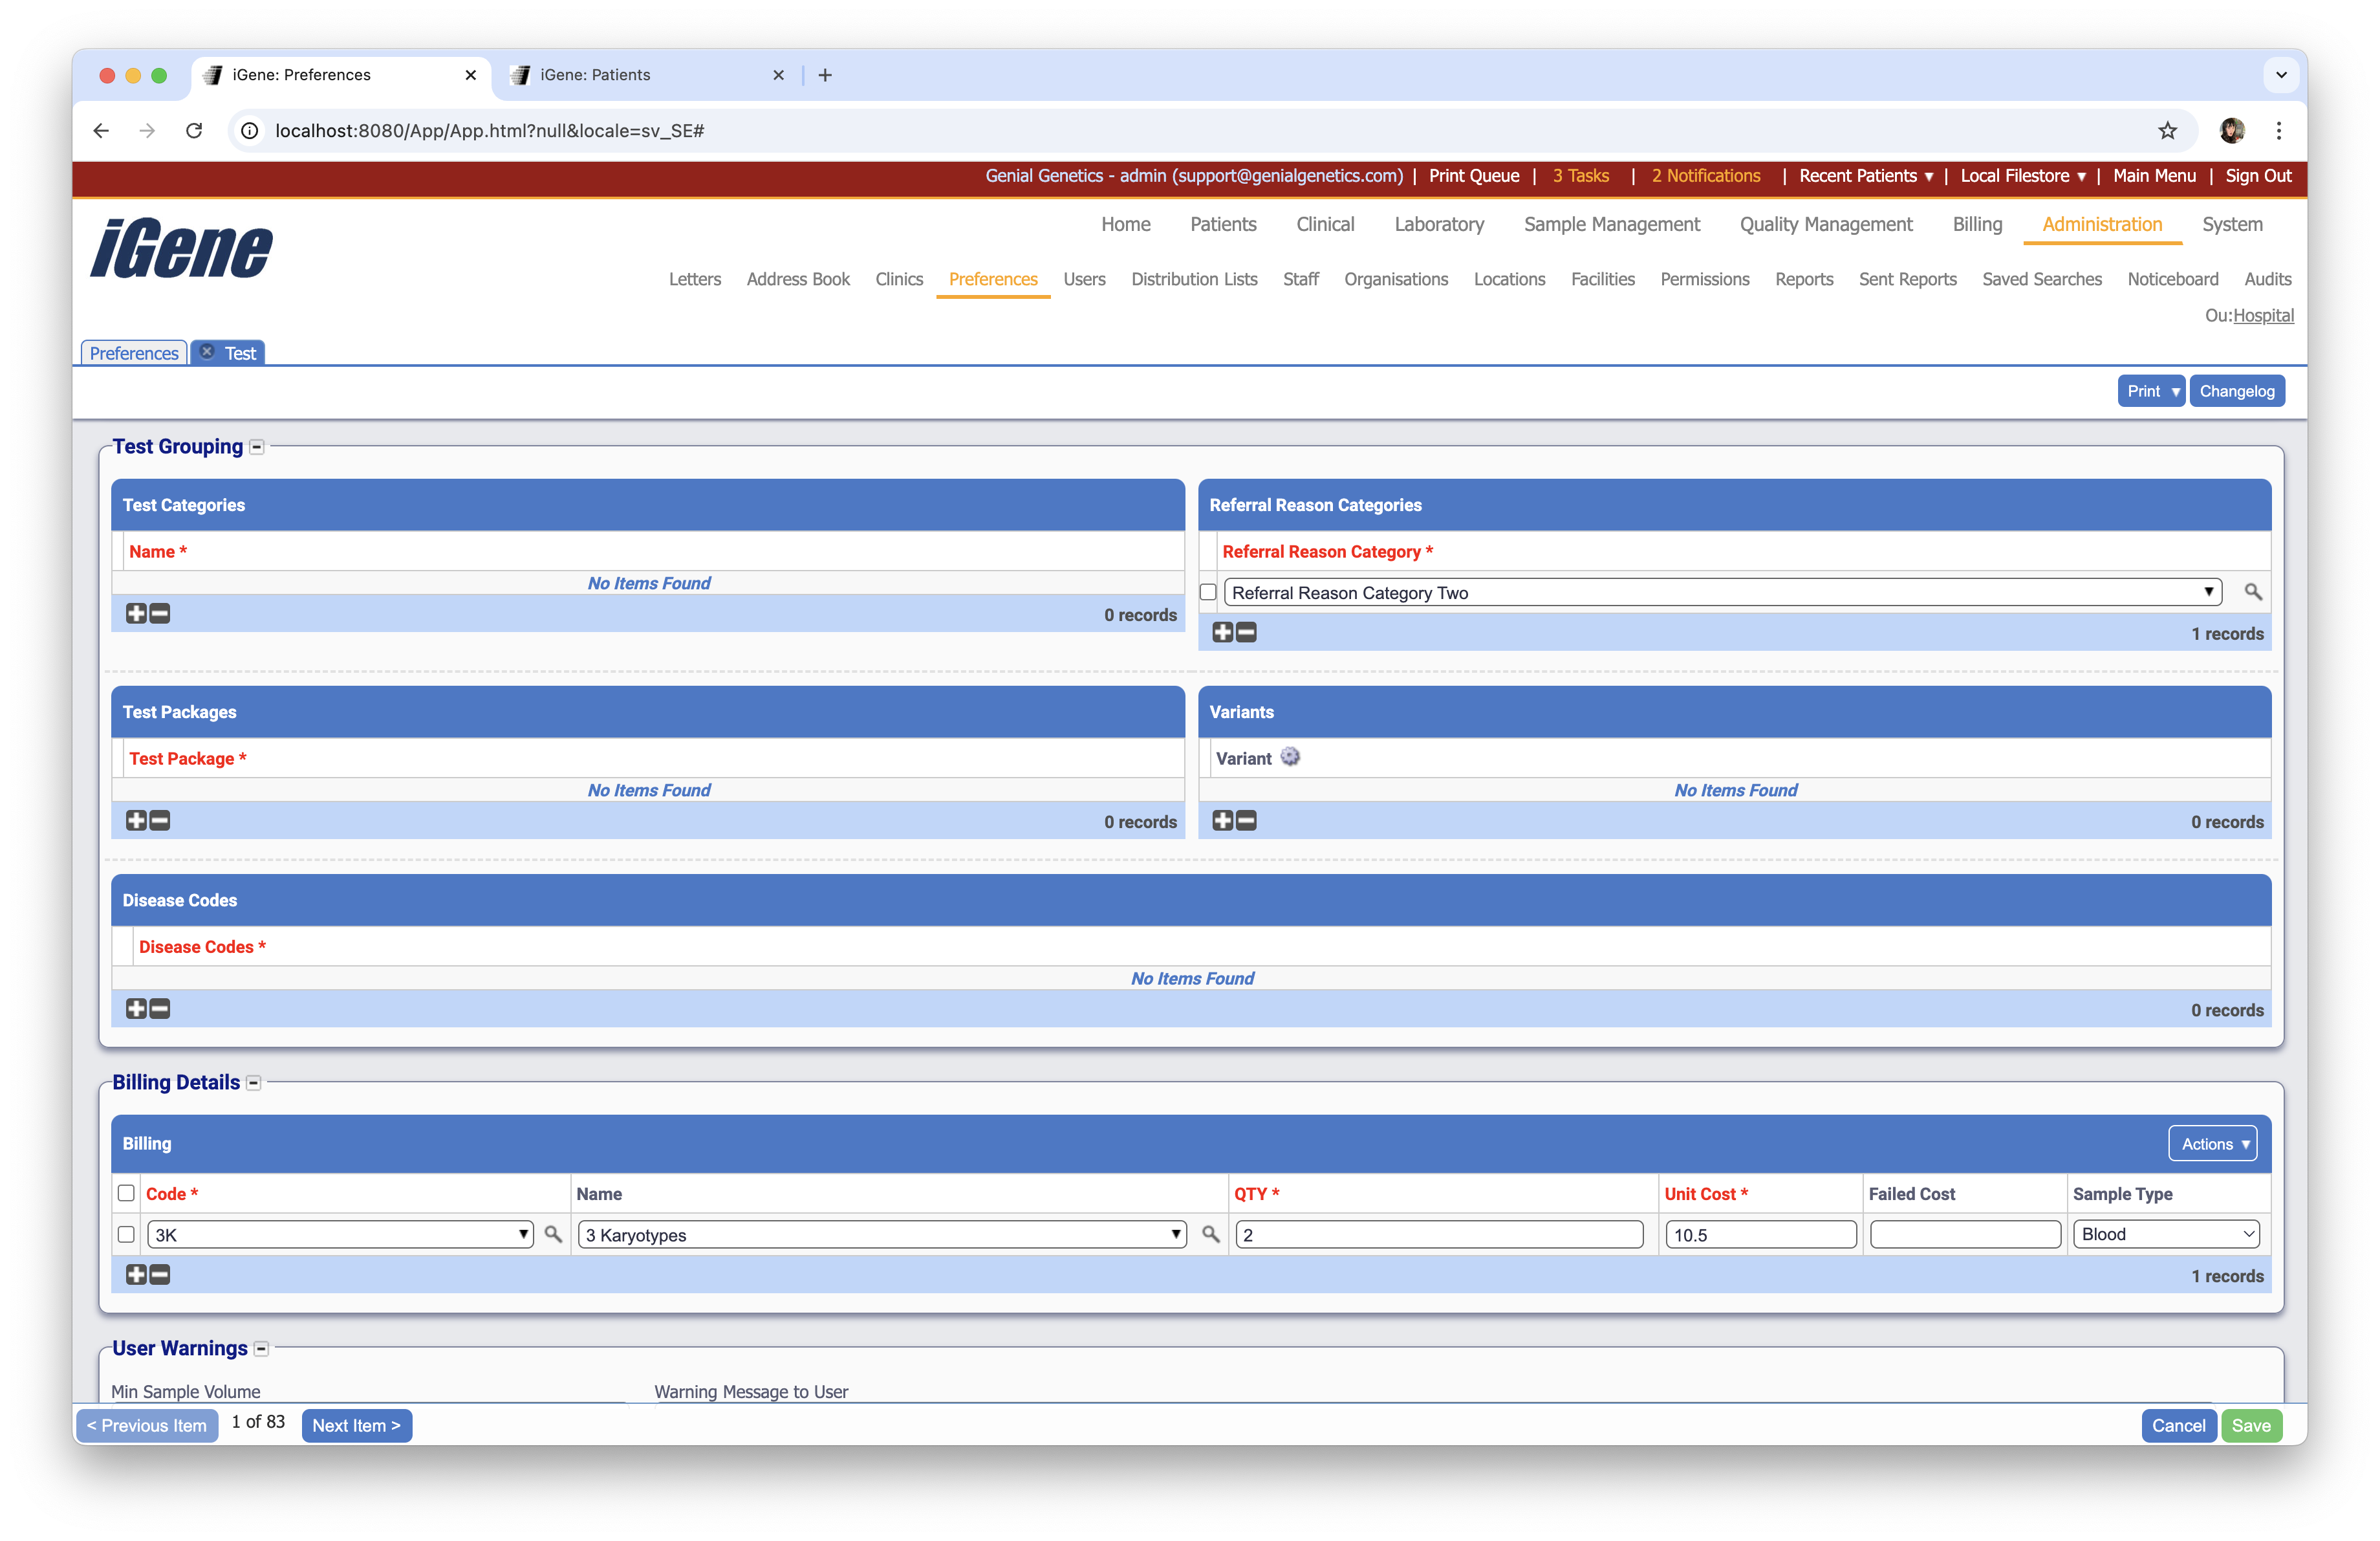
Test Categories
Test categories allow tests to be grouped into a custom category. This has no effect on selecting the test, but is a useful option: for grouping tests for reporting, statistical purposes, or creating worklists. Test categories can be created by the Test Category Preferences area.
To add a new grouping, select the + button at the bottom of the relevant table. A search box will appear and is used to locate the relevant item to add into the group, e.g. Adding a test category is shown below:
Referral Reason Categories
Tests can be grouped into referral reason categories. This option does not limit selection but rather is used for grouping purposes and is useful for statistical reports. To limit tests to referral reason categories, please see the Availability Rules) section above.
Test Packages (Deprecated)
Test packages are a way of grouping tests into a package so that the package can be ordered as one unit. This option has been replaced by Child Tests and is marked as deprecated.
Variants
Variants are used for the test type Genomics to limit the selection of available variants when entering results. The field has no effect anywhere else in the system.
Disease Codes
Disease codes are used to limit the list of tests when ordered from the clinical outcome screen. The list of tests will be limited based on the diagnosis codes entered and can help a clinician decide which tests to order.
Test Group Path
This is site specific preference for Manchester.
Billing Details
Billing
The billing table is used to add bill codes and their costs to a test. When the test is first ordered, these billing codes are added automatically to the test (and ultimately the referral). To add a new bill code, select the + button at the bottom of the table.
The billing table has the following fields:
- Code: An autocomplete for choosing the bill code. Bill codes can be created via the (Billing Code Preferences).
- Name: A name for the billing code. This will default to the name of the code chosen above.
- QTY: The number of codes to add, e.g. 2 will add two of the selected billing codes to the test.
- Unit Cost: The cost of a single unit. Normally, no currency is specified and instead a cost is simply defined here, e.g. 100.00. The unit cost can be overridden by the user after the test has been ordered or it may be overridden based on the organisation billing code preferences (TODO link to organisations section on billing codes).
- Failed Cost: The cost to charge if the test was marked as failed (i.e. A result code was chosen which is marked as failed). If no value is given here the unit cost above will be used.
- Sample Type: A sample type for limiting the billing. Using this field, it is possible to charge different costs based on a sample type.
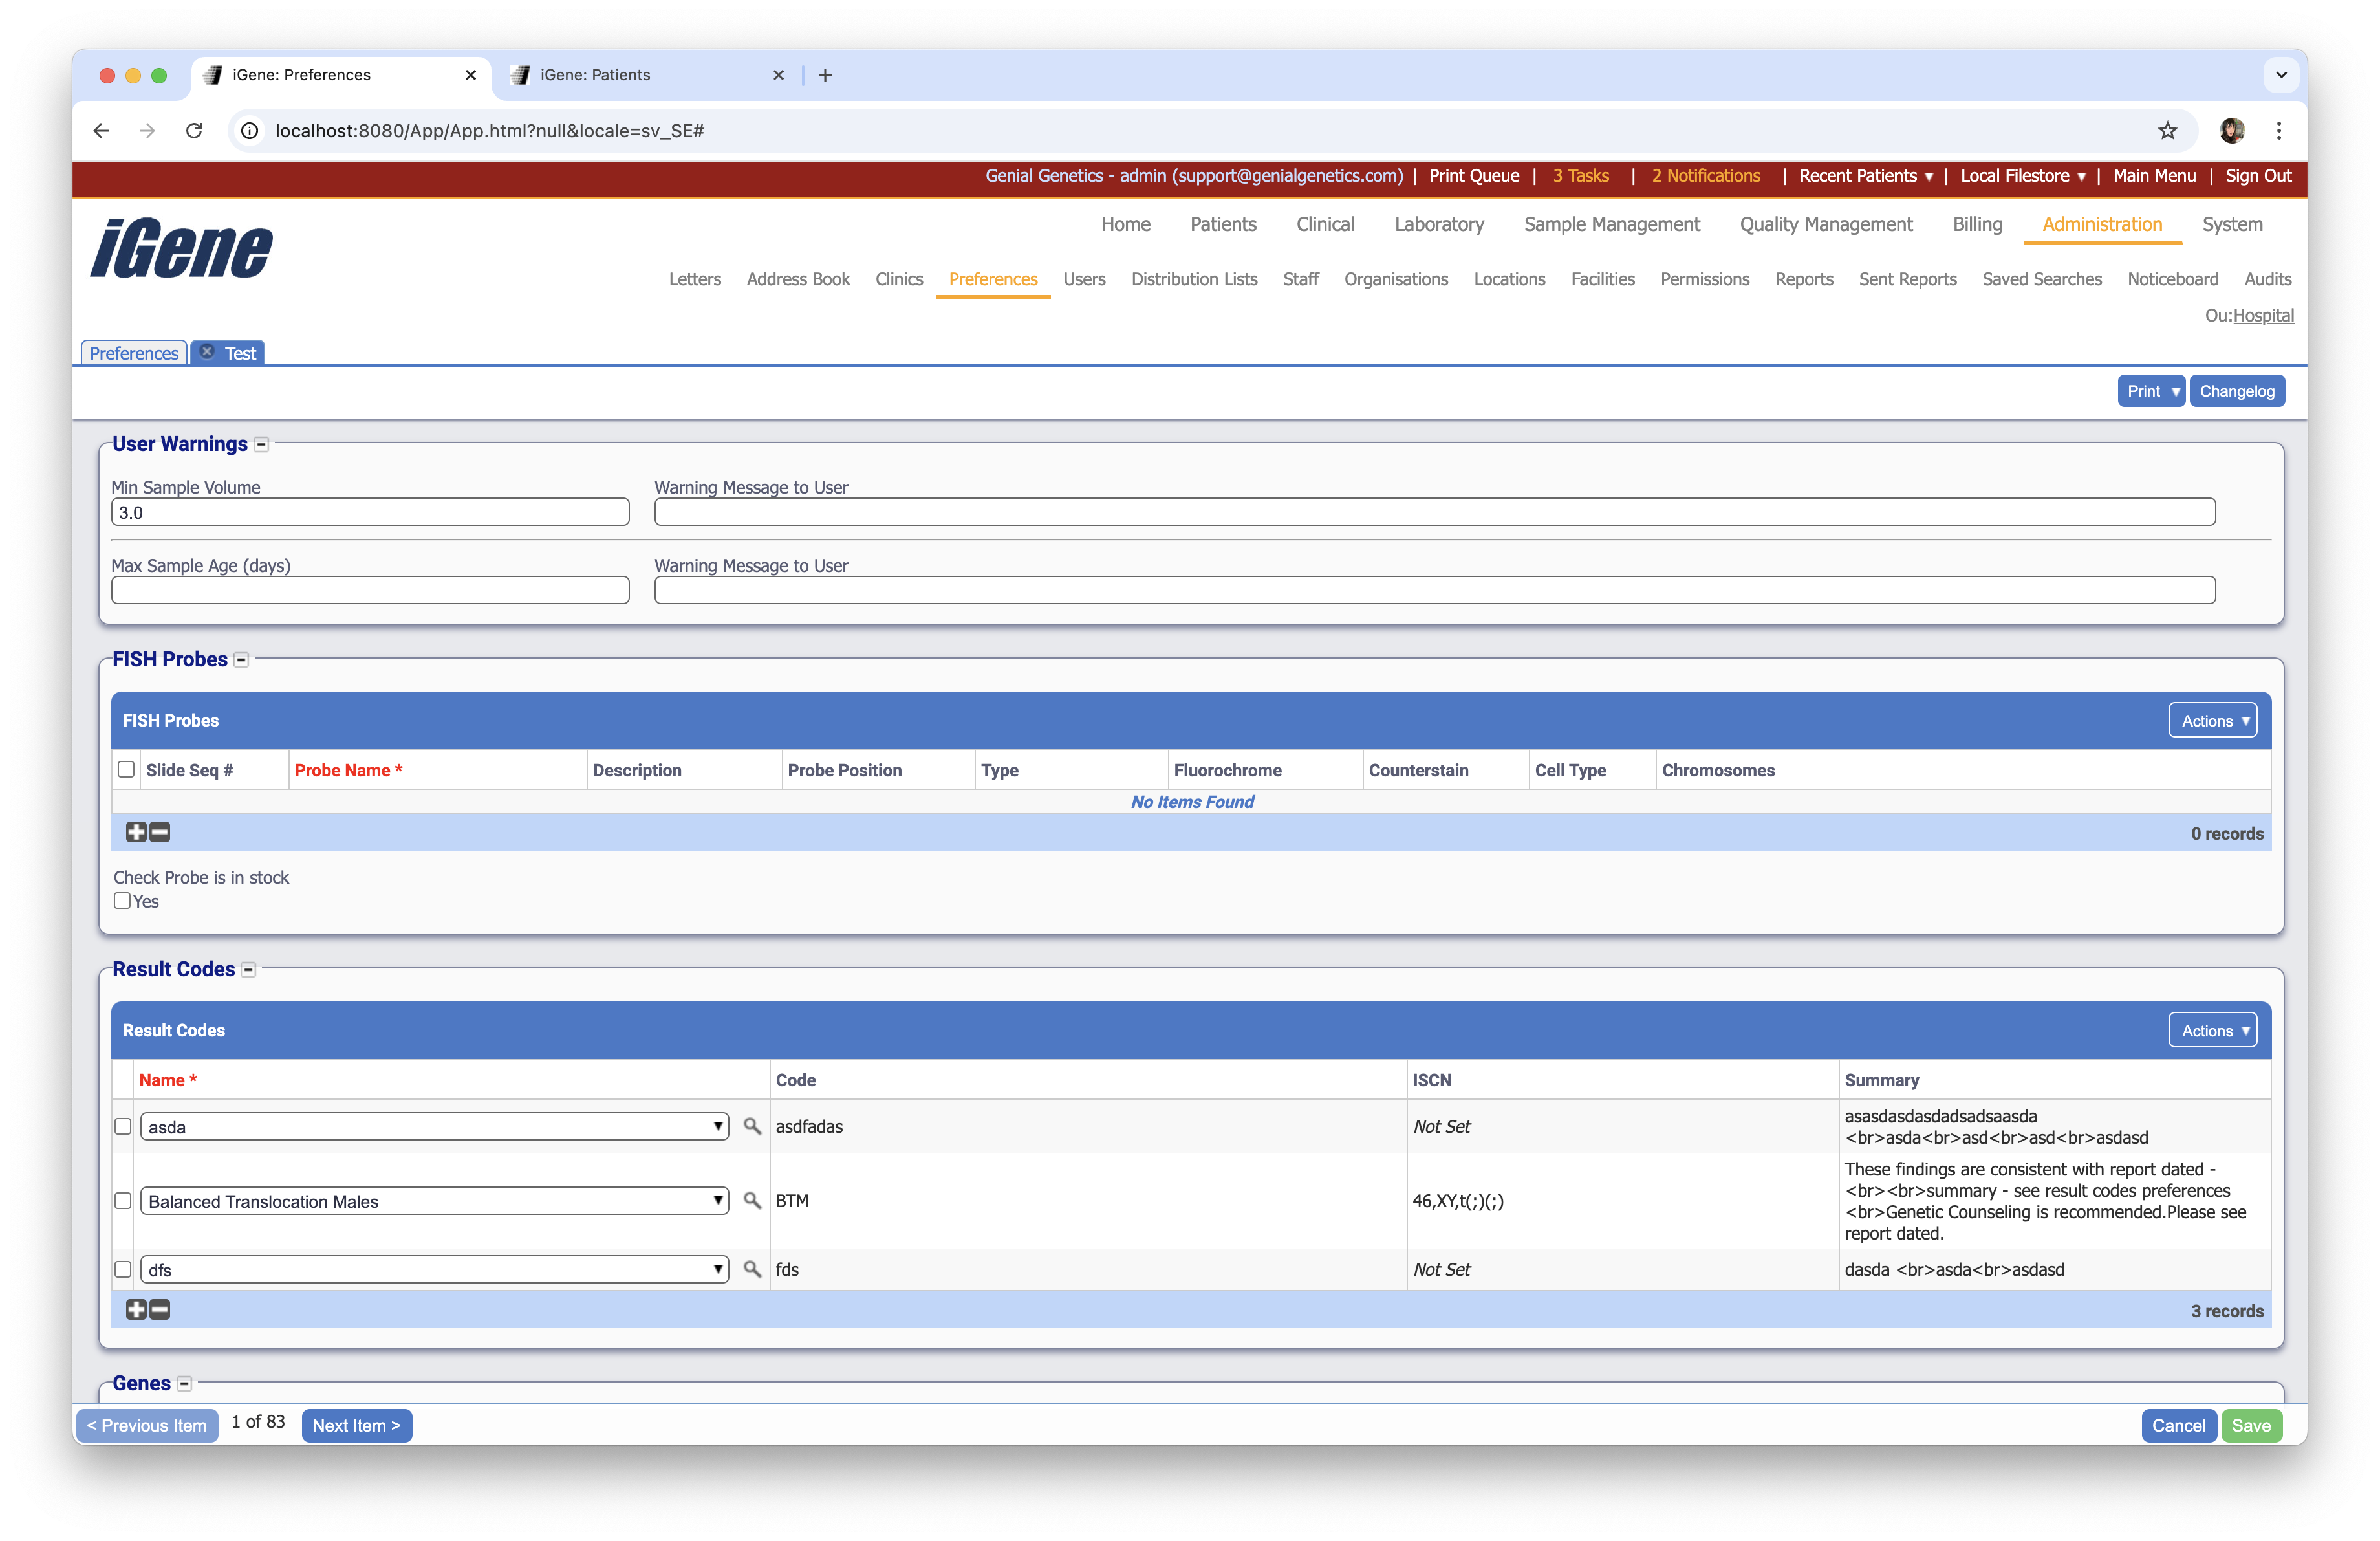
User Warnings (Deprecated)
The user warnings area is used to configure warning messages regarding sample volumes and age when performing this test:
The following values can be set:
- Min Sample Volume: The minimum sample volume required to perform this test.
- Warning Message To User: The warning message to show to the user if there is not enough sample material to perform the test.
- Max Sample Age (days): The maximum age a sample can have to perform this test.
- Warning Message To User: The warning message to show to the user if the sample has passed the max sample age given above.
FISH Probes
The FISH probes area is used to add/define the default FISH probes that are added for FISH tests. Probes added here will be added automatically when ordering the test or when adding the probes to slides created on the test. To add a new FISH probe, select the + button at the bottom of the table:
The FISH probes table has the following fields:
- Slide Seq #: The slide sequence number is used to define which slides to apply the probe to. e.g. If several slides have been created and numbered with sequences and number 2 is specified here, the slide at number 2 will be applied to this FISH probe.
- Probe Name: An autocomplete indicating the probe to use. The list of probes is defined in the Stock/Reagents area. This is a required field.
- Description: A description of the probe chosen via Probe Name.
- Probe Position: The probe position to use populated from the (Probe Position Preferences). Example values are Centre, Top, Bottom.
- Fluorochrome: The fluorochrome field populated from the chosen Probe Name. This is a readonly field.
- Counterstain: The counterstain field populated from the chosen Probe Name. This is a readonly field.
- Cell Type: The cell type field populated from the chosen Probe Name. This is a readonly field.
- Chromosomes: The chromosomes field populated from the chosen Probe Name. This is a readonly field.
The Check Probe is in stock checkbox is used with the stock management module and can ensure that a test cannot be ordered if the relevant FISH probes are not in stock.
The adding of FISH probes to test is particularly useful when used with panels of probes. If a user has a specific test e.g. Jewish Panel, the user can default the probes added so the user does not need to add them individually each time the test is ordered.
Result Codes
The Result Codes table is used to limit the available result codes for this test when entering the result. To add a new result code, select the + button at the bottom of the table and using the Name autocomplete, locate the required result code:
When the result code table is empty, the test can have any result code defined in iGene. However, as soon as a single entry is added to this table, the selection of result codes will be limited just to those entries in this table.

Genes
A table which allows for specific genes to be added to the test. This is used for the test type Genomics and is used to limit the selection of genes when entering results.
Reporting Options
Test Method (used on reports)
A text area which can be used to define the test method. This is useful for reports where the test method is required to be displayed.
Additional Information (for reporting)
A text area which can be used to define additional information. This is useful for reports where additional information is required to be displayed.
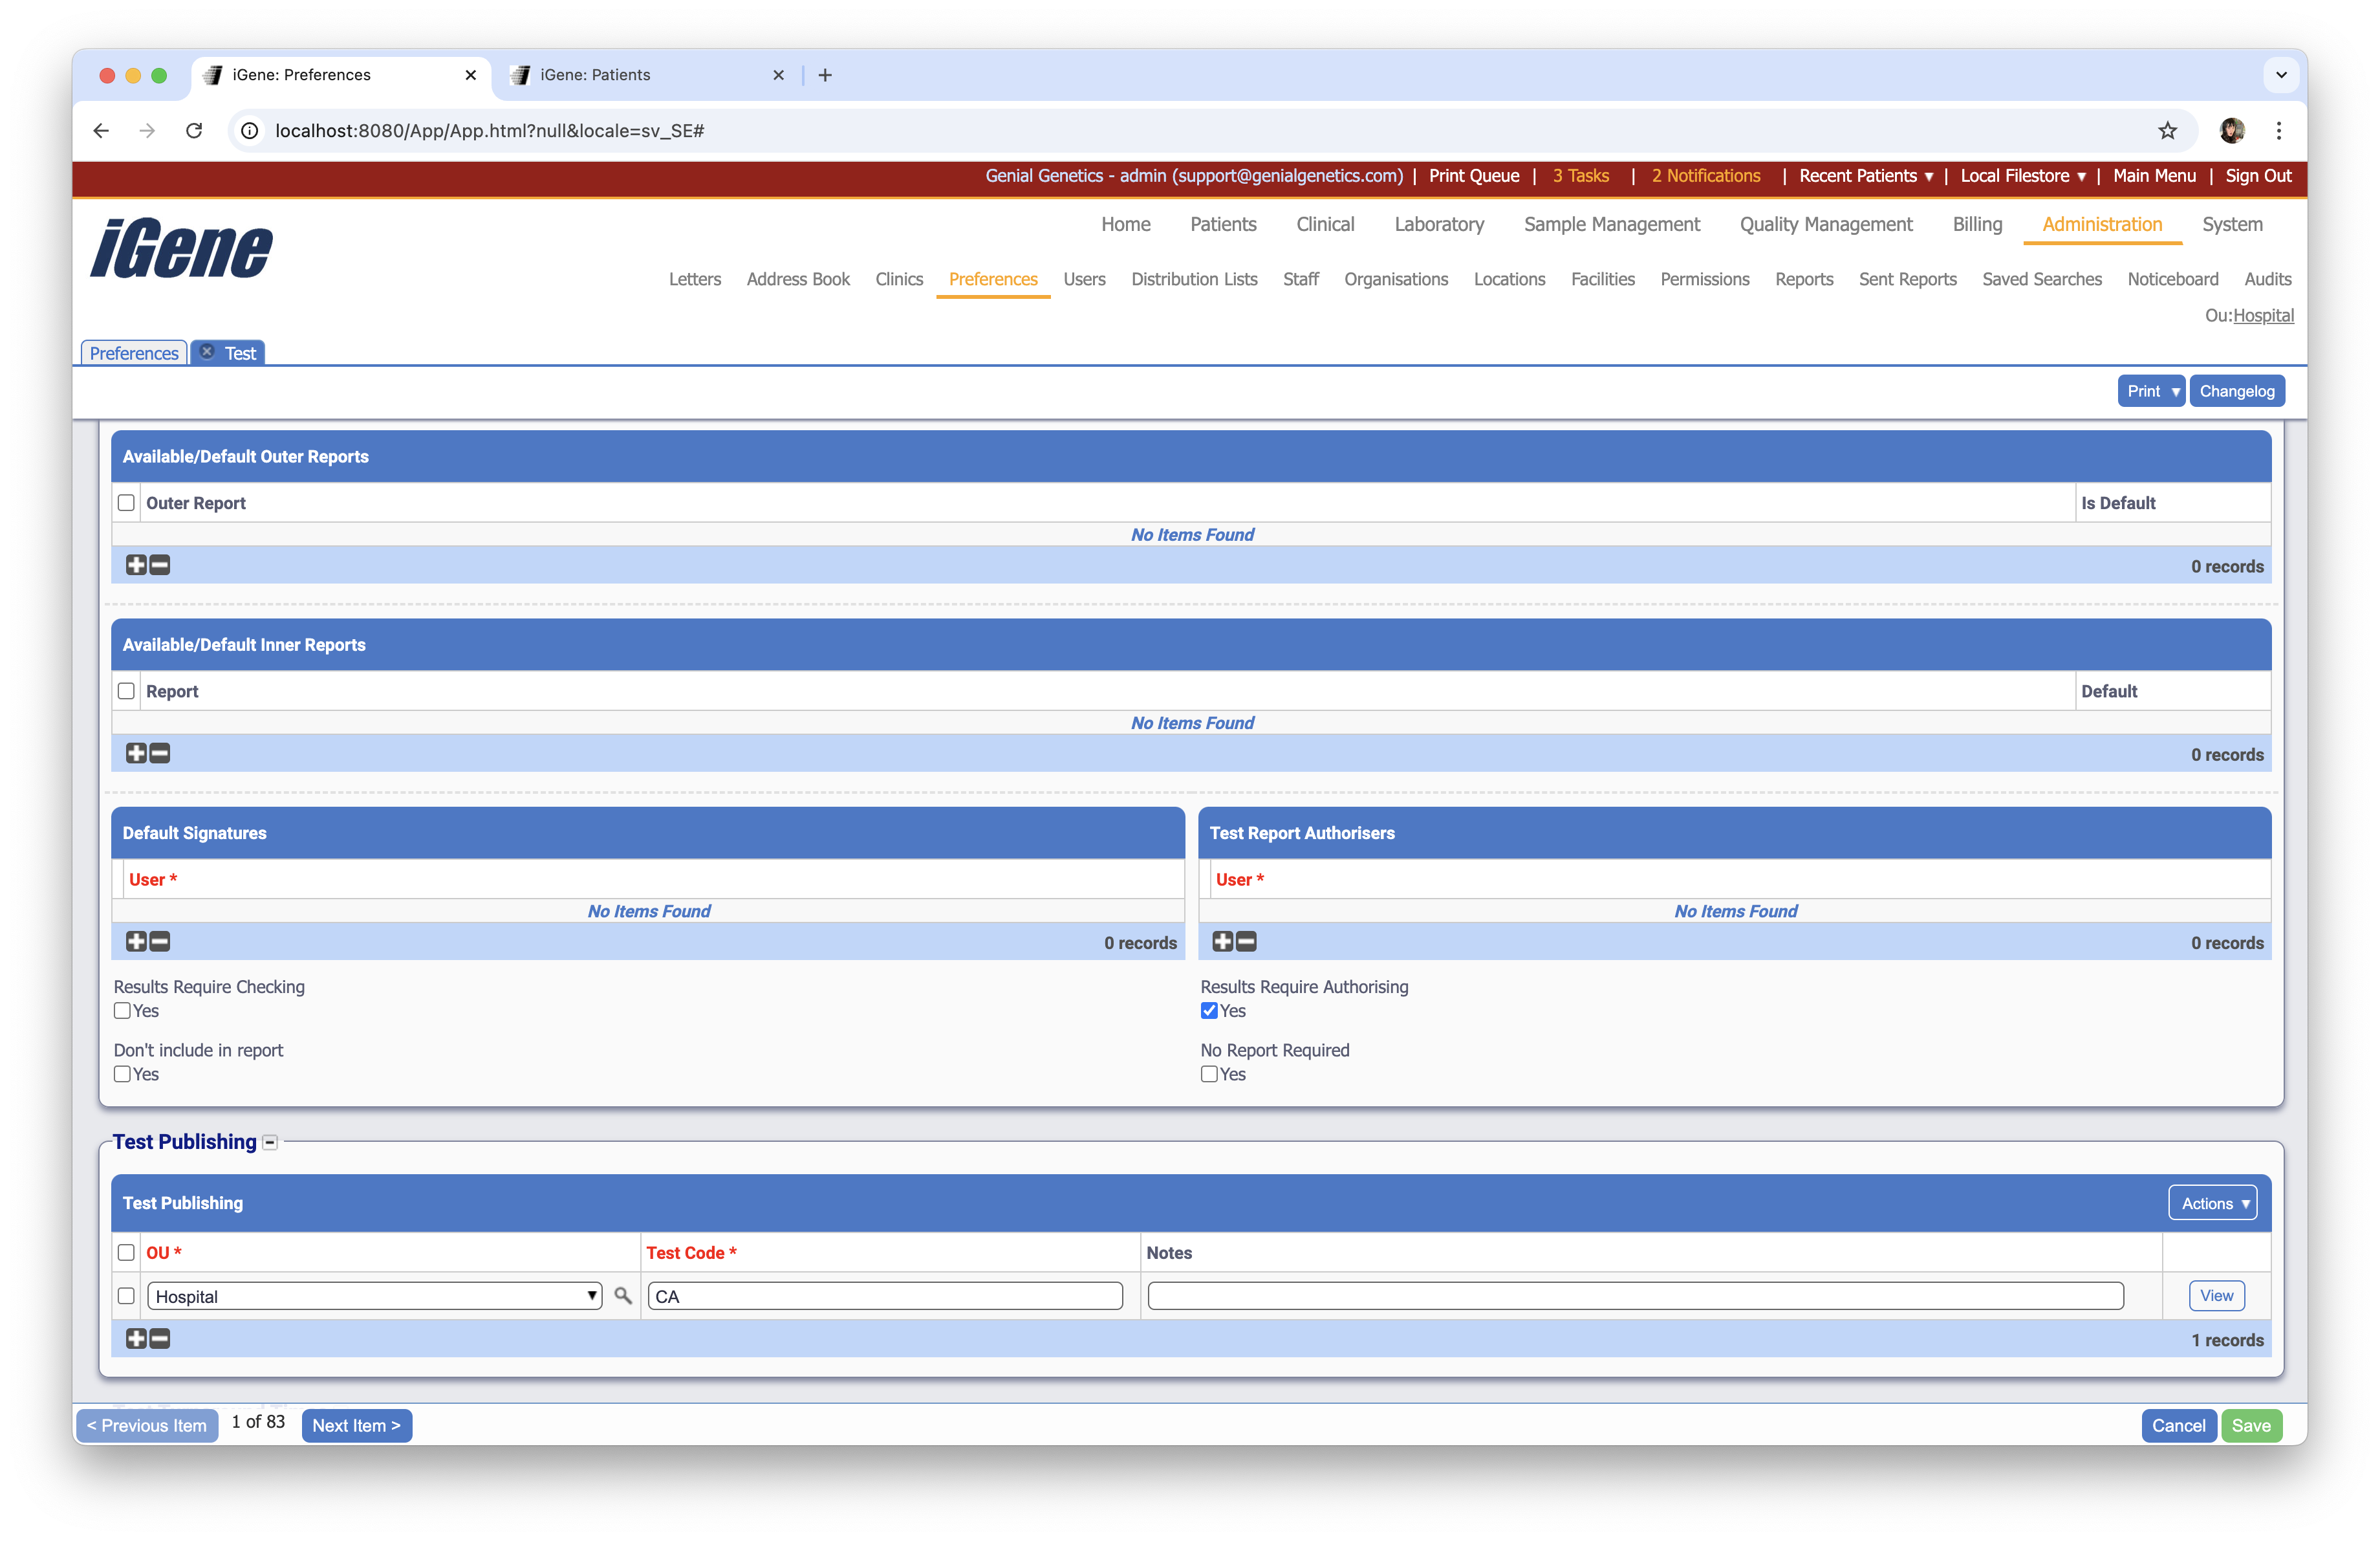
Available/Default Outer Reports and Available/Default Inner Reports
The available/default reports table is used to limit the available report templates for a particular test as well as set one as the default. If a particular report template (or selection of report templates) are always used with a particular test then it is a good idea to set them up here. e.g. There may be 30 CustomTest reports on the system, but only one of them was designed to be used with this test. To add a new report template, select the + button at the bottom of the table and choose the report from the dropdown list.
The available report templates in the dropdown list are related to the Test Type. e.g. If the test being edited was a FISH test, then the list would show all report templates for the FISH test type.
The Default checkbox will allow a particular template to be chosen by default when creating a new report. If there is only one available report then the setting has no effect.
If the list of available reports is empty then all report templates on the system matching the Test Type are made available to the user when creating a new report. As soon as single item is added into this table, the available reports will be filtered. It is highly recommended to use this table with Custom Test test types as attempting to run the wrong template on the wrong custom test can result in hard-to-troubleshoot errors.
Default Signatures
A table of users who are allowed to sign the test. This is used to limit the list of users who can sign the test when the test is completed. To add a new user, select the + button at the bottom of the table and choose the user from the dropdown list.
Test Report Authorisers
A table of users who are allowed to authorise the test. This is used to limit the list of users who can authorise the test when the test is completed. To add a new user, select the + button at the bottom of the table and choose the user from the dropdown list.
Results Require Checking
When selected, the results require checking option will require the results to be checked before they can be signed off. This is useful for tests that require a second opinion before they can be signed off.
Results Require Authorising
When selected, the results require authorising option will require the results to be authorised before they can be signed off. This is useful for tests that require a second opinion before they can be signed off.
Don’t Include in Reports
When selected, the don’t include in reports option will prevent the test from being included in reports. This is useful for tests that are used for internal purposes only and should not be included in reports.
No Report Required
When selected, the no report required option will prevent a report from being generated for this test. This is useful for tests that do not require a report to be generated.
Test Publishing
The test publishing table is used to make this test available across multiple organisation units (OUs). It is used for lab tests that should be selectable from the clinical module even though the lab test is not available or visible in the clinical OU. To publish this test to another OU, click the + button at the bottom of the table.
The table has the following fields:
- OU: The organisation unit OU to publish to, e.g. Clinical.
- Test Code: The test code normally defaults to the current test’s code, however the test code can be overridden here to provide a different code in the given OU. This is useful if the code being used is already in use or if the Clinical OU uses a different code scheme for their tests.
- Notes: Optional notes explaining what the test is for or why it was published.
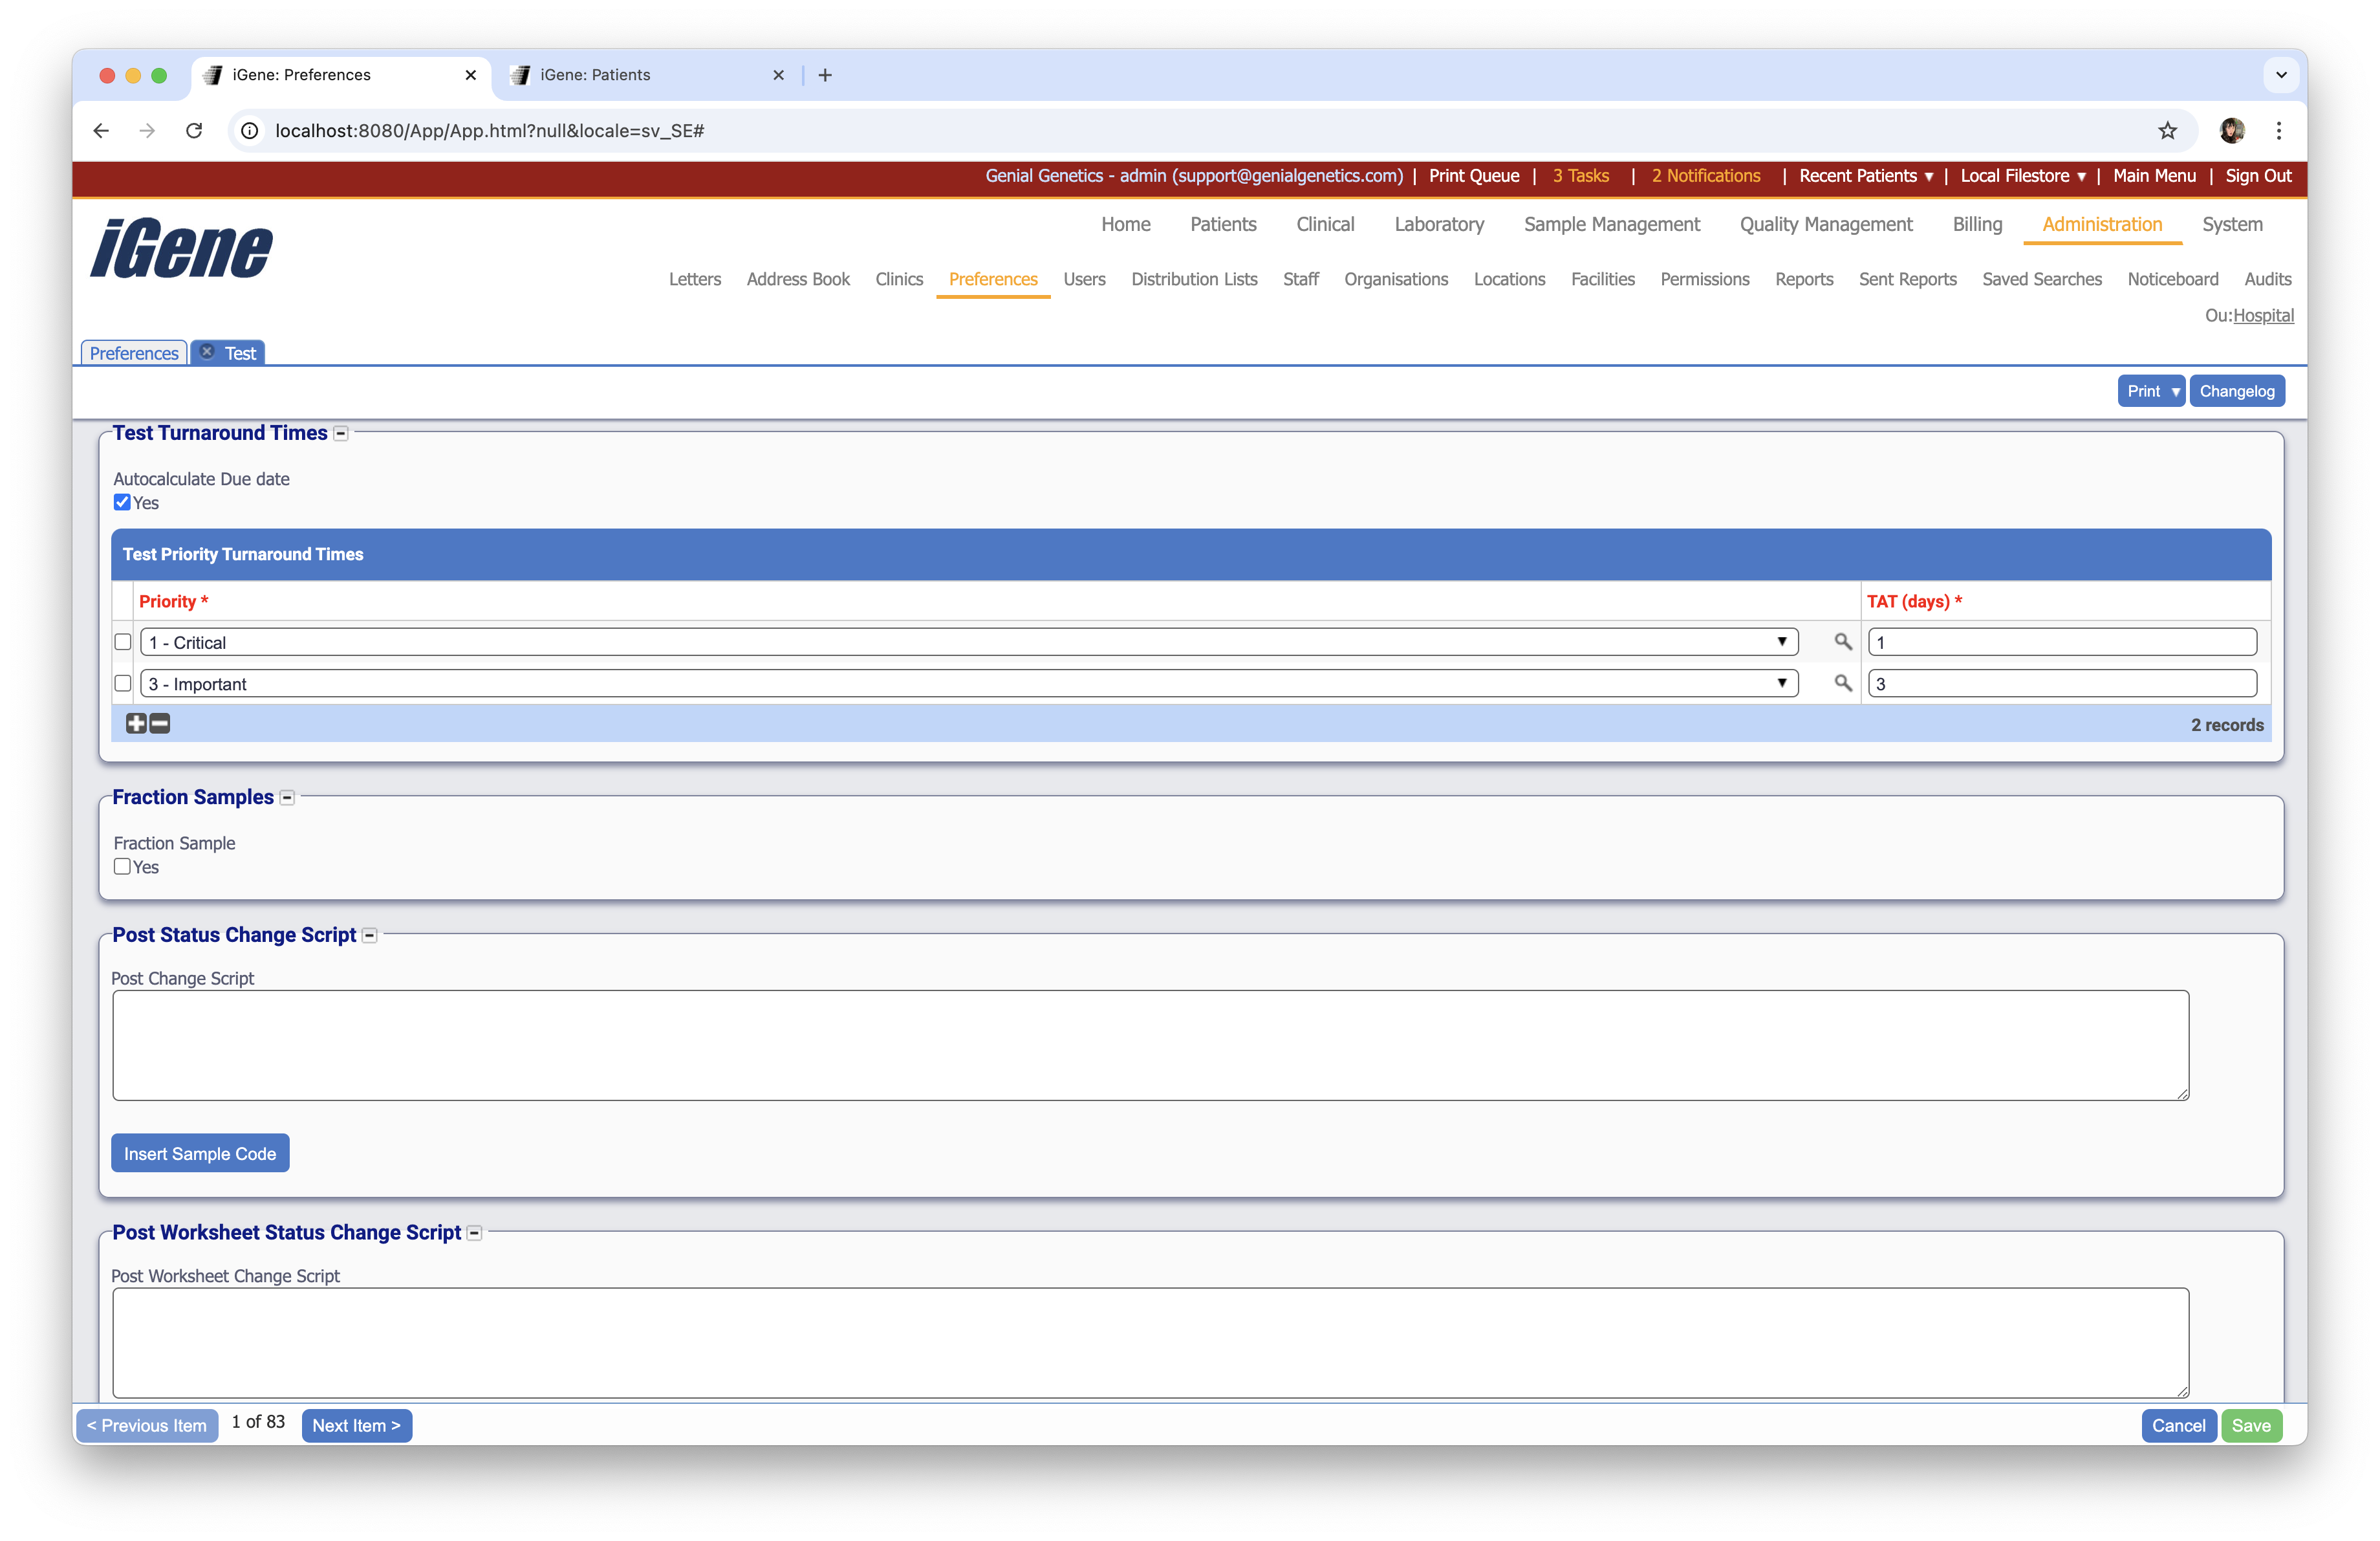
Test Turnaround Time
Autocalculate Due Date
When selected, the autocalculate due date option will automatically calculate the due date of the test based on the turn around time and the order date. This is useful for tests that have a fixed turn around time and do not require the due date to be manually set.
Test Priority Turnaround Times
The test priority turnaround times table is used to set the turn around time for a test based on the priority of the test. To add a new priority, select the + button at the bottom of the table.
Fraction Samples
A checkbox to indicate that the test requires a fraction sample. This is useful for tests that require a fraction of a sample to be used.
Post Status Change Script
The post status change script is used to run a script after the status of the test has been changed. This is useful for running custom code after a test has been completed.
Post Worksheet Status Change Script
The post worksheet status change script is used to run a script after the status of the worksheet has been changed. This is useful for running custom code after a worksheet has been completed.
Custom Tests
Custom tests are the most powerful types of test in iGene as they allow the user to add their own custom fields and configure how they look. In addition, a test must be a custom test in order to be used with the worksheet module.
More information about how setup and use custom tests can be found Using Custom Tests.
A custom test consists of a list of custom fields and two templates describing how to display the test. The first template controls how the template should appear in a worksheet cell, and the second on the result screen. The following types of custom fields are currently supported:
- Plain text
- Dropdown lists
- Number/Floating point fields
- A mutation
- A list of mutations
Each of these field types are covered in the Result Type Preferences.
To create a custom test, ensure the Test Type field is set to Custom.
Once a test has been set as custom, the Custom Fields fieldset will become visible at the bottom of the form.
The fieldset has the following areas:
- Worksheet Cell Display Template: This template contains the display code (HTML) for how this test should be displayed in a worksheet cell.
- Field Display Template: This template contains the display code (HTML) for how the custom fields should be displayed when viewing a result.
- Set Default: The set default button will insert a default Worksheet Cell Display Template into the field above.
- Custom Fields: The custom fields table lists all of the custom fields defined in this test.
To add a custom field, select the + button at the bottom of the Custom Fields table:
A custom field has the following values:
- Code: A unique short code for the field. This code is required for the field display template and should not contain any spaces. The code is also used when referring to the custom field inside a report template.
- Name: A unique name for the field.
- Default Value: A default value for the field. This field can be left blank if no default value is required.
- Result Type: The type of custom field. See Result Type Preferences on how to set these up.
- Default From Previous: When selected, iGene will check the previous test result for the patient for this custom field and copy the previous value across. It will override whatever is in the Default Value box. For example it could be used in a chimerism test. Each time the test is ordered the target value would be copied over from the previous test.
Worksheet Cell Display Template
The worksheet cell display template uses a combination of HTML and Freemarker to define how the cell will be displayed inside a worksheet cell, e.g.
<p>${displayIcon}${testNumber}</p>
<p>${referral.referralNumber}</p>
The above code snippet will display the test’s icon and number on the first line, and the referral number on the second line. To use a variable from iGene, the model path will be required (TODO link to section on modelPaths). The freemarker path is escaped inside ${____} brackets and refers to the current test (ReferralTest). Some examples of modelPaths are given below:
- referral.patient.medicareNumber: The patient’s identity number (The usage of this field varies between sites, e.g. PID, NHI Number, NHS Number, etc.).
- firstSampleType.name: The sample type of the first sample triaged to the test, e.g. DNA.
- referral.referralType.code: The code of the referral’s referral type.
Field Display Template
The field display template uses a combination of HTML and Freemarker to define how the result screen will look. Each field is referred to by the unique code given when creating the custom field, e.g. field1. An example template is shown below:
<b>Test Results</b>
<hr />
<table>
<tr><td>Field 1:</td><td>${field1}</td></tr>
<tr><td>Field 2:</td><td>${field2}</td></tr>
</table>
The templates format may seem daunting at first for users not used to HTML, however Genial Genetics will provide support for setting up the first few templates, and afterwards the existing templates can be used in other custom tests with only minor changes.
When using HTML, there is no need to include body or html tags, however since the application runs inside a web browser, the content can be anything that can be represented with simple HTML.